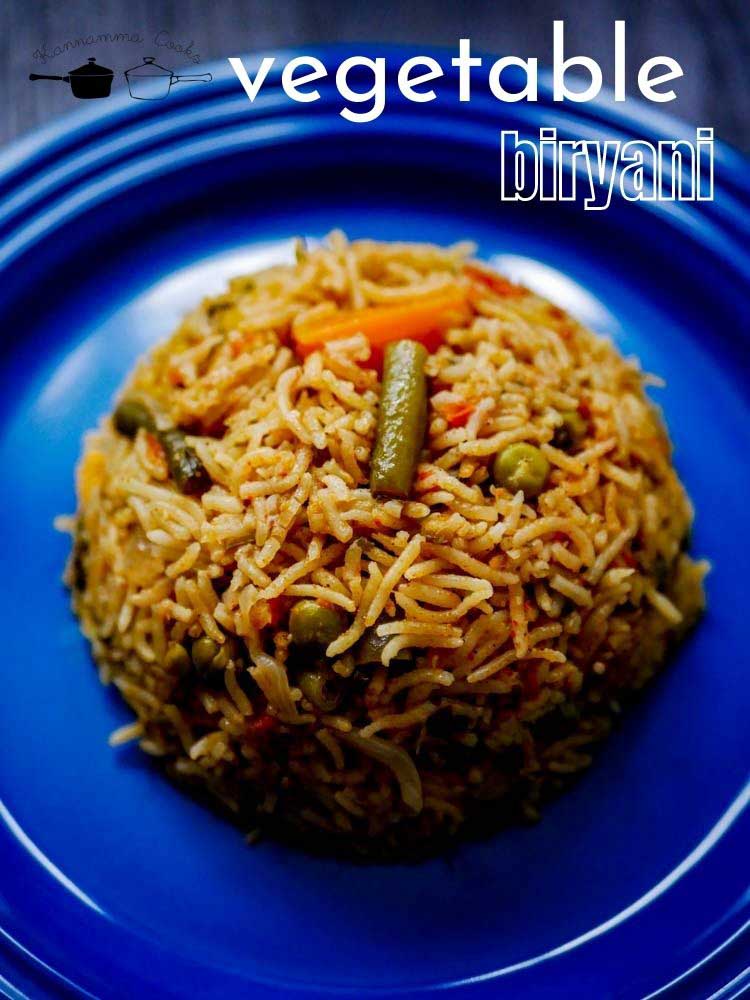
Recipe for Vegetable biryani made with the addition of coconut milk. Biryani made in the pressure cooker. Recipe with step by step pictures and video.
Here is a simple one pot biryani recipe made with the addition of coconut milk. The coconut milk adds a nice richness and flavour to the rice. I have used ready made biryani masala today to make it a bachelor friendly version. One can use home made masala too. The brand of rice I use, masala etc. have been mentioned in the post here. Read along.
Here are some of the tips while making biryani in a pressure cooker. 1. Soaking the rice – Soak the rice just before starting to cook (about 20 minutes). The rice will absorb some of the water and will nicely fluff up while cooking without becoming mushy or gummy. After the said time, drain the rice in a colander and set aside. 2. Using the right kind / size pressure cooker is important. Using a very big cooker for a small quantity of rice is one of the main reasons for burning / charring at the bottom. For this recipe, a 5-6 liter cooker works best. 3. Readymade biryani masalas usually has added salt. So go easy on salt and adjust the seasoning later if need be. I use Kohinoor brand biryani masala. 4. Sauté the spice powders and masala powders for a minute to extract the flavors of the spices. Do not add it directly to water. 5. Add the rice only after the water / liquid comes to a rolling boil. This is very important for the rice to stay fluffy. 6. I use 1 rice : 1.5 water for cooking the biryani. I like to use the brands Daawat / Lal Qila. These are the brands I use at home too. 7. 1:2 rice vs veggie ratio. If you use one cup of rice, use two cup of veggies. Use firm veggies that will retain its shape after cooking. Vegetables like Carrot, Beans, Green Peas, Potato, Baby Corn, Mushroom, Paneer all works well. 8. Canned coconut milk works perfectly fine for this recipe.
Here are other biryani recipes from the site Biryani Recipes
Here is the video of how to make Vegetable Biryani with Coconut Milk (Pressure Cooker Method)
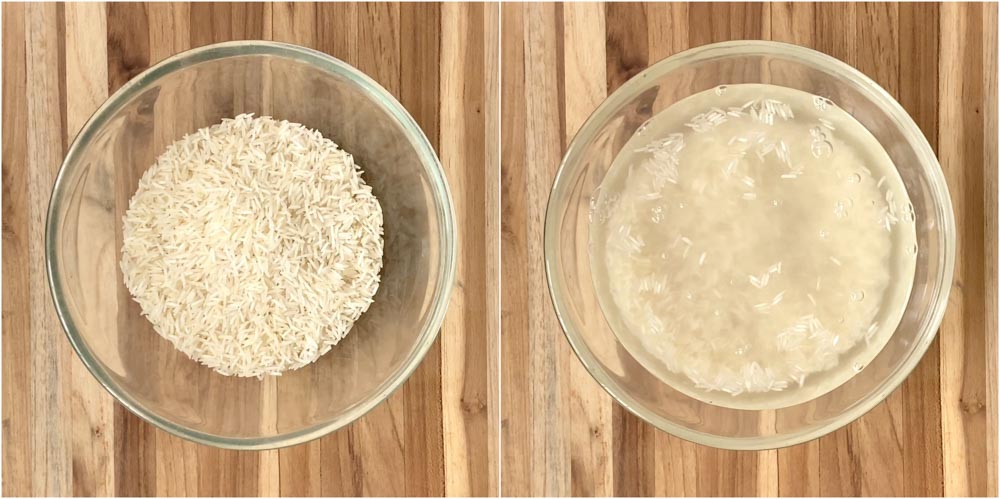
Here is how to do Vegetable Biryani with Coconut Milk (Pressure Cooker Method) Before starting to cook, wash and soak the rice in water. I like to use the following brands of rice.
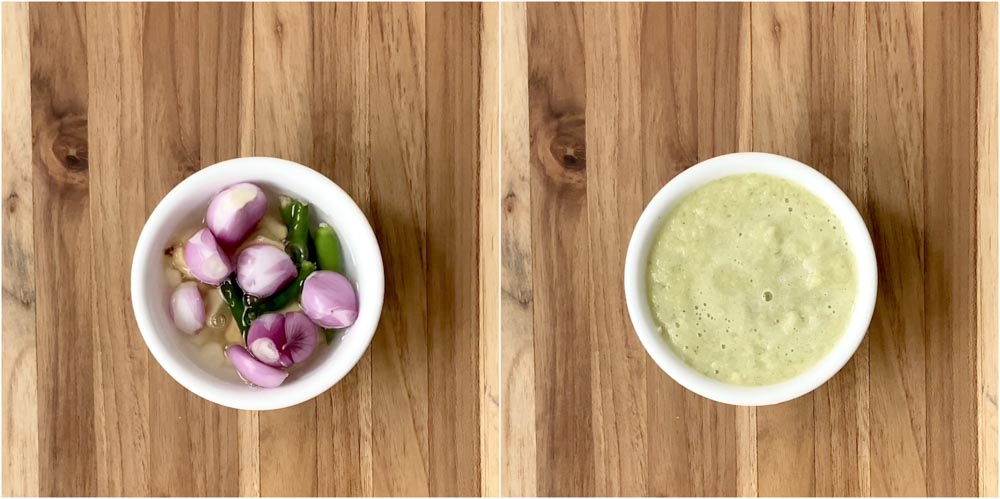
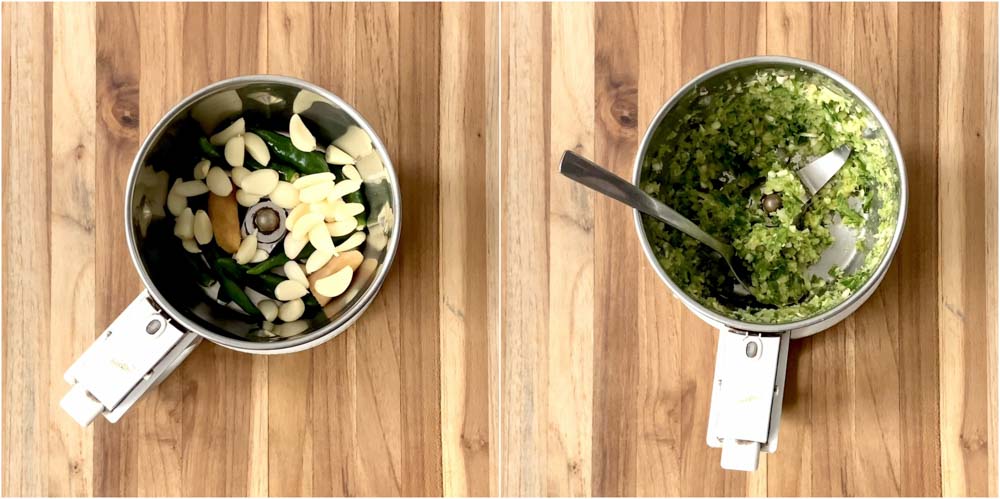
Make a masala paste with garlic, ginger, green chillies and shallots. Add a little water while grinding. Grind to a really fine paste. Set aside.
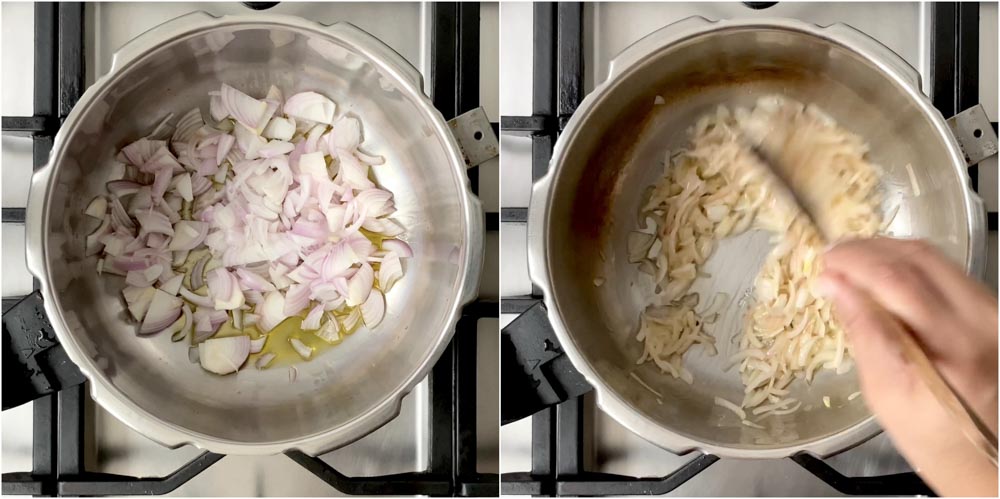
Heat ghee and oil in a pressure pan. I have used a 5 liter pressure cooker for making the Vegetable Biryani with Coconut Milk today. Using the right kind / size pressure cooker is important. Using a very big cooker for a small quantity of rice is one of the main reasons for burning / charring at the bottom. Add in the sliced onions and cook till the onions are soft.
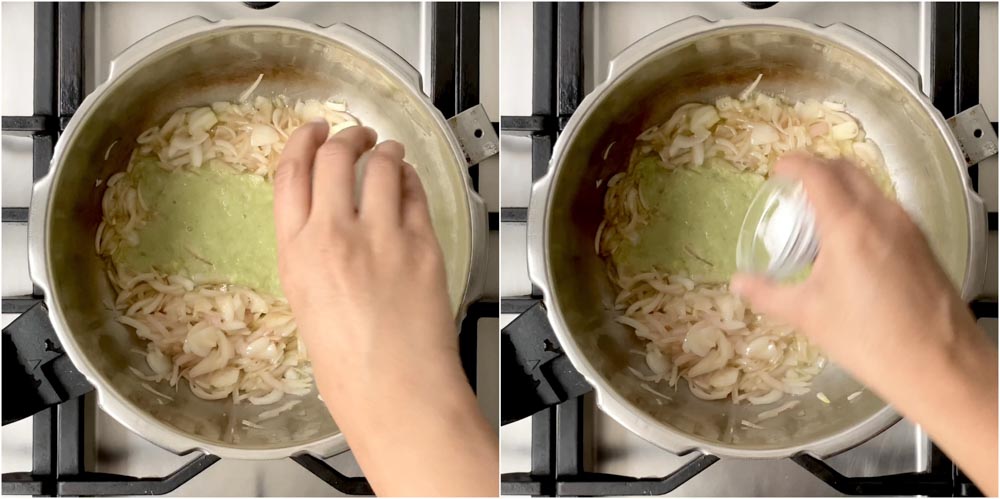
Add in the ground paste and the salt. I have used only 3/4 teaspoon of salt for the whole dish as the biryani masala (readymade) that we will be adding later consists added salt. So go easy on the salt. We can adjust the seasoning later if need be.
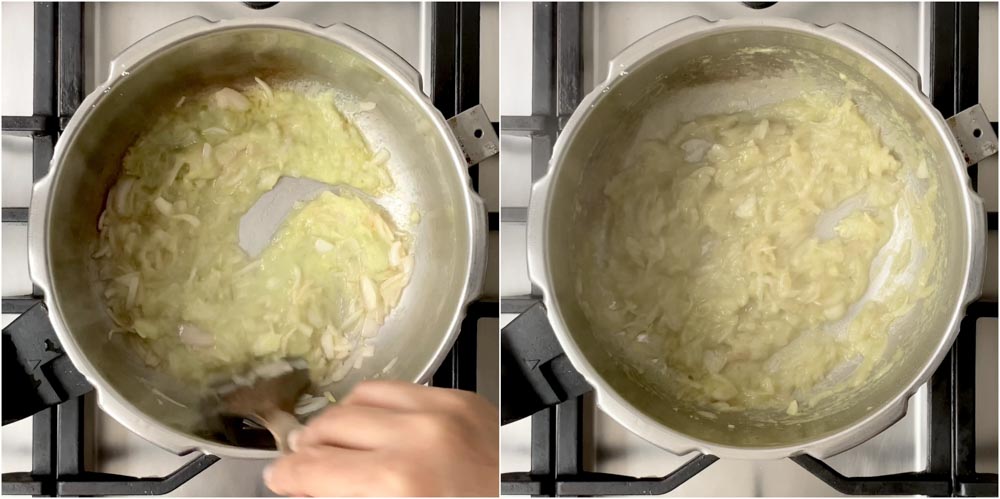
Cook for a few minutes.
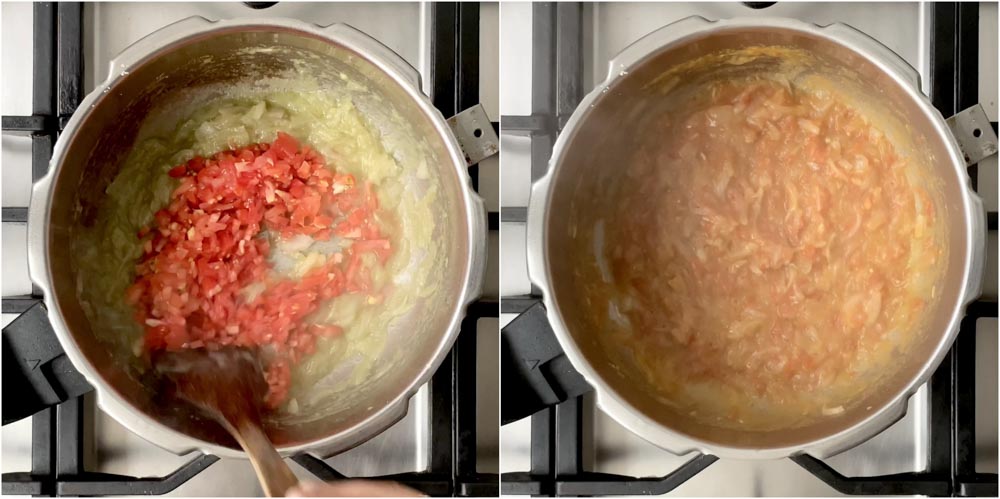
Add in the finely chopped tomatoes. If you cannot chop the tomatoes fine, you can grate the tomatoes and add instead. Cook till the tomatoes are mushy.
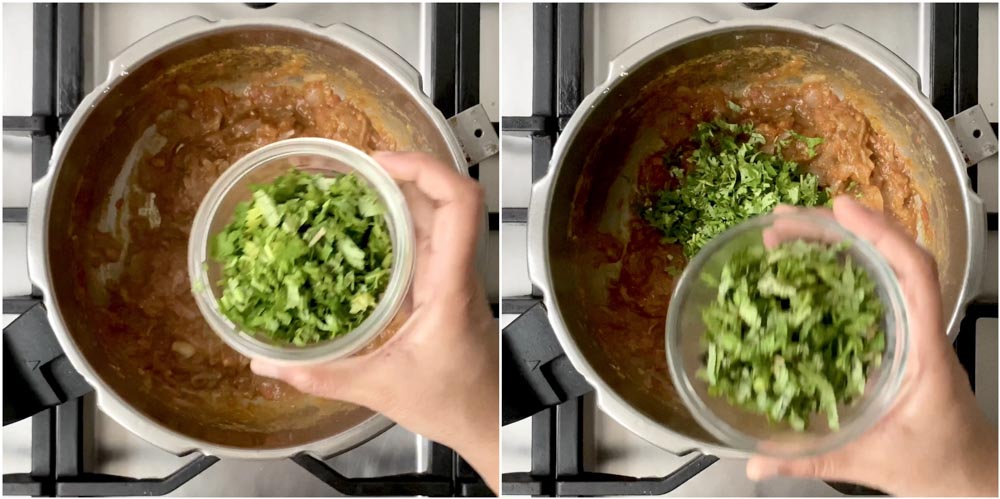
Add in the chopped coriander leaves and mint leaves. Sauté for a minute.
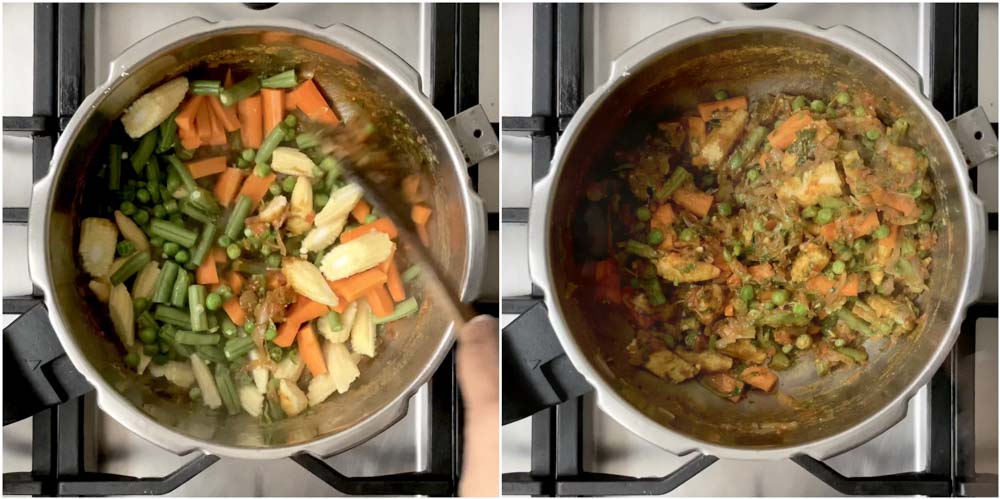
Add in the veggies and toss well to coat.
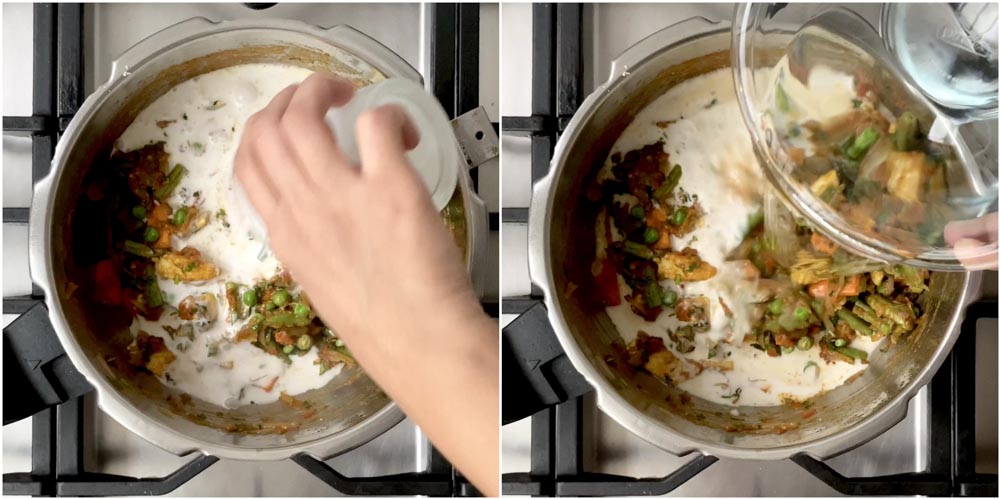
Add in the coconut milk and water. I like to use 1 rice : 1.5 liquid for making this recipe. I have used 200 ml canned coconut milk. To that, I have added 350 ml water.

Mix well and let everything come to a rolling boil.
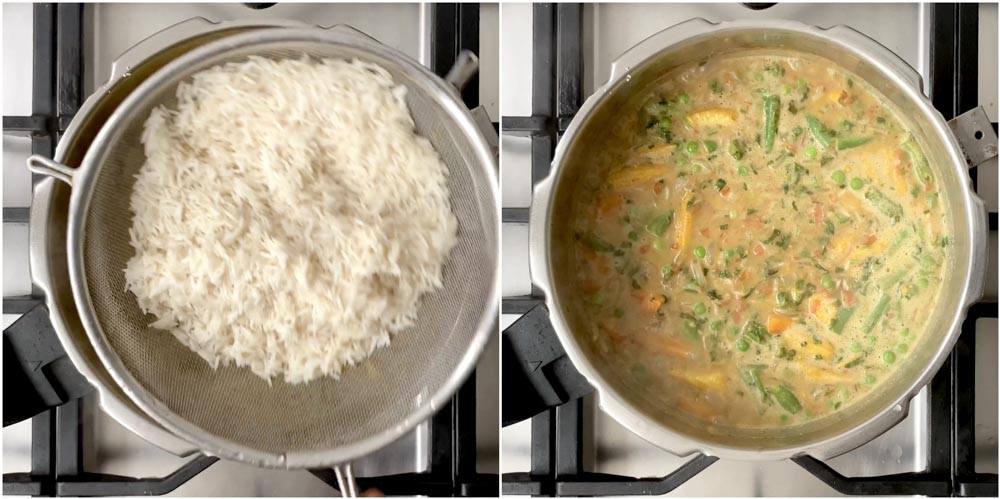
Its very important to add the rice only after the liquid comes to a rolling boil. Drain the rice and add it to the pan.

Cover and cook for two whistles. About 7-8 minutes on medium flame. After the said time / whistles, switch off the flame and allow the pressure to settle naturally. Open and gently fluff up the rice.
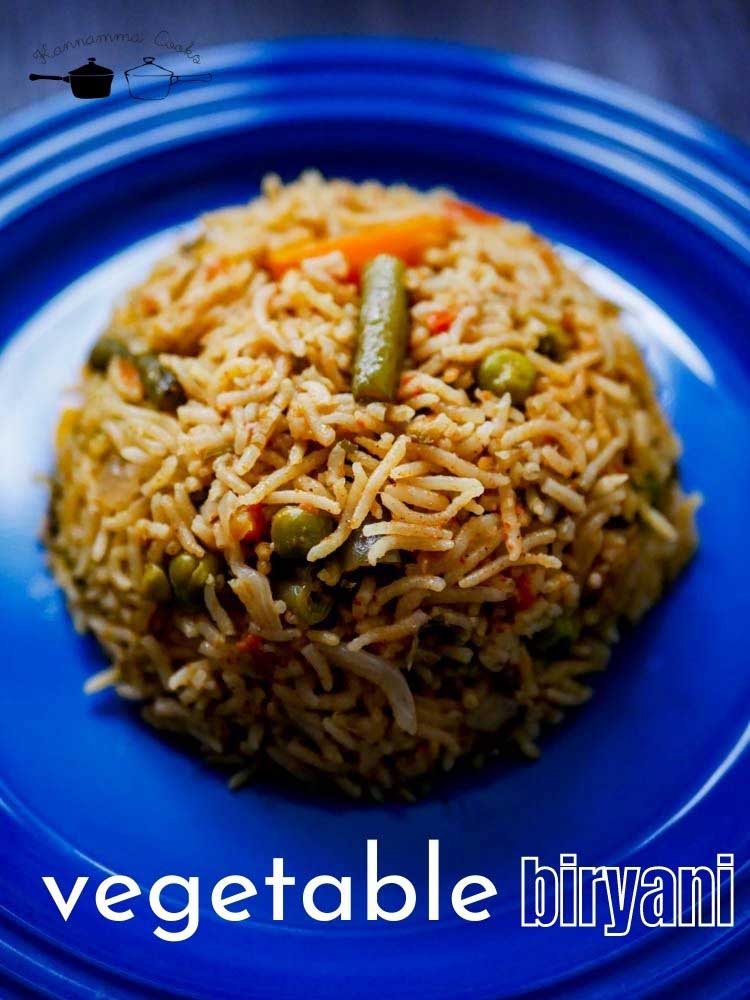
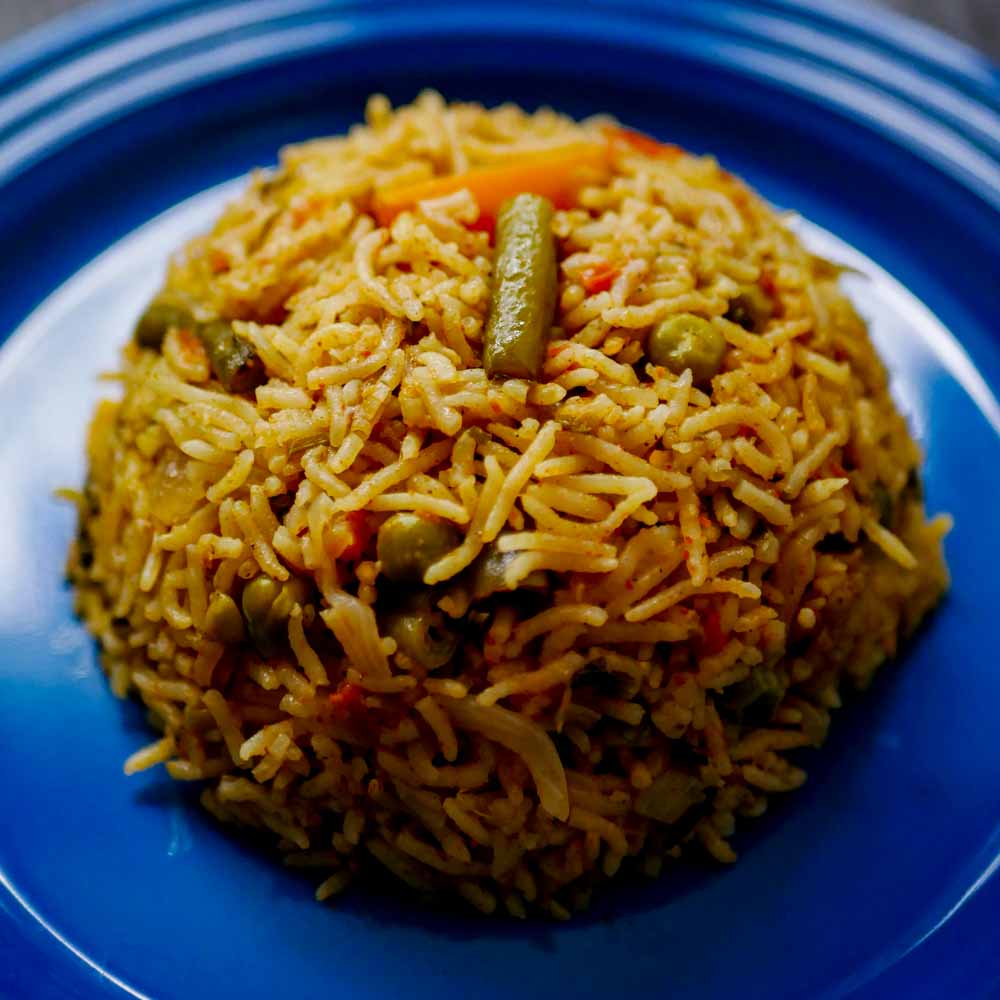
Vegetable biryani with rich addition of coconut milk is ready. You can just serve as is. You dont even need any side dish for this recipe. You can serve it with a simple raita. This is a perfect lunch box dish as it stays very moist and delicious even when cold.
Main Ingredients for Vegetable biryani made with coconut milk
1.5 cups ( 350 ml) basmati rice 1 tablespoon ghee 2 tablespoon vegetable oil 1.5 cups onions, sliced 3/4 teaspoon salt 1.5 cups tomatoes, finely chopped 15 grams readymade biryani masala 1/2 cup coriander leaves, chopped 1/2 cup mint leaves, chopped 200 ml coconut milk 350 ml water
For the Vegetable biryani paste
1 pod garlic (about 10 cloves) 2 inch piece ginger, chopped 5 green chillies 6 Indian shallots / small onions 1/4 cup water
Here is how to do Vegetable Biryani with Coconut Milk (Pressure Cooker Method)
Before starting to cook, wash and soak the rice in water.
Make a masala paste with garlic, ginger, green chillies and shallots. Add a little water while grinding. Grind to a really fine paste. Set aside.
Heat ghee and oil in a pressure pan. Add in the sliced onions and cook till the onions are soft.
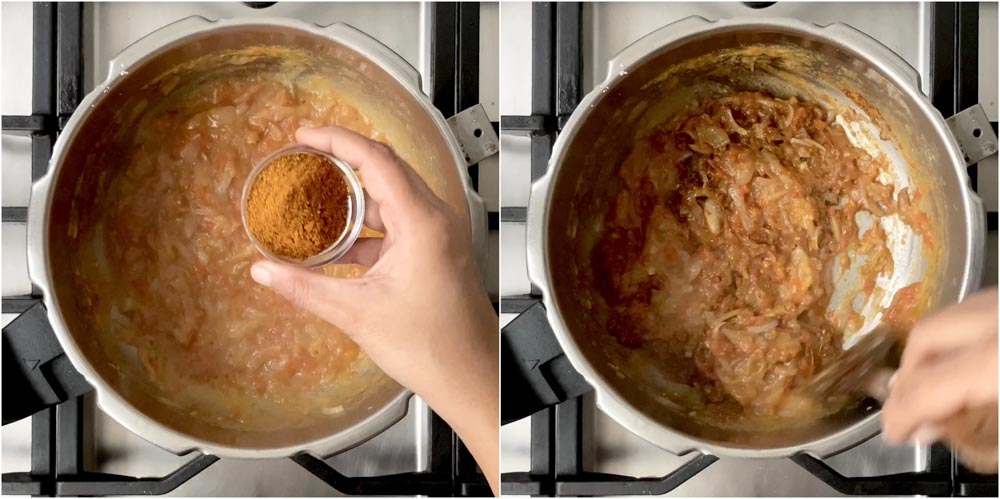
Add in the ground paste and the salt. I have used only 3/4 teaspoon of salt for the whole dish as the biryani masala (readymade) that we will be adding later consists added salt. So go easy on the salt. We can adjust the seasoning later if need be. Cook for a few minutes. Add in the finely chopped tomatoes. If you cannot chop the tomatoes fine, you can grate the tomatoes and add instead. Cook till the tomatoes are mushy. Add in the ready made biryani masala. Sauté for a minute.
Add in the chopped coriander leaves and mint leaves. Sauté for a minute. Add in the veggies and toss well to coat. Add in the coconut milk and water. I like to use 1 rice : 1.5 liquid for making this recipe. I have used 200 ml canned coconut milk. To that, I have added 350 ml water. Mix well and let everything come to a rolling boil. Drain the rice and add it to the pan.
Cover and cook for two whistles. About 7-8 minutes on medium flame. After the said time / whistles, switch off the flame and allow the pressure to settle naturally. Open and gently fluff up the rice.
Notes
Here are some of the tips while making biryani in a pressure cooker. 1. Soaking the rice – Soak the rice just before starting to cook (about 20 minutes). The rice will absorb some of the water and will nicely fluff up while cooking without becoming mushy or gummy. After the said time, drain the rice in a colander and set aside. 2. Using the right kind / size pressure cooker is important. Using a very big cooker for a small quantity of rice is one of the main reasons for burning / charring at the bottom. For this recipe, a 5-6 liter cooker works best. 3. Readymade biryani masalas usually has added salt. So go easy on salt and adjust the seasoning later if need be. I use Kohinoor brand biryani masala. 4. Sauté the spice powders and masala powders for a minute to extract the flavors of the spices. Do not add it directly to water. 5. Add the rice only after the water / liquid comes to a rolling boil. This is very important for the rice to stay fluffy. The hot water kind of shocks the rice and immediately starts to cook. 6. I use 1 rice : 1.5 water for cooking the biryani. I like to use the brands Daawat / Lal Qila. These are the brands I use at home too. 7. 1:2 rice vs veggie ratio. If you use one cup of rice, use two cup of veggies. Use firm veggies that will retain its shape after cooking. Vegetables like Carrot, Beans, Green Peas, Potato, Baby Corn, Mushroom, Paneer all works well. 8. Canned coconut milk works perfectly fine for this recipe.
- Author: Suguna Vinodh
- Prep Time: 10m
- Cook Time: 20m
Main Ingredients for Vegetable biryani made with coconut milk
1.5 cups ( 350 ml) basmati rice 1 tablespoon ghee 2 tablespoon vegetable oil 1.5 cups onions, sliced 3/4 teaspoon salt 1.5 cups tomatoes, finely chopped 15 grams readymade biryani masala 1/2 cup coriander leaves, chopped 1/2 cup mint leaves, chopped 200 ml coconut milk 350 ml water
For the Vegetable biryani paste
1 pod garlic (about 10 cloves) 2 inch piece ginger, chopped 5 green chillies 6 Indian shallots / small onions 1/4 cup water
Here is how to do Vegetable Biryani with Coconut Milk (Pressure Cooker Method)
Before starting to cook, wash and soak the rice in water.
Make a masala paste with garlic, ginger, green chillies and shallots. Add a little water while grinding. Grind to a really fine paste. Set aside.
Heat ghee and oil in a pressure pan. Add in the sliced onions and cook till the onions are soft.
Add in the ground paste and the salt. I have used only 3/4 teaspoon of salt for the whole dish as the biryani masala (readymade) that we will be adding later consists added salt. So go easy on the salt. We can adjust the seasoning later if need be. Cook for a few minutes. Add in the finely chopped tomatoes. If you cannot chop the tomatoes fine, you can grate the tomatoes and add instead. Cook till the tomatoes are mushy. Add in the ready made biryani masala. Sauté for a minute.
Add in the chopped coriander leaves and mint leaves. Sauté for a minute. Add in the veggies and toss well to coat. Add in the coconut milk and water. I like to use 1 rice : 1.5 liquid for making this recipe. I have used 200 ml canned coconut milk. To that, I have added 350 ml water. Mix well and let everything come to a rolling boil. Drain the rice and add it to the pan.
Cover and cook for two whistles. About 7-8 minutes on medium flame. After the said time / whistles, switch off the flame and allow the pressure to settle naturally. Open and gently fluff up the rice.
Notes
Here are some of the tips while making biryani in a pressure cooker. 1. Soaking the rice – Soak the rice just before starting to cook (about 20 minutes). The rice will absorb some of the water and will nicely fluff up while cooking without becoming mushy or gummy. After the said time, drain the rice in a colander and set aside. 2. Using the right kind / size pressure cooker is important. Using a very big cooker for a small quantity of rice is one of the main reasons for burning / charring at the bottom. For this recipe, a 5-6 liter cooker works best. 3. Readymade biryani masalas usually has added salt. So go easy on salt and adjust the seasoning later if need be. I use Kohinoor brand biryani masala. 4. Sauté the spice powders and masala powders for a minute to extract the flavors of the spices. Do not add it directly to water. 5. Add the rice only after the water / liquid comes to a rolling boil. This is very important for the rice to stay fluffy. The hot water kind of shocks the rice and immediately starts to cook. 6. I use 1 rice : 1.5 water for cooking the biryani. I like to use the brands Daawat / Lal Qila. These are the brands I use at home too. 7. 1:2 rice vs veggie ratio. If you use one cup of rice, use two cup of veggies. Use firm veggies that will retain its shape after cooking. Vegetables like Carrot, Beans, Green Peas, Potato, Baby Corn, Mushroom, Paneer all works well. 8. Canned coconut milk works perfectly fine for this recipe.
- Author: Suguna Vinodh
- Prep Time: 10m
- Cook Time: 20m
Find it online : https://www.kannammacooks.com/vegetable-biryani-coconut-milk/

Recipe for Andhra Chilli Chicken Gravy. Bangalore Restaurant Style Andhra Chilli Chicken Recipe with step by step pictures and video.
Andhra chilli chicken – The famous chicken starter that you will not get anywhere in Andhra but only in the restaurants of namma Bengaluru. The dish was made popular by the famous Bangalore Andhra restaurants like RR, Nandini and Nagarjuna. Its a very simple recipe that can be put together in minutes. There are a lot of variations on this dish and this is my take on the chilli chicken. I like to use the long green chillies that are less spicy but very flavorful for making this dish. A very bachelor friendly recipe too. I like to serve the chilli chicken with rice. It goes perfectly well with dal, rasam etc…
Here are other recipes from the site using chicken as the main ingredient. Chicken Recipes
Here are some of the ingredients you will need for making this recipe that you can buy online Kikkoman Soy Sauce Green Chilli Sauce Plain Vinegar Turmeric Powder
Here is the video of how to make Bangalore Restaurant Style Andhra Chilli Chicken Recipe
Here is how to make Bangalore Restaurant Style Andhra Chilli Chicken Recipe
Chilli Paste First we will make a coarse paste of ginger, garlic and green chillies. I like to use the green chillies that are of the long variety. These chillies pack a lot of flavour without being too spicy. Take a small mixie jar and add in the ginger, garlic and the green chillies. I have added about 8 green chillies. You can use upto 12. Grind without adding any water to a coarse paste. Use the pulse mode in the mixie and grind several times. The texture should be that of finely grated veggies. Set aside.
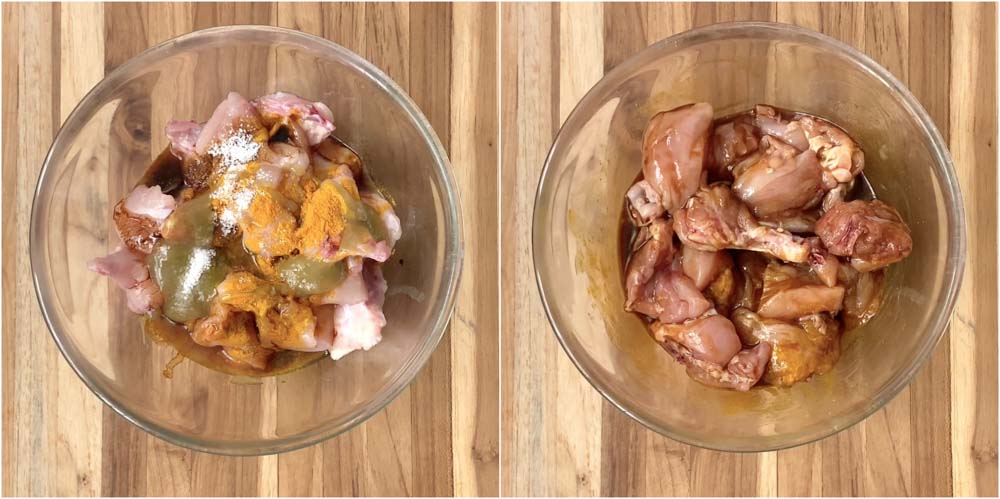
Marinating the chicken We will need chicken with bone for making Andhra style chilli chicken recipe. The bone has a lot of flavour and will add lot of flavour to the sauce. To the chicken, add in the turmeric powder, soy sauce, green chilli sauce, vinegar and the salt. The sauces already have salt. So go easy on the salt. We can adjust the seasoning later if need be. Marinate for about thirty minutes.
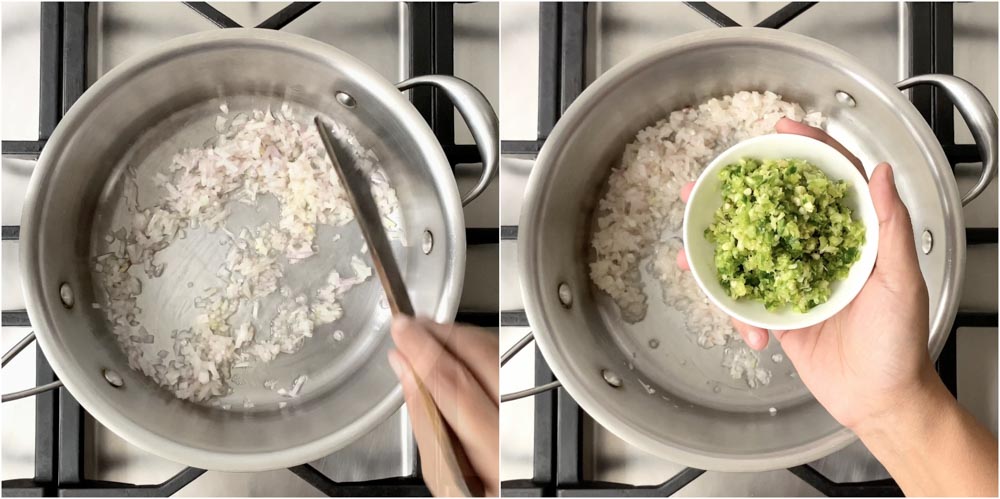
Making the chilli chicken Take a pan and add in the oil. Once the oil is hot, add in the finely chopped onions. Sauté for a couple of minutes. Add in the ground green chilli – garlic – ginger paste.
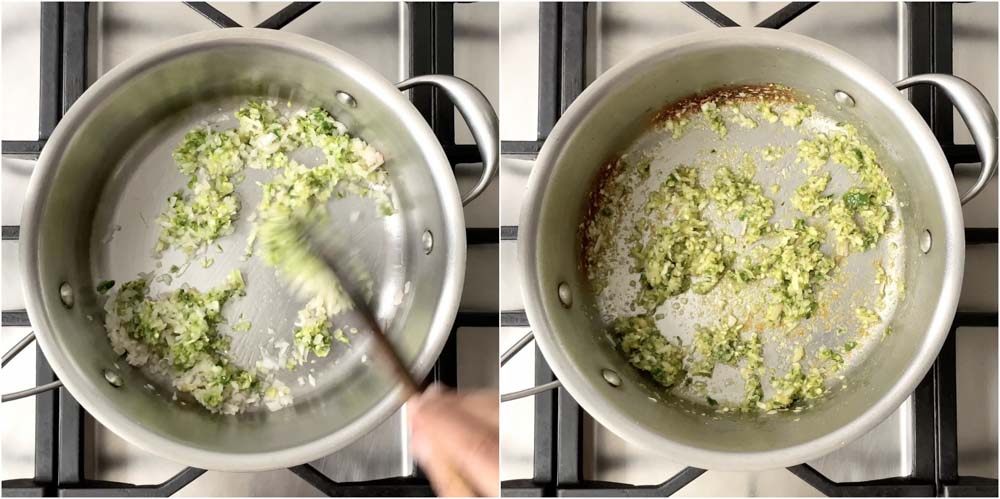
Sauté on a low flame for about 5 minutes. Turn your chimney on as the green chillies will create a strong smell when fried in oil. Also, fry on a low flame.

Add in the marinated chicken. Add in the whole chillies along with the chicken at this stage. The chillies add a nice aroma and flavour.

Sauté for a couple of minutes. Add in half a cup of water.

Cover the pan with a lid and simmer the gravy for 15 minutes.
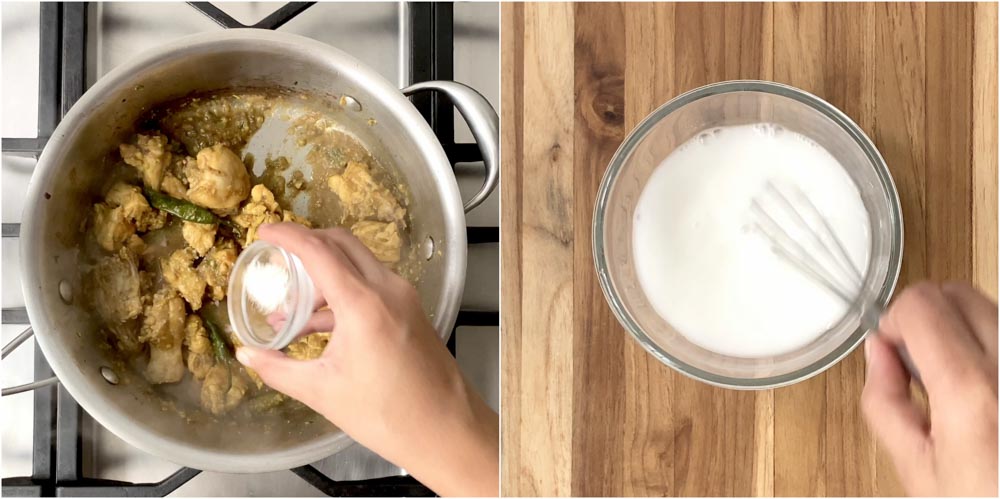
Add in a little sugar. The sugar nicely balances the hot and sour taste. Make a corn starch slurry by mixing the corn starch (refined corn flour) and water.
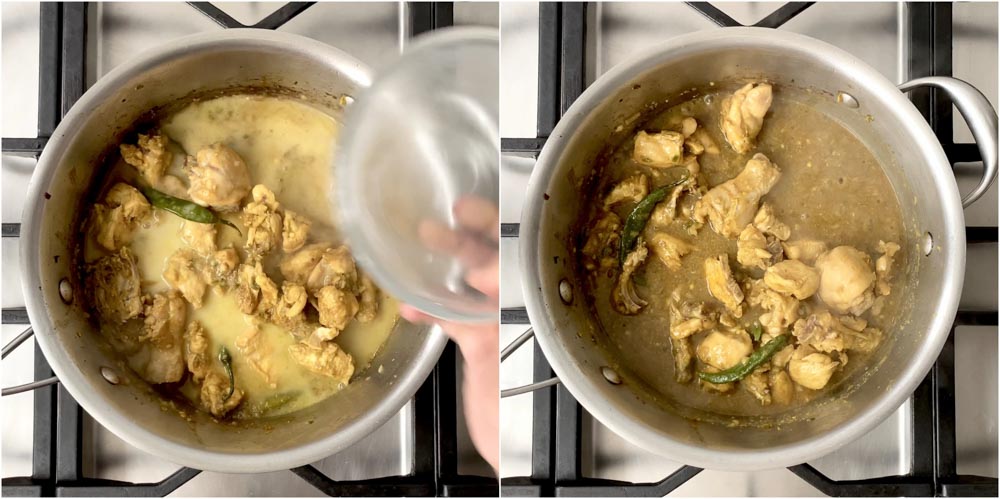
Add in the corn starch slurry and let the gravy simmer for two minutes. The gravy will instantly thicken. If the gravy is too thick, dilute the gravy with little water.
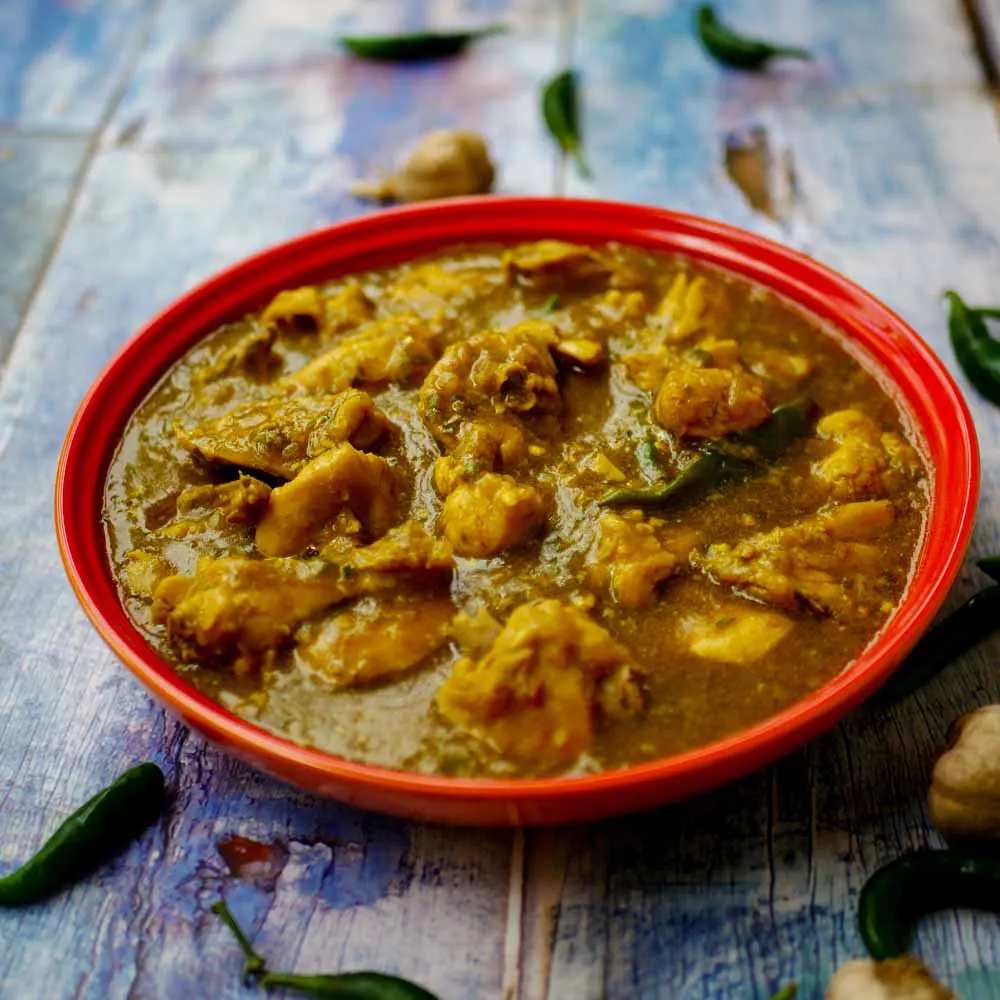
Serve hot with rice.
Chilli Paste
8 - 12 green chillies (long variety) 2 inch piece ginger 1 pod garlic
Marinating the Chicken
500 grams chicken bone-in 1/2 teaspoon turmeric powder 2 teaspoon soy sauce 2 teaspoon green chilli sauce 1 teaspoon plain vinegar 1/2 teaspoon salt
Making the Sauce
2 tablespoon vegetable oil 1/2 cup finely chopped onions 5 whole green chillies 1/2 cup water 1/4 teaspoon sugar
Corn Starch Slurry
2 teaspoon corn starch 1/2 cup water
First we will make a coarse paste of ginger, garlic and green chillies. I like to use the green chillies that are of the long variety. These chillies pack a lot of flavour without being too spicy. Take a small mixie jar and add in the ginger, garlic and the green chillies. I have added about 8 green chillies. You can use upto 12. Grind without adding any water to a coarse paste. Use the pulse mode in the mixie and grind several times. The texture should be that of finely grated veggies. Set aside.
We will need chicken with bone for making Andhra style chilli chicken recipe. The bone has a lot of flavour and will add lot of flavour to the sauce. To the chicken, add in the turmeric powder, soy sauce, green chilli sauce, vinegar and the salt. The sauces already have salt. So go easy on the salt. We can adjust the seasoning later if need be. Marinate for about thirty minutes.
Take a pan and add in the oil. Once the oil is hot, add in the finely chopped onions. Sauté for a couple of minutes. Add in the ground green chilli – garlic – ginger paste. Sauté on a low flame for about 5 minutes. Turn your chimney on as the green chillies will create a strong smell when fried in oil. Also, fry on a low flame. Add in the marinated chicken. Add in the whole chillies along with the chicken at this stage. The chillies add a nice aroma and flavour. Sauté for a couple of minutes. Add in half a cup of water. Cover the pan with a lid and simmer the gravy for 15 minutes. Add in a little sugar. The sugar nicely balances the hot and sour taste. Make a corn starch slurry by mixing the corn starch (refined corn flour) and water. Add in the corn starch slurry and let the gravy simmer for two minutes. The gravy will instantly thicken. If the gravy is too thick, dilute the gravy with little water.
Serve hot with rice.
- Author: Suguna Vinodh
- Prep Time: 10m
- Cook Time: 20m
