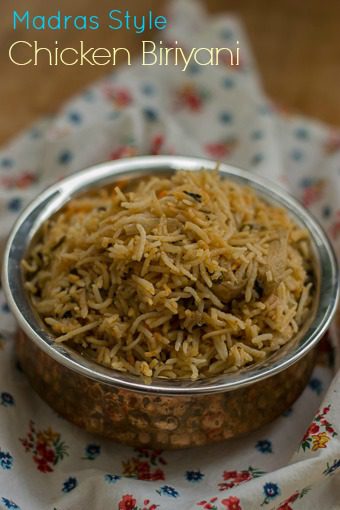
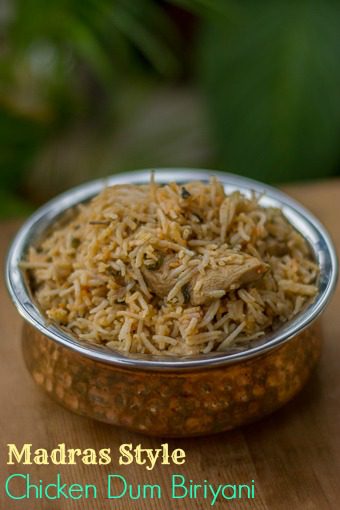
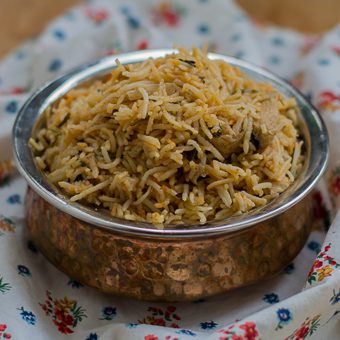
Chennai Madras Style Spicy Chicken Biryani. Made using the Dum method. Tastes good with mutton too.
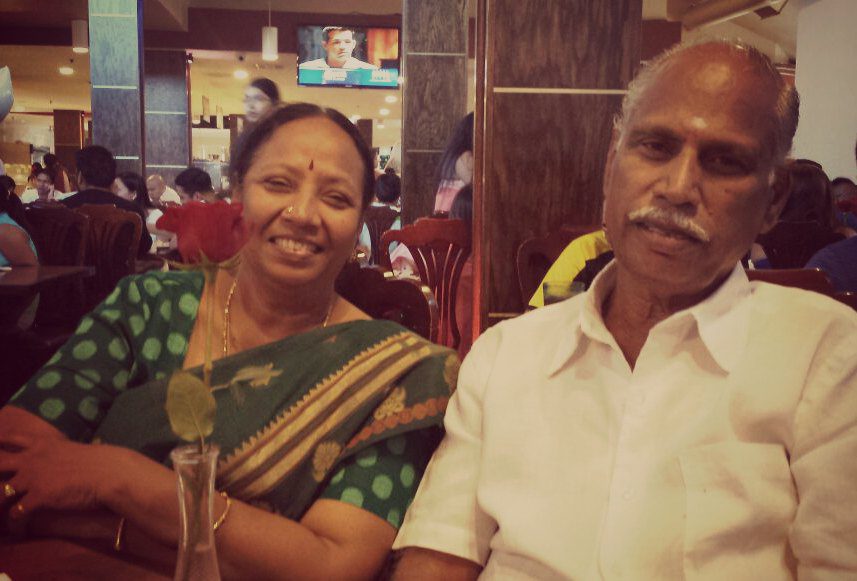
Usha Aunty was my neighbor in San Diego. She loved to cook. She loved to cook for others. She was the one who taught us ( a bunch of friends ), how to make chicken biryani for 50 people in an 80 sq.ft tiny kitchen. We must have cooked tonnes of chicken biryani in her kitchen. She rocks. Her chicken biryani rocks. Her enthusiasm is infectious. She physically pushes herself every single time for that extra mile to show that nothing is impossible. Good food meant happy people. chicken biryani meant very happy people. We all used to follow behind her to the kitchen like children following their mama wherever they go. We have had countless number of parties and countless number of this amazing chicken biryani. Her husband Pandurangan Uncle is an equally adorable man. I have seen him say ” குடு மா அந்த தேங்காய நான் ஒடச்சி தர்றேன் ” – “give me the coconut ma, i will break it for you “, and he would take the coconut to the balcony to break it for her. He would come to the kitchen frequently to see if Usha aunty needs any help. She has that little Madras slang that I soooooo love. She used to be there for everyone when they needed something. She is the true living proof that age is just a number and she just does not care about that. She is my true inspiration. She is not here now with me but I have really really fond memories that revolve around food and behind this chicken biryani. After all food is nothing but memories. My son calls her as poori paati as paati not only makes the tastiest chicken biryani but poori too. I have learnt a lot of dishes from her. This one takes the crown.
Here is the recipe for an amazing Madras Style Chicken Biryani.
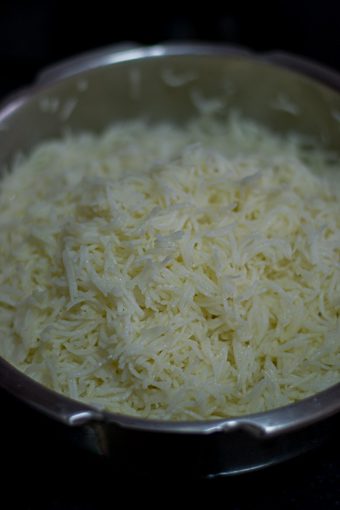
Soak basmati rice for chicken biryani in water for 15 minutes. I used 2.5 cups of rice today. For every cup of rice, use 1.5 cups of water. So I used 3 3/4 cups of water. You can cook the rice in a rice cooker or a pressure cooker. If cooking in a pressure cooker, then cook in medium flame and switch off the flame after 2 whistles. Immediately release the pressure and cool it on a plate. You need to cool the rice immediately else it might become mushy. If cooking in a rice cooker, remove the rice once its done onto a plate and allow it to cool completely. Once cool, mix some ghee into the rice to thoroughly coat. Set aside. Usha aunty sprinkles ghee on rice before putting it in dum, but I feel mixing ghee at this stage helps spreading the ghee evenly all over the rice for chicken biryani.
Heat oil in a pan and add in the cloves, cardamom and cinnamon sticks. Add in the sliced onions and fry till soft.

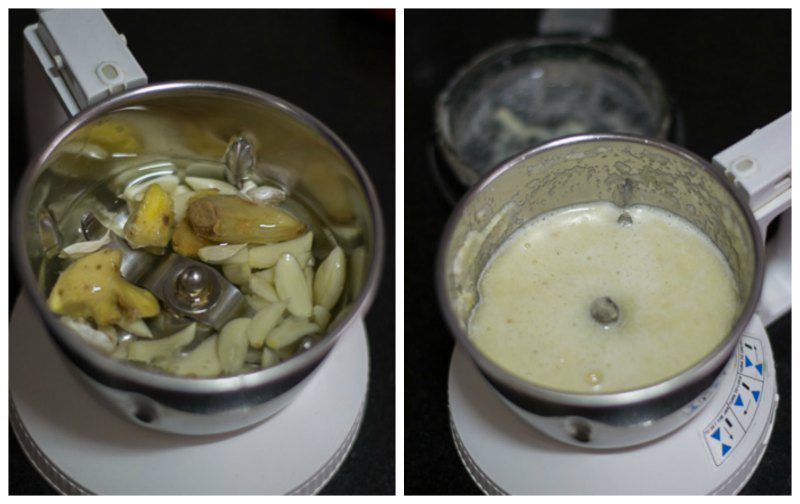
In the mean time make a paste of ginger and garlic. Add a little water while grinding if necessary.
Add in the chopped tomatoes and the ginger garlic paste, fry till the tomatoes are soft. It will take about 4-5 minutes in medium flame. Add in the coriander powder, chilli powder, green chillies, curd and salt. Fry for a minute to combine. Add in the chicken pieces and allow it to cook. Do not add any water. The juices from the chicken will be enough to cook the meat.
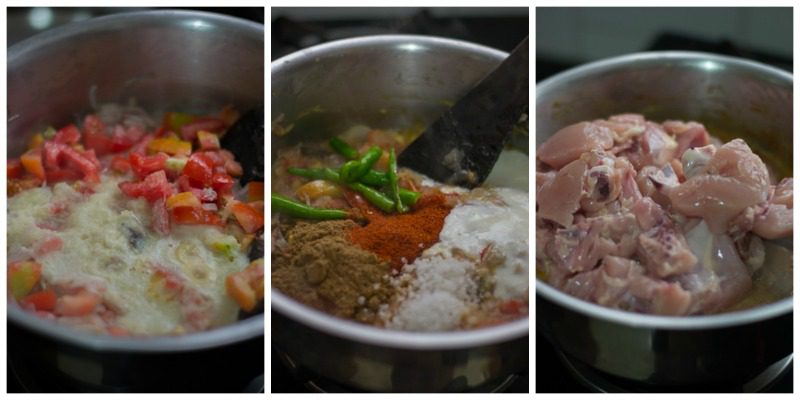
Cook the chicken until tender and the gravy has thickened. Keep stirring to avoid scorching at the bottom. Once the gravy has thickened, add in the lemon juice and switch off the flame. Keep stirring to avoid scorching at the bottom.

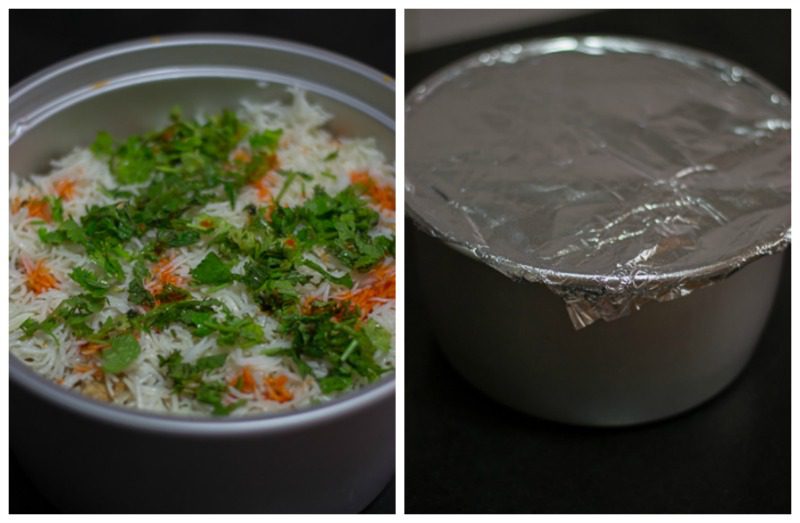
Now its time for layering the chicken biryani. Approximately divide the chicken gravy and rice into 3 equal parts. # Take a big bowl and add a layer of chicken gravy at the bottom. # Add in a layer of rice. If you dint add ghee to the rice before, spoon a tablespoon of ghee onto the rice now. # The Chennai chicken biryani has that little streaks of orange color on the rice that comes from artificial coloring. Its optional. If you want to use it, spoon a little of the coloring mixed with water on the rice. I use edible food coloring used for cake decorating ( like Wilton, Americolor etc..). # Finally, Sprinkle some chopped mint leaves and coriander leaves.

Repeat the layering process, until all the rice and gravy has been used. Tightly cover it with an aluminium foil and close it with a lid. Now its ready for dum. Traditionally, dum is done using charcoal. But that’s not feasible at home. The substitute for dum cooking at home is to use an oven. Place the chicken biryani bowl in a preheated 400 degree F oven for 30 minutes. If you don’t have an oven, heat a dosa pan on the stove and put the chicken biryani bowl on top of the dosa pan and allow it to cook on low flame for 15 minutes.
Once the dum cooking is over, open the lid and gently fluff up the rice to mix. Serve chicken biryani hot with raita.
For cooking Rice
Measurements Used – 1 cup = 250 ml
- 2.5 cups ( 625 ml) basmati rice
- 3¾ cups water
- ¼ cup ghee
For the gravy
- 1 kg chicken with bone
- 4 tablespoon peanut oil
- 3 stick cinnamon
- 5 cardamom
- 5 cloves
- 5 medium onion, sliced
- 3 medium tomatoes, chopped
- 2 pod garlic
- 3 inch piece ginger
- 5 green chillies, slit
- 1 tablespoon salt
- 1 tablespoon red chilli powder
- 2 tablespoon coriander powder
- ½ cup plain yogurt
- Juice of a small lemon
Herbs for layering
- 15 - 20 mint leaves, coarsely chopped
- 6 - 7 sprigs coriander leaves, coarsely chopped
- orange food color (optional)
- Soak basmati rice in water for 15 minutes. You can cook the rice in a rice cooker or a pressure cooker. If cooking in a pressure cooker, then cook in medium flame and switch off the flame after 2 whistles. Immediately release the pressure and cool it on a plate. Once cool, mix some ghee into the rice to thoroughly coat. Set aside.
- Heat oil in a pan and add in the cloves, cardamom and cinnamon sticks. Add in the sliced onions and fry till soft.
- Add in the chopped tomatoes and the ginger garlic paste, fry till the tomatoes are soft. Add in the coriander powder, chilli powder, green chillies, curd and salt. Fry for a minute to combine. Add in the chicken pieces and allow it to cook. Do not add any water.
- Cook the chicken until tender and the gravy has thickened. Once the gravy has thickened, add in the lemon juice and switch off the flame.
- Layer the biriyani. Take a big bowl and add a layer of chicken gravy at the bottom.. Add in a layer of rice. Finally, Sprinkle some chopped mint leaves and coriander leaves. Repeat the layering process, until all the rice and gravy has been used. Tightly cover it with an aluminium foil and close it with a lid. Place the biryani bowl in a preheated 400 degree F oven for 30 minutes.
- Serve hot.
- Author: Kannamma - Suguna Vinodh
- Prep Time: 20 mins
- Cook Time: 1 hour
- Category: Biryani
- Cuisine: South Indian
Find it online : https://www.kannammacooks.com/madras-chicken-dum-biryani/
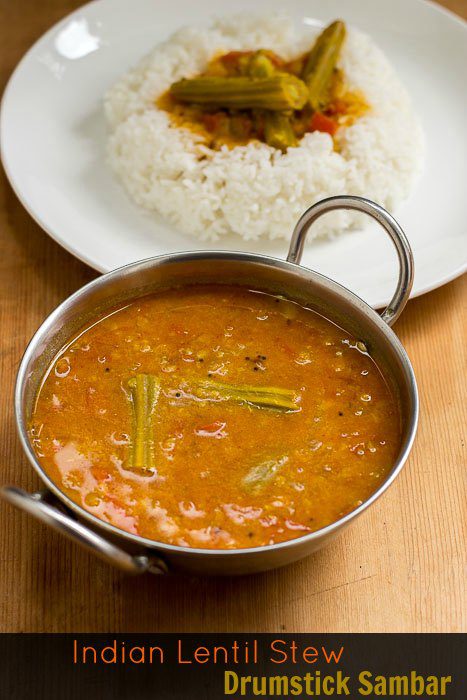
Recipe for Tamilnadu Madras style murungakkai sambar for idli and rice. Indian Chennai drumstick Sambar.
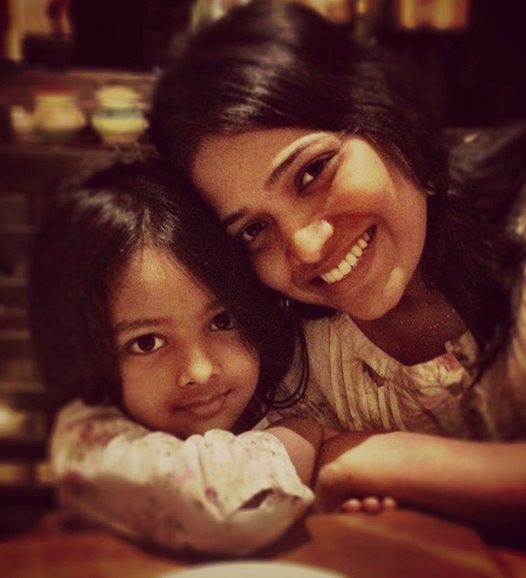
This recipe for Murungakkai Sambar is from my good friend Anandhi. This is her mom’s Murungakkai Sambar recipe. We used to work together almost a decade back (gosh – its been a long time). At that time, the food at the canteen/food court was horrible. We were doing crazy night shifts at that time and we were so tired to get into the kitchen after we came back home. We did not have time to go out for dinner too. So we were stuck with the horrendous food from the food court. Our horrible meal times continued day after day. In-spite of the night shift and crazy 12-14 hour work days, she made this Murungakkai Sambar and brought one day. Food is memories. This is a simple everyday Murungakkai Sambar that’s so nourishing and a healthy meal. Anandhi is the most cutest and the sweetest person you will meet in life. Some people leave an indelible mark in our lives. Below is Anandhi with her daughter.
Here is the video recipe for Madras Style everyday Murungakkai Sambar.
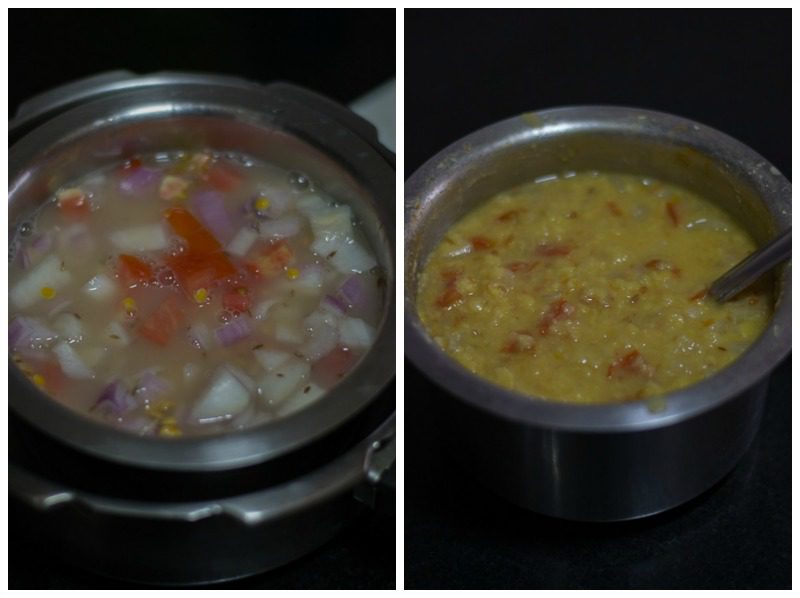
Boil 100 grams (3/4 cup) of toor-dal, chopped onions, chopped tomatoes, cumin seeds and garlic (optional) with 2 cups of water in a pressure cooker for 10 minutes (5 whistles). Let the pressure from the cooker release naturally. Set aside. Soak half a lime size tamarind in one cup of water for 20 minutes. Once the tamarind has been soaked, squeeze it between the fingers to release all the juices. Strain the juice. Set aside.
Clean the drumsticks, peel the outer skin of the drumsticks if its very hard. Chop them to 3 inch pieces. Set aside.

Heat sesame oil in a pan until hot. Add in the mustard seeds, cumin seeds, fenugreek seeds (வெந்தயம்) and curry leaves. Let it splutter. Reduce the flame to low and add in the asafoetida, chilli powder, coriander powder and turmeric powder. Fry for 10 seconds. Add 1 cup of water and the drumsticks.
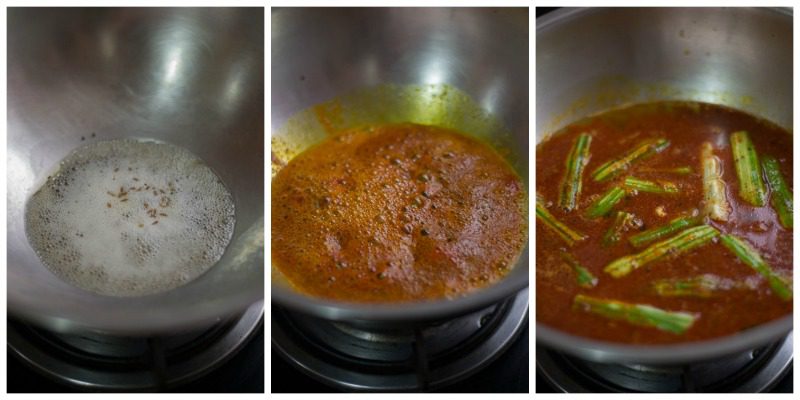
Add in the tamarind juice to the pan. Add in the salt and jaggery. Anandhi’s mom does not use jaggery. I like a little jaggery in my sambar. Cover the pan with a lid and let it cook for 10-15 minutes in medium flame until the drumsticks are soft and tender. Lightly mash the dal and the tomatoes in the pressure cooker with a ladle and add it to the pan. Add some water to the pan if the dal is very thick. Add water only if necessary. Let it simmer for 15 minutes.
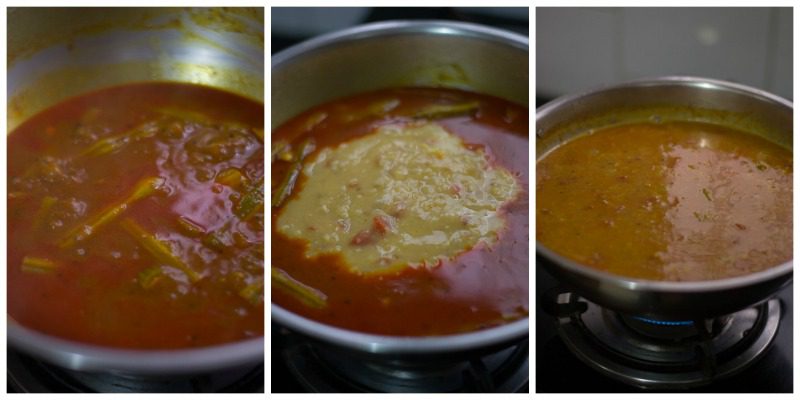
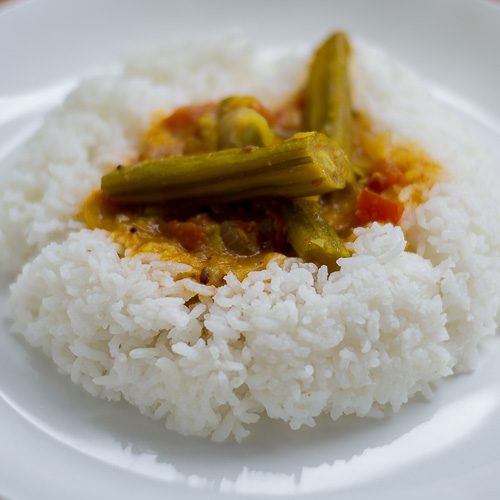
Switch off the flame. Add in the coriander leaves and serve Murungakkai Sambar hot with rice.

The best Murungakkai Sambar ever!
Pressure Cooking Ingredients
- 100 grams Toor dal
- 2 medium sized Tomatoes
- 1 onion
- 1 teaspoon cumin seeds
- 2 cloves garlic (optional)
Other Ingredients
- 1 tablespoon sesame/gingely oil
- 1/4 teaspoon fenugreek seeds
- 1/2 teaspoon mustard seeds
- 1/4 teaspoon cumin seeds
- 2 sprigs curry leaves
- 1/4 teaspoon asafoetida
- 1/2 tablespoon chilli powder
- 1 tablespoon coriander powder
- 1 teaspoon turmeric powder
- 2 Drumsticks
- half a lime size Tamarind
- 1 teaspoon salt
- 1 teaspoon jaggery (optional)
- 4 sprigs Coriander leaves
- Boil 100 grams (3/4 cup) of toor-dal, chopped onions, chopped tomatoes, cumin seeds and garlic (optional) with 2 cups of water in a pressure cooker for 10 minutes (5 whistles). Set aside. Soak half lime size tamarind in one cup of water for 20 minutes. Once the tamarind has been soaked, squeeze it between the fingers to release all the juices. Strain the juice. Set aside.
- Clean the drumsticks, peel the outer skin of the drumsticks a little if its very hard. Chop them to 3 inch pieces. Set aside.
- Heat sesame oil in a pan until hot. Add in the mustard seeds, cumin seeds, fenugreek seeds and curry leaves. Let it splutter. Reduce the flame to low and add in the asafoetida, chilli powder, coriander powder and turmeric powder. Fry for 10 seconds. Add 1 cup of water and the drumsticks.
- Add in the tamarind juice to the pan. Add in the salt and jaggery. I like a little jaggery in my sambar. Cover the pan with a lid and let it cook for 10-15 minutes in medium flame until the drumsticks are soft and tender.
- Lightly mash the dal and the tomatoes in the pressure cooker with a ladle and add it to the pan. Let it simmer for 15 minutes.
- Switch off the flame and garnish with coriander leaves.
- Author: Kannamma - Suguna Vinodh
- Prep Time: 15 mins
- Cook Time: 40 mins
- Category: Dal/Lentils
- Cuisine: South Indian, Tamilnadu, Madras

