
Recipe for one pot pulao made with thatta payaru known as cowpea. Perfect for busy weekdays and here is another delicious lunch box recipe that can be made in under 30 minutes.
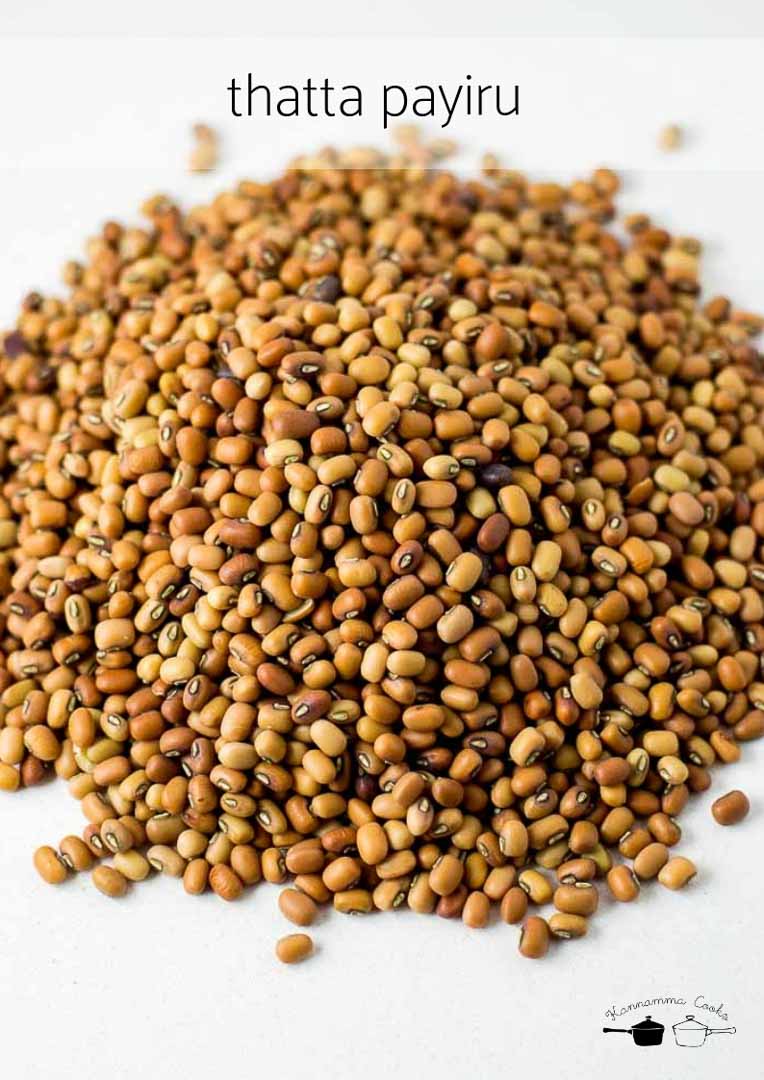
Cowpea is cultivated all over the Kongunadu region due to its nature of being tolerant to drought and heat than other legumes. A single seed can contain upto 25% protein. Cowpea is perfect for cultivation in poor dry conditions and it makes it an important crop for arid and dry regions where many other crops fail to grow. Its also a rich source of folic acid. Cowpea is a high-quality plant protein source eaten throughout the world. The plant itself is used as forage for cattle so the name “cowpea”. It comes in a variety of colors – white, brown and red. The brown cowpea is what is predominantly used in Kongunadu.
But due to its anti nutritional properties like phytic acid and protease inhibitors, soaking the seeds overnite is preferred to increase the bioavailability of nutrients.
Here are some of the things you can buy online for making this recipe Deep Pressure Pan https://amzn.to/3HhD74p Cold Pressed Natural Virgin Coconut Oil https://amzn.to/3JcsMr8 Teak-wood Chopping Board https://amzn.to/3hZa4qm Seeraga Samba Rice https://amzn.to/3wA9RDf Red / Brown Cowpea https://amzn.to/3wBFixa
Here is the video of how to make thatta payaru pulavu | cow pea pulao Print
1/2 cup cowpea (thatta payaru) 2 tablespoon coconut oil 2 inch piece cinnamon / cassia 2 cloves 2 cardamom 2 bayleaves 1 star anise 1/2 teaspoon fennel seeds 2 sprigs curry leaves, chopped 2 green chillies, chopped 1 cup onions, chopped 1/2 teaspoon turmeric powder 1 teaspoon red chilli powder 1 tablespoon ginger garlic paste 2 tomatoes chopped 1 teaspoon salt 1/4 cup mint leaves, chopped 1/4 cup coriander leaves, chopped 2 cups water 1 cup seeraga samba rice 1/2 a lime , juiced
We will be using brown cowpea today for making this recipe. Brown cowpea is preferred. The cowpea needs to be washed and soaked overnight in water. Soaking hard lentils overnight helps increase the bioavailability of the nutrients present. Cowpea is rich in protein and folic acid. A single seed can contain upto 25% protein. Do include cowpea in your diet if you are vegetarian. After soaking, the cowpea is ready to go into our pulav.
Let’s make the pulav Take a pressure pan and add in coconut oil. Any oil is ok but coconut oil goes so well in this recipe. I used a 5 liter pressure cooker today to make this recipe.
Once the oil is hot, add in the whole spices. Add in a piece of cinnamon, a couple of cloves, a couple of cardamom and bay leaves and a small piece of star anise. Add in little fennel seeds along. Chop some curry leaves and add it to the pan. Add some chopped green chillies along.
Saute the spices and herbs for a few seconds. The spices should turn aromatic once sauteed in oil. Make sure not to burn the spices. Once the spices are aromatic, add in the chopped onions. Saute the onions until the onions are soft. It will take about 3-4 minutes on medium flame. Once the onions are soft and slowly starting to change color, add in the turmeric powder and the red chilli powder. Add in the ginger garlic paste. Saute the spice powders and the ginger garlic paste for a minute.
Add in a couple of tomatoes that are chopped fine. Mix well to combine. Add in the salt at this stage. Along with the salt, add in the mint leaves and coriander leaves. Make sure to chop the herbs and add to the pan. Mix well.
Add a few tablespoons of water to the pan to avoid scorching at the bottom. Mix well. Cover the pan with a lid and cook on a low flame for about five minutes. We are looking for the tomatoes to be mushy.
Tomatoes should be soft and mushy after about five minutes of cooking. Add in about two cups of water to the pan at this stage.
After adding the water, add in the soaked and drained cowpea to the pan. Mix well to combine. Check for seasoning at this stage and add in some salt if necessary. If you think the pulav needs more spice, throw in some green chillies if need be. Cover the pan with a lid and cook on a medium flame for about 15 minutes.
While the cowpea is cooking, let’s get the rice ready. I am using seeraga samba rice today. Seeraga samba rice is a short grained rice variety that is traditionally used for biryanis and pulav in Tamil nadu and certain parts of South India. If you cannot get hold of this rice, basmati rice will work just fine. Wash the seeraga samba rice in water once and soak the rice for about 15 minutes.
Once the cowpea is firm but tender, add in the rice. Drain the rice and then add it to the pan. Mix everything well. Add in juice of half a lime to the pan. After adding the lime juice, cover the pressure pan with a lid.
Make sure the flame is at a medium. Cook for about 5-7 minutes. About two whistles in an Indian style pressure cooker. After the said whistles, switch off the flame and wait for the pressure to settle. Once the pressure settles, open the pan.
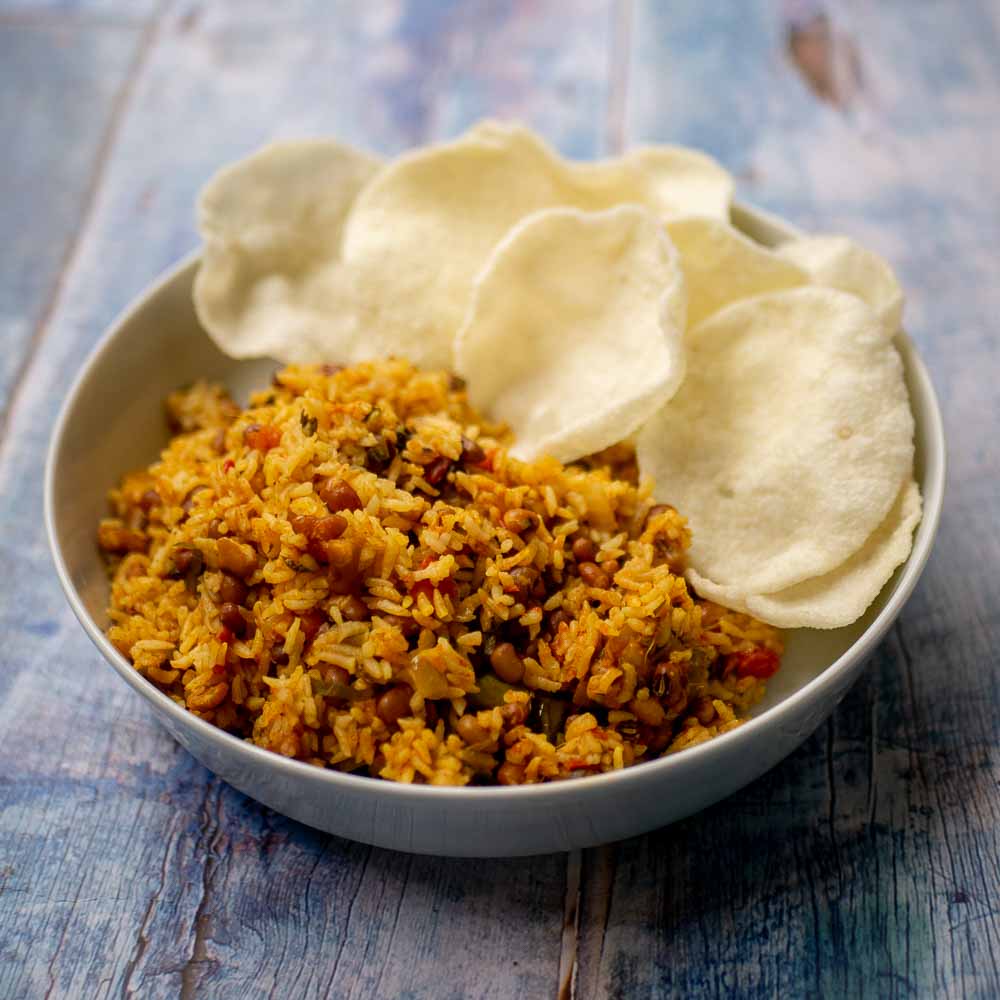
Gently fluff up the rice. If doing this dish for a party, add a couple of tablespoons of ghee at this stage to make this dish very rich. Our thatta payaru pulavu / cow pea pulao is ready to be served.
You can serve the pulav with fried vadagam or appalam.
- Author: Suguna Vinodh
- Prep Time: 8h
- Cook Time: 30m
1/2 cup cowpea (thatta payaru) 2 tablespoon coconut oil 2 inch piece cinnamon / cassia 2 cloves 2 cardamom 2 bayleaves 1 star anise 1/2 teaspoon fennel seeds 2 sprigs curry leaves, chopped 2 green chillies, chopped 1 cup onions, chopped 1/2 teaspoon turmeric powder 1 teaspoon red chilli powder 1 tablespoon ginger garlic paste 2 tomatoes chopped 1 teaspoon salt 1/4 cup mint leaves, chopped 1/4 cup coriander leaves, chopped 2 cups water 1 cup seeraga samba rice 1/2 a lime , juiced
We will be using brown cowpea today for making this recipe. Brown cowpea is preferred. The cowpea needs to be washed and soaked overnight in water. Soaking hard lentils overnight helps increase the bioavailability of the nutrients present. Cowpea is rich in protein and folic acid. A single seed can contain upto 25% protein. Do include cowpea in your diet if you are vegetarian. After soaking, the cowpea is ready to go into our pulav.
Let’s make the pulav Take a pressure pan and add in coconut oil. Any oil is ok but coconut oil goes so well in this recipe. I used a 5 liter pressure cooker today to make this recipe.
Once the oil is hot, add in the whole spices. Add in a piece of cinnamon, a couple of cloves, a couple of cardamom and bay leaves and a small piece of star anise. Add in little fennel seeds along. Chop some curry leaves and add it to the pan. Add some chopped green chillies along.
Saute the spices and herbs for a few seconds. The spices should turn aromatic once sauteed in oil. Make sure not to burn the spices. Once the spices are aromatic, add in the chopped onions. Saute the onions until the onions are soft. It will take about 3-4 minutes on medium flame. Once the onions are soft and slowly starting to change color, add in the turmeric powder and the red chilli powder. Add in the ginger garlic paste. Saute the spice powders and the ginger garlic paste for a minute.
Add in a couple of tomatoes that are chopped fine. Mix well to combine. Add in the salt at this stage. Along with the salt, add in the mint leaves and coriander leaves. Make sure to chop the herbs and add to the pan. Mix well.
Add a few tablespoons of water to the pan to avoid scorching at the bottom. Mix well. Cover the pan with a lid and cook on a low flame for about five minutes. We are looking for the tomatoes to be mushy.
Tomatoes should be soft and mushy after about five minutes of cooking. Add in about two cups of water to the pan at this stage.
After adding the water, add in the soaked and drained cowpea to the pan. Mix well to combine. Check for seasoning at this stage and add in some salt if necessary. If you think the pulav needs more spice, throw in some green chillies if need be. Cover the pan with a lid and cook on a medium flame for about 15 minutes.
While the cowpea is cooking, let’s get the rice ready. I am using seeraga samba rice today. Seeraga samba rice is a short grained rice variety that is traditionally used for biryanis and pulav in Tamil nadu and certain parts of South India. If you cannot get hold of this rice, basmati rice will work just fine. Wash the seeraga samba rice in water once and soak the rice for about 15 minutes.
Once the cowpea is firm but tender, add in the rice. Drain the rice and then add it to the pan. Mix everything well. Add in juice of half a lime to the pan. After adding the lime juice, cover the pressure pan with a lid.
Make sure the flame is at a medium. Cook for about 5-7 minutes. About two whistles in an Indian style pressure cooker. After the said whistles, switch off the flame and wait for the pressure to settle. Once the pressure settles, open the pan.
Gently fluff up the rice. If doing this dish for a party, add a couple of tablespoons of ghee at this stage to make this dish very rich. Our thatta payaru pulavu / cow pea pulao is ready to be served.
You can serve the pulav with fried vadagam or appalam.
- Author: Suguna Vinodh
- Prep Time: 8h
- Cook Time: 30m
Find it online : https://www.kannammacooks.com/thatta-payaru-pulao/
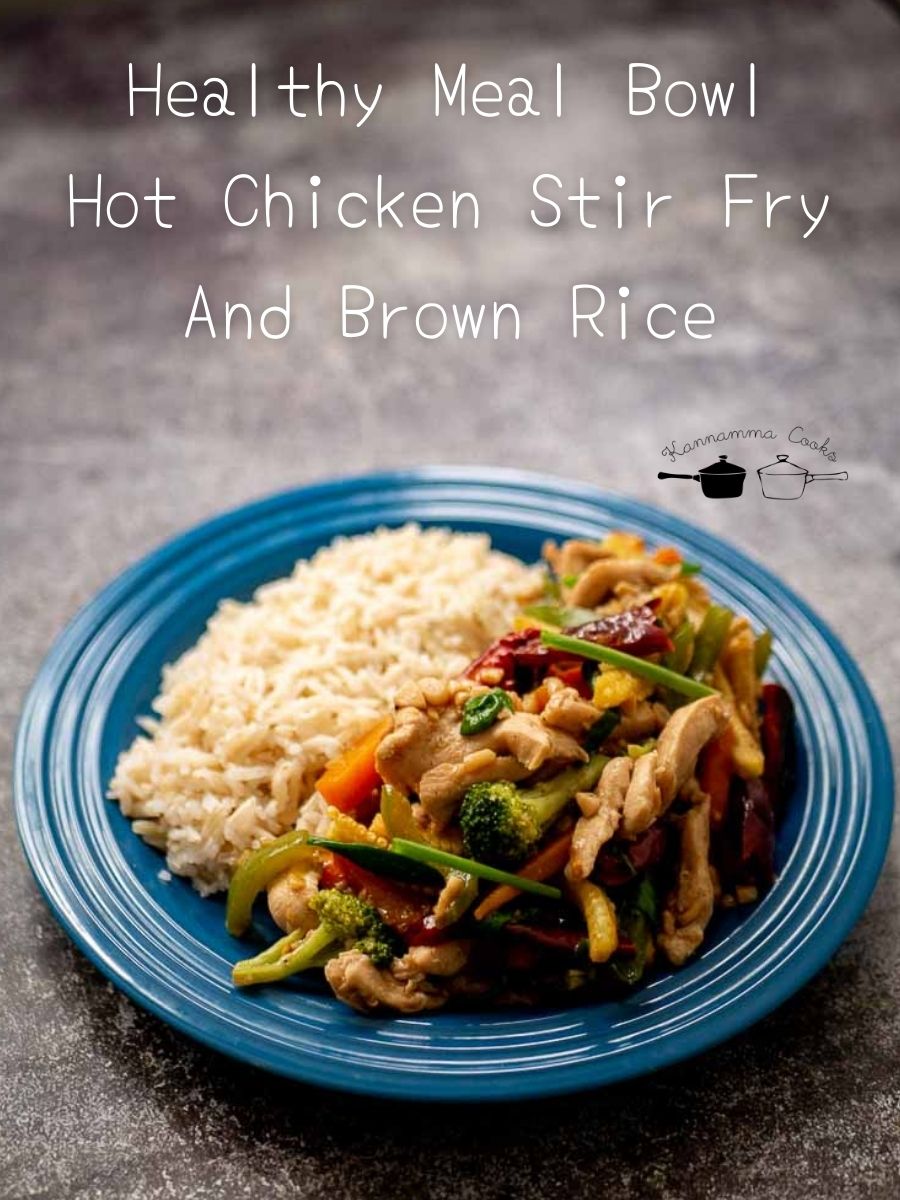
Healthy Meal Bowl – Hot Chicken Stir Fry With Veggies And Brown Rice | How To Cook Brown Rice In Cooker. We are going to make Hot Chicken Stir Fry With Veggies And Brown Rice and it’s not just healthy, it’s really delicious too.
Velveting the chicken Velveting is the process of passing the marinated meat (mostly lean cuts of meat) briefly in oil or water. This process keeps the meat tender, juicy and moist. The secret to tenderizing the meat is egg whites, baking soda and cornstarch. As egg whites and baking soda are alkaline, it prevents the muscle fibers from tightening up. They remain tender and retain the moisture making the meat very juicy. Thanks Kenji Lopez Alt for teaching me how to velvet meat:) This makes the meat so moist and we love it at home. These days, I am always velveting the meat for any stir fry that I do at home. Do try this and I am sure you will be hooked.
Here are the things you can buy online for making this recipe Carbon Steel Wok Pan https://amzn.to/3s6NuSr Kikkoman All Purpose Soy Sauce https://amzn.to/3wBqPBe Chicken Stock Cube https://amzn.to/3LJbOS6 Brown Basmati Rice https://amzn.to/3wLSGgK
Here is the video of how to make Hot Chicken Stir Fry With Veggies And Brown Rice
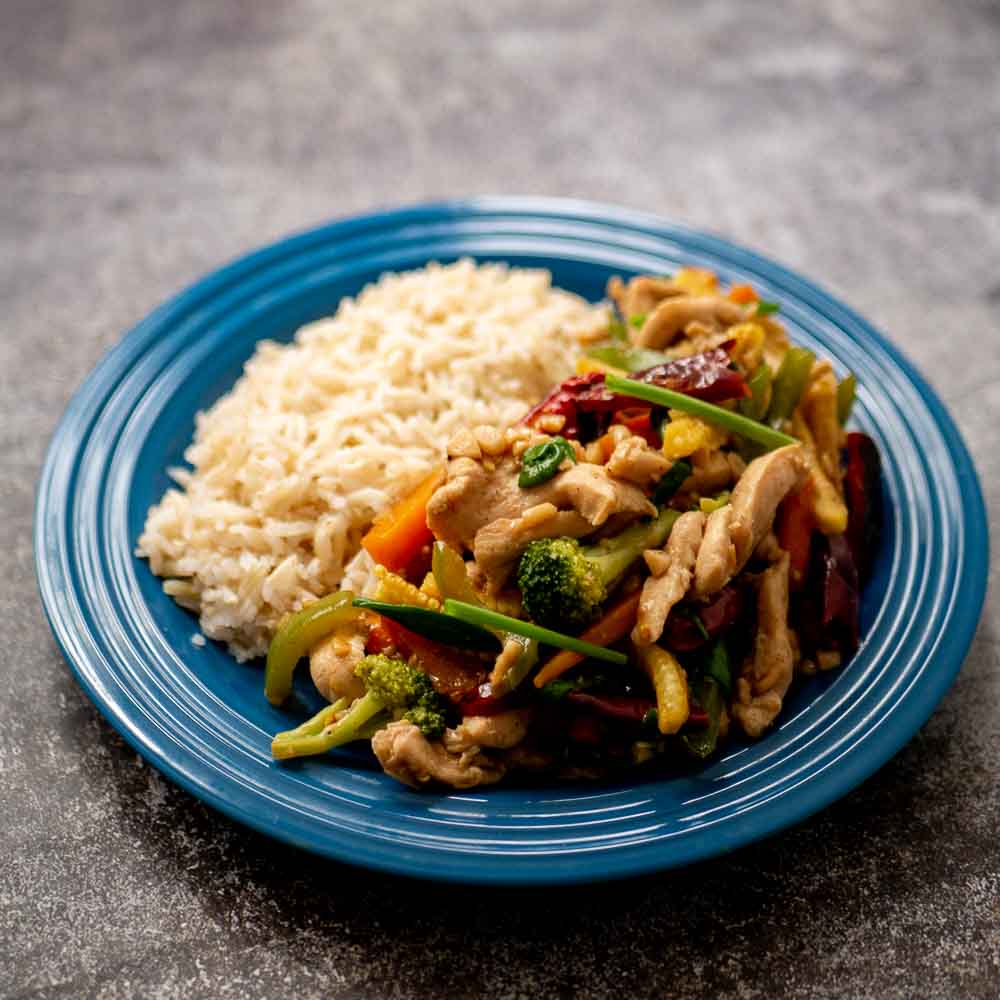
Hot Chicken Stir Fry With Veggies
For Velveting The Chicken (Water Velvet)
500 grams boneless chicken breast, cut into thin strips 1/2 teaspoon black pepper powder 1/2 teaspoon sugar 1/2 teaspoon baking soda 1 teaspoon cornstarch 1 teaspoon soy sauce 1 teaspoon sesame oil 1 egg white
For the Stir-Fry
2 tablespoon groundnut oil 1 tablespoon minced ginger 2 tablespoon minced garlic 2 stalks spring onion (white part) 12 dried red chillies (seeds removed in half the chillies) 1 cup carrots cut in strips 1 cup baby corn cut in strips 1 cup broccoli florets 1 cup capsicum cut in strips 1/2 teaspoon black pepper powder 2 tablespoon soy sauce 1 teaspoon plain vinegar 1 chicken stock cube 1/2 cup water 1 teaspoon cornstarch 1/2 cup spring onion, cut in strips
For Cooking Brown Rice
1 cup brown basmati rice 5 cups water
First we will be velveting the chicken.
We have about 500 grams of boneless skinless chicken breasts that need to be cut into thin strips. Velveting is the process of passing the marinated meat (mostly lean cuts of meat) briefly in oil or water. This process keeps the meat tender, juicy and moist. Wash the chicken after cutting and drain the water completely.
To the chicken, add in a little pepper powder. If you have white pepper powder, you can use that too. Add a little sugar, half a teaspoon of baking soda – as baking soda is alkaline, it prevents the muscle fibers from tightening up while cooking. The meat remains tender and retains the moisture while cooking making the chicken very juicy. Add in little corn starch, soy sauce and little sesame oil. Finally add in the egg white. Mix everything well to combine. Make sure to massage the chicken well so the ingredients get to penetrate into the chicken flavoring it till deep.
Marinate the chicken for at least 30 minutes. You can leave it in the fridge for upto 3-4 hours if not using it immediately.
Now it’s time to velvet the meat. Bring a big pot of water to a boil. When it’s boiling, add in the marinated meat. Mix well so the chicken does not clump up. Let the water come to a boil again. It should take about a couple of minutes. You need not cook the chicken for long. We will be cooking it again briefly while stir-frying. So cooking for a couple of minutes will do.
After cooking for a couple of minutes, remove the chicken from the pan and set aside. Discard the water.
Now let’s stir fry. Heat a wok on high flame and add in the oil. I used groundnut oil today. To the oil, add in the minced ginger and the minced garlic. I like to use a lot of garlic as we love the flavour of garlic in stir-fries at home. You can always use more or less depending on what your family prefers. Add in the spring onions, the white part only at this stage. Add in the dried red chillies. Break the chillies into two and add to the wok. I have removed the seeds from half of them and kept the seeds in the remaining. Adjust the spice levels according to your taste. If you like a really spicy stir fry, leave the seeds on. If you want a mild stir fry, de-seed the red chillies so only the flavour of the chillies penetrate but not the heat. Most of the heat of the chilli is only in the seed. Saute briefly for a few seconds. We will need about four cups of veggies for this recipe. Add in the veggies that take a longer time to cook first. The veggies you use in your stir fry is totally up to you. I have added carrots and baby corn today. Mix the veggies well. Cook the veggies for a couple of minutes so it gets charred here and there. After a couple of minutes, add in the remaining veggies. I have added broccoli and capsicum. Make sure to cut all the veggies in similar sizes so they cook uniformly. Add in a few tablespoons of water at this stage so the veggies do not scorch at the bottom. Cover the wok with a lid and cook for a few minutes till the veggies are tender but firm. It should take about 3-4 minutes. Once the veggies are cooked to your liking, add in the chicken. Add in the black pepper powder. Add in the soy sauce. Add in a teaspoon of plain vinegar. I have also added a chicken stock cube for additional flavour. Just break it into small pieces and add so it does not remain clumpy. Cook everything for a few more minutes. Finally make a cornstarch slurry by mixing half a cup of water and a teaspoon of cornstarch. Mix well and add it to the wok. The slurry will coat the veggies and chicken making it slightly saucy. Along with the slurry, add in chopped spring onion. I like to add a lot of spring onion in stir fries. Cook for a couple of minutes for the sauce to thicken. At this stage, check for seasoning and add salt only if necessary. The soy sauce and the stock cube have enough salt in them. Our stir fry is ready.
Now let’s move on to the Brown Rice
I used a regular basmati variety for cooking today. There are two types of brown rice. The quick cooking variety and the regular old fashioned rice. I like the regular ones better as they are less processed, more hearty and remain very aromatic after cooking. This method will work for both kinds of rice. Wash and soak the rice for 15 minutes in water. No need to soak the brown rice for long. 15 minutes is good enough. I like to cook the brown rice using the drain method and not the absorption method. The drain method is where you cook the rice in lots of water and drain the excess water after cooking. The texture of rice cooked this way is much better than the texture of rice cooked using the absorption method. I have used about 1 cup of rice and 5 cups of water. Add them in a cooker and cook for two whistles. After the said whistles, let the pressure settle on its own. Once the pressure has settled, open the cooker. Drain the rice on a colander. Tap the colander several times to get rid of the excess water and moisture from the rice. Transfer the rice from the colander to a serving bowl. The rice will be cooked well and still hold as separate grains. Our brown rice is ready.
- Author: Suguna Vinodh
- Prep Time: 30m
- Cook Time: 30m
