
Recipe for Indo Chinese Veg Schezwan fried rice. This home style veg fried rice made Indian chinese style with sauces and store bought sauce / masala is a winner. Recipe with step by step pictures. Try this amazing Indo Chinese Veg Schezwan fried rice at home today.
Schezwan veg fried rice is the answer for everyone who loves to have their Indo Chinese fixings spicy. The main thing about the schezwan veg fried rice is the schezwan paste / masala that gives the heat and taste. I have used store bought schezwan chilli paste today. Its available in all major stores and tastes very good too.
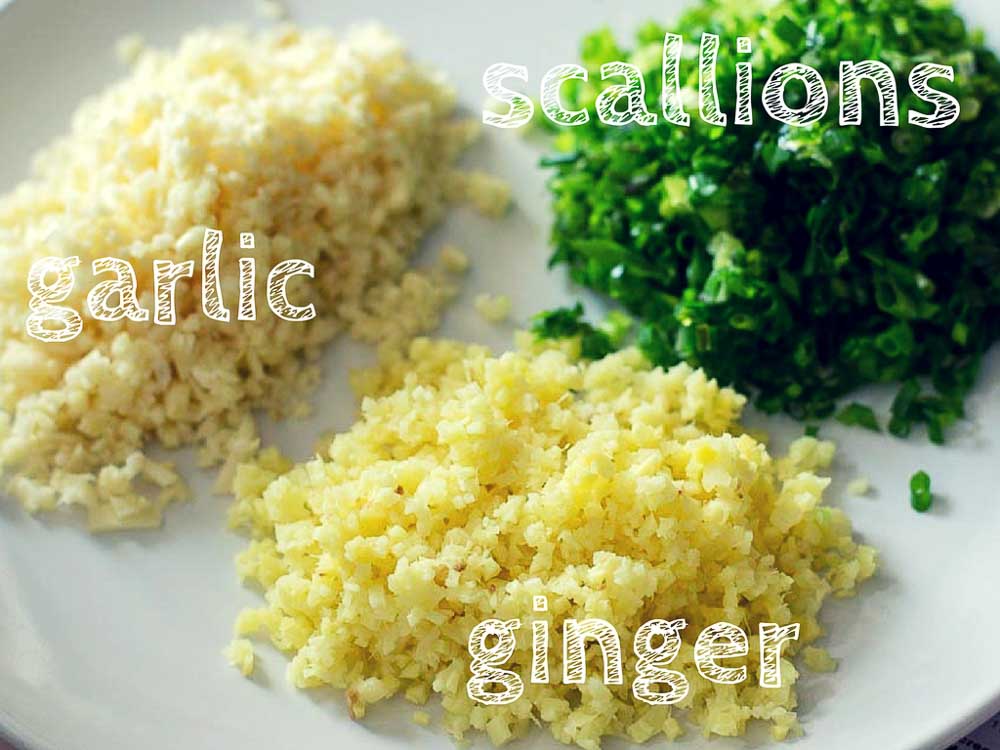
Schezwan Fried rice is very easy to make when you have the mise en place ready. Just like the veggie trinity mirepoix in western cooking, there is a holy trinity of veggies in Chinese cooking too! Its the combination of Ginger, Garlic and Scallions / Spring onions. Use them generously whenever you make chinese food!!!
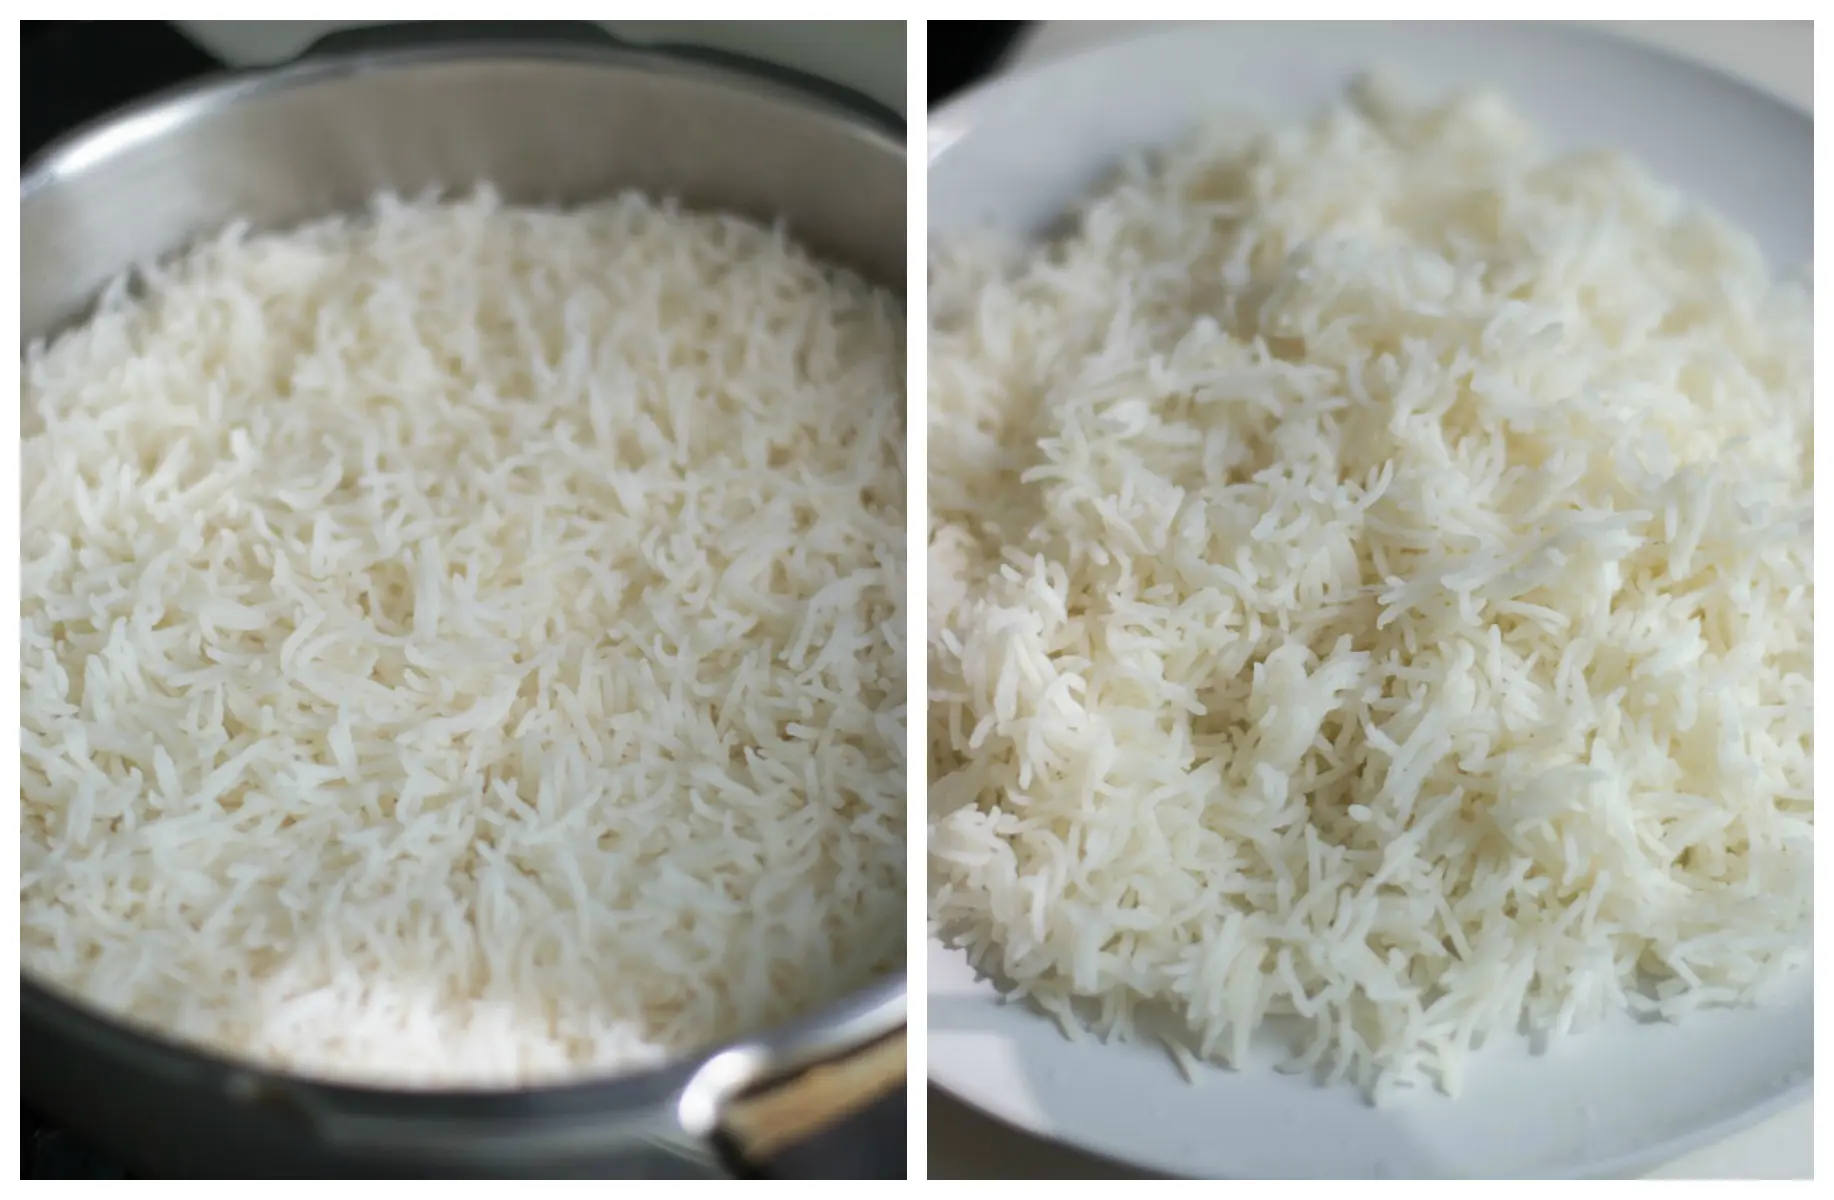
First, lets talk about the rice. We will be using basmati rice for making fried rice. The whole idea is to get the texture right. Its very important that the grains of rice do not turn mushy. Here is how I do it. Wash and soak the basmati rice in water for 30 minutes. Drain the water. Add 1.5 cups of water to every cup of rice used. Cook in a pressure cooker, medium flame – for exactly 2 whistles. Switch off the flame and allow it to rest for 15 minutes. The pressure will release on its own during that time.

After 15 minutes, open the cooker and fluff up the rice. Immediately, transfer the rice to 2-3 plates to cool it down completely. The rice needs to be completely cool before you start cooking the fried rice. Note: For a very dry rice, release the pressure manually after 5 minutes.
Now lets talk about the flame. High heat is very important in chinese cooking. The chinese restaurants use heavy burners that can cook and slightly char the veggies and meat in seconds. Even though, we cannot replicate that at home, keep the flame of the gas stove to the maximum it will go. Cooking the veggies on high heat will give it a slight char and flavour that’s desirable.


Now, lets make the Schezwan fried rice with loaded vegetables. Heat oil in a pan and add in the finely minced garlic and finely minced ginger. Fry for a couple of minutes. No need to fry for a long time. Just a couple of minutes is enough.
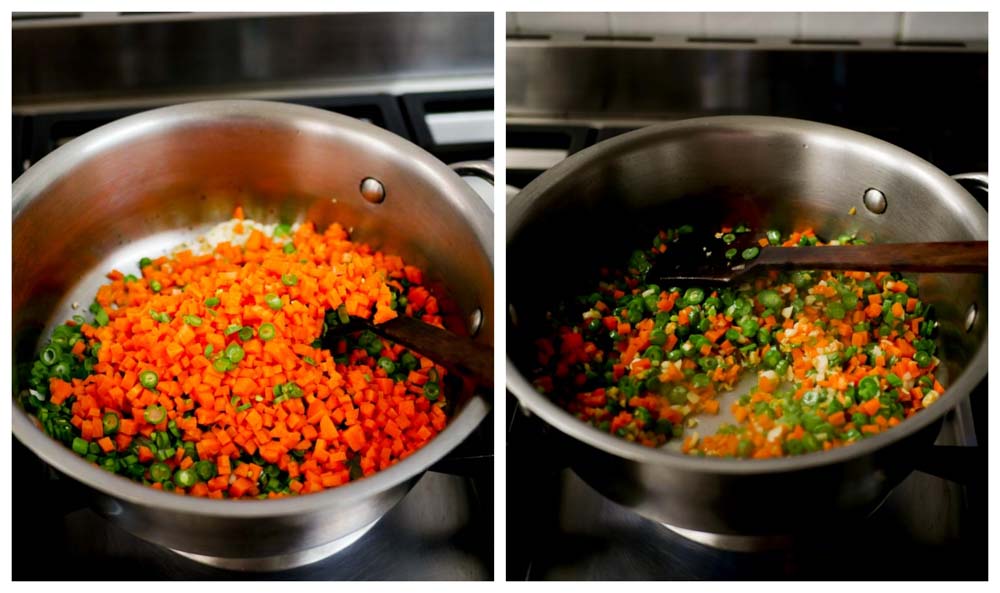
Now comes the veggies. I do not like to use a lot of types of veggies in my fried rice. But its totally up to you. You can use whatever you find in your fridge. I have used finely chopped carrots, beans and a little cabbage. The flavour of cabbage is very essential for fried rice. You may add capsicum, corn, mushrooms etc… depending on what you like. Make sure you chop them as fine as possible so it cooks quickly! I have added roughly about two cups of veggies.
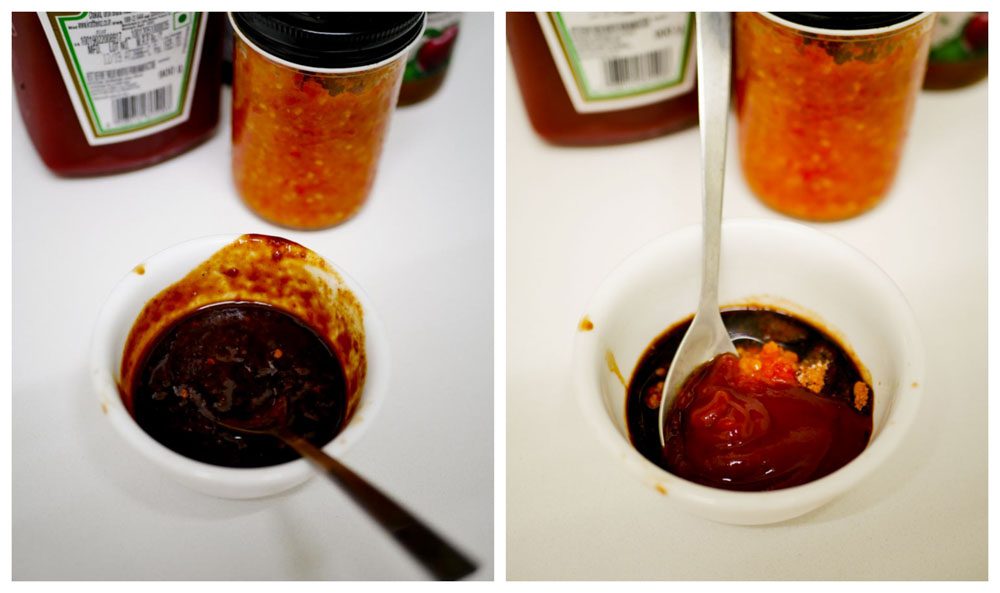
Take a bowl and add in the salt, pepper powder, sugar and the sauces. The little sugar will balance the taste. Mix well. Add a little water if the sauce is too thick. If you want a very spicy fried rice, add a little more of the Schezwan paste. You can also add red chilli flakes if you like.
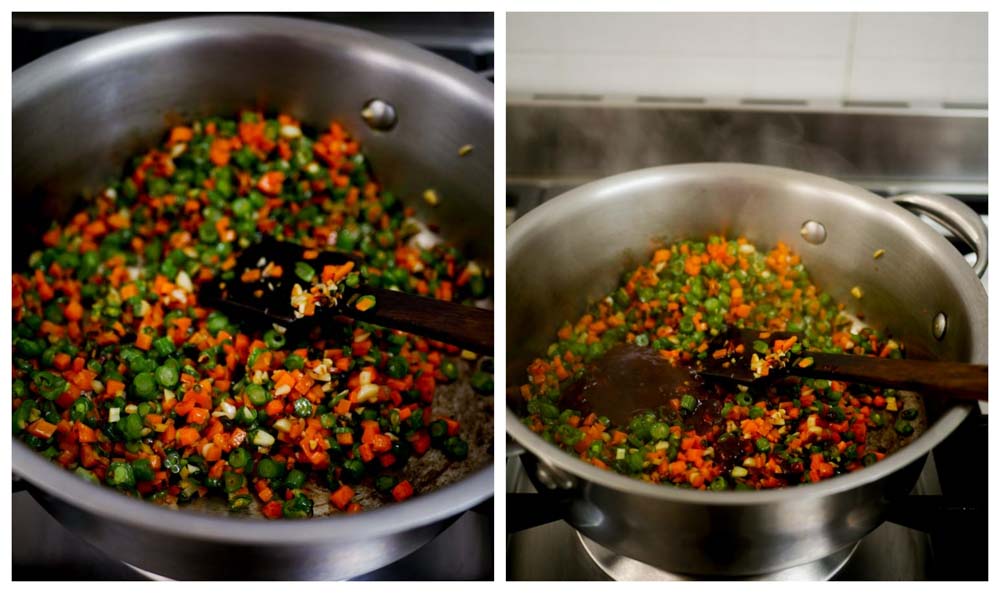
Add in the sauces to the pan. Saute for a couple of minutes.
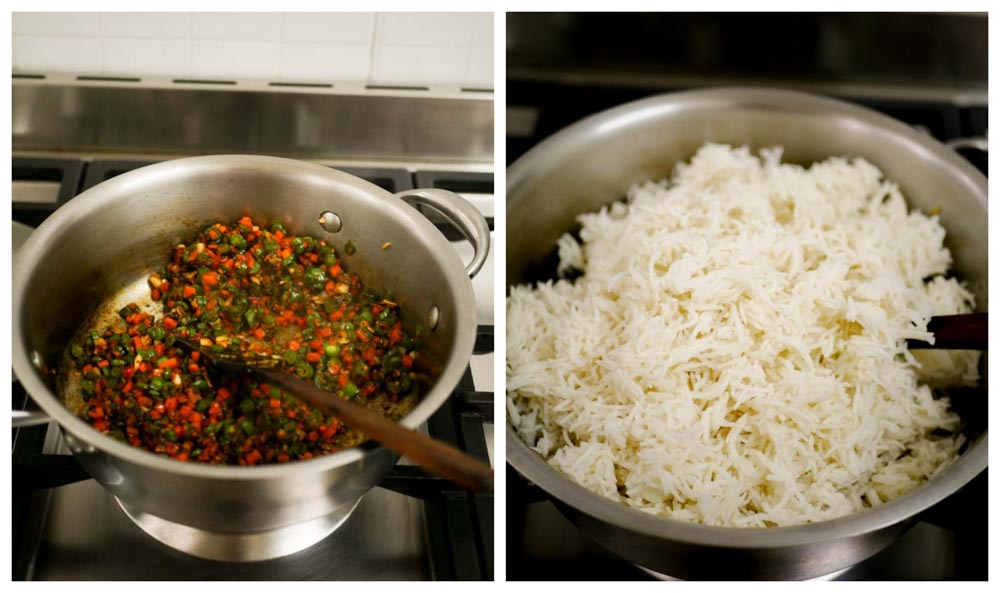
Add in the cooled rice. Saute for a couple of minutes more. Cold rice works best while making any kind of fried rice. Overnite rice is the best.
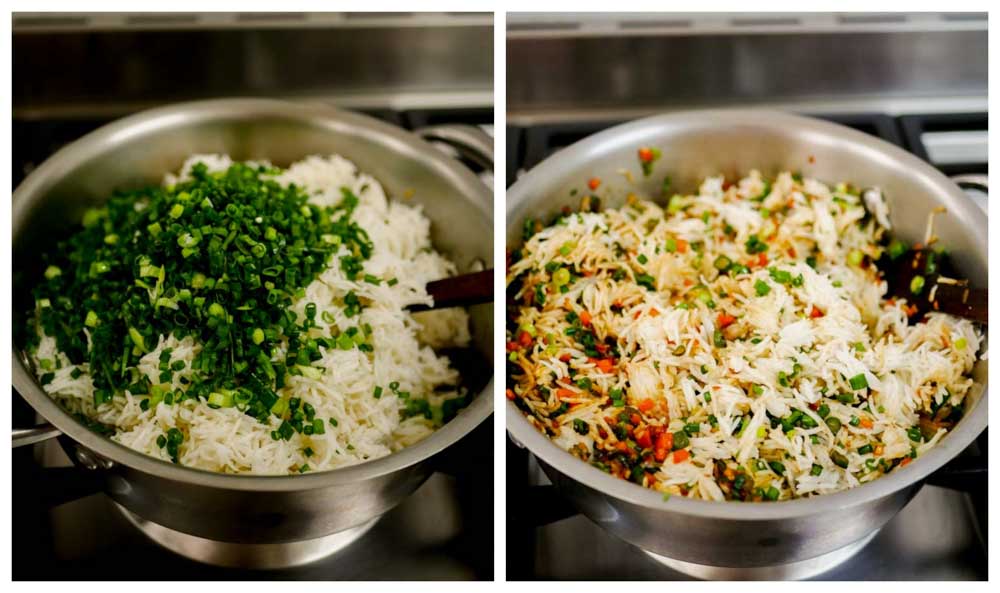
Add in the chopped spring onions. Mix well.
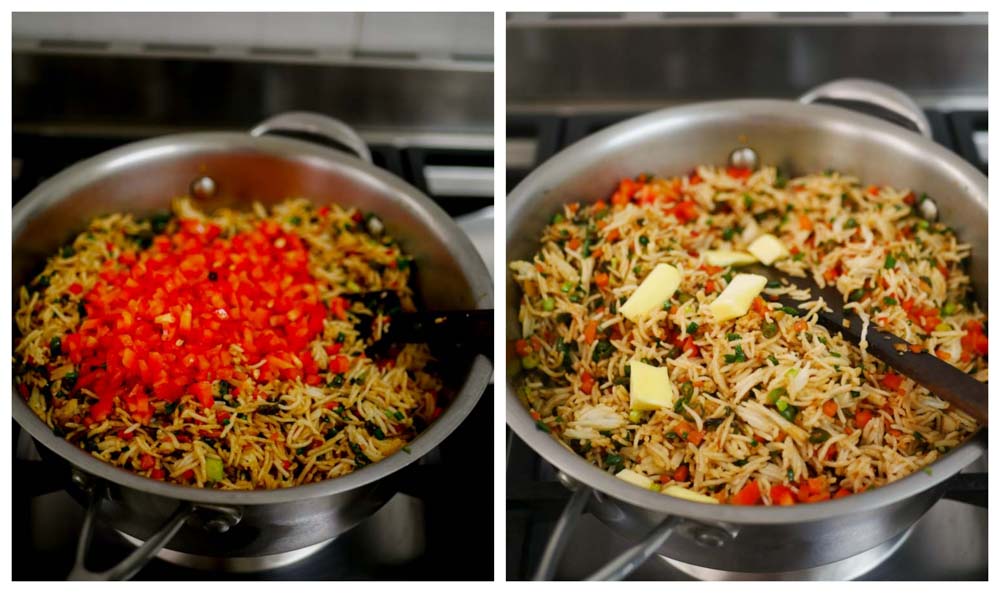
Add in the capsicum. I like to add the capsicum at last so it stays crunchy. Finally add in the butter. Butter is the secret to a good restaurant style fried rice. It gives a delicious flavour to the rice and makes it really rich.
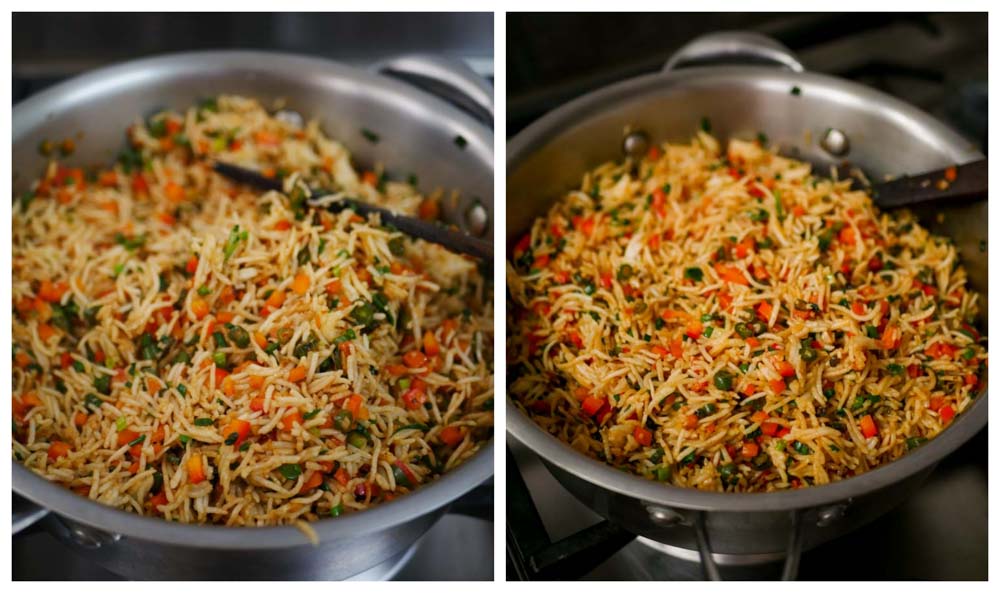
Briefly saute for a minute and switch off the flame.

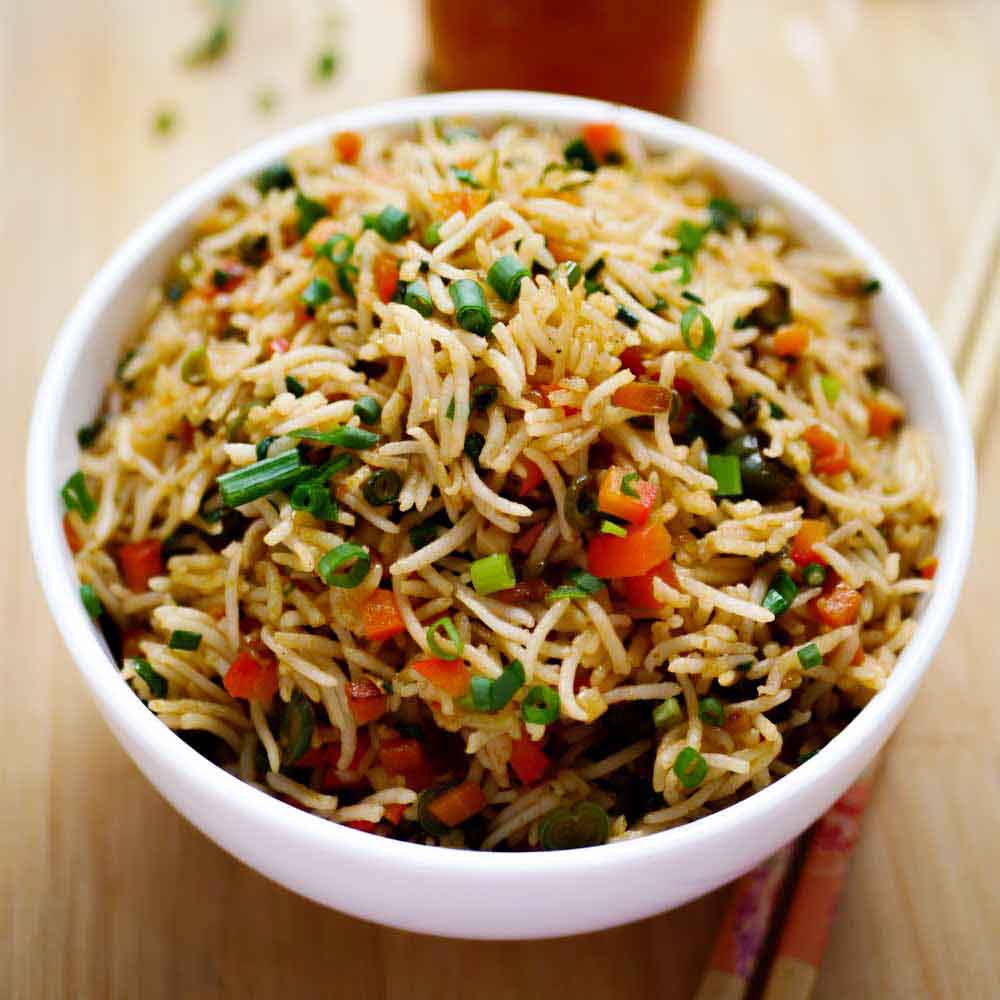
Schezwan veg fried rice is ready. Serve with gobi manchurian , chilli paneer or sweet and sour fish
1.5 cups basmati rice (cook as instructed above)
2 tablespoon peanut oil
10 cloves garlic, finely minced
1 inch ginger, finely minced
2 cups finely chopped veggies
1/4 teaspoon salt
1/2 teaspoon black pepper powder
1 teaspoon sugar
1 tablespoon schezwan paste
1 tablespoon tomato ketchup
1 teaspoon red chilli sauce
2 teaspoon soya sauce
1/3 cup finely chopped spring onion
1 capsicum, finely chopped
1 tablespoon butter, unsalted
Heat oil in a pan and add in the finely minced garlic and finely minced ginger. Fry for a couple of minutes. No need to fry for a long time. Just a couple of minutes is enough.
Add in the veggies and saute for 3-4 minutes.
Take a bowl and add in the salt, pepper powder, sugar and the sauces. The little sugar will balance the taste. Mix well. Add a little water if the sauce is too thick. If you want a very spicy fried rice, add a little more of the Schezwan paste. You can also add red chilli flakes if you like. Add in the sauces to the pan. Saute for a couple of minutes.
Add in the cooled rice. Saute for a couple of minutes more. Cold rice works best while making any kind of fried rice. Overnite rice is the best.
Add in the chopped spring onions. Mix well. Add in the capsicum. I like to add the capsicum at last so it stays crunchy. Add in the butter.
Briefly saute for a minute and switch off the flame.
Notes
There is no need to use additional salt. I have used just 1/4 teaspoon. The sauces are already very salty. So be cautious while adding salt.
- Author: Suguna Vinodh
- Prep Time: 15m
- Cook Time: 20m
Find it online : https://www.kannammacooks.com/schezwan-veg-fried-rice-recipe/
Mushroom Dum Biryani Recipe / Hyderabadi style Mushroom Biryani Recipe – Lip-smacking biryani recipe from scratch home-style. Recipe with step by step pictures.
Let me say it before you start. The time you spend to make this Mushroom Dum Biryani Recipe will be worth it. Ideal for a Sunday lunch and I promise you wont miss the meat. This Hyderabadi style mushroom biryani is lip-smacking and super delicious that you will always have that little extra serving than usual. Get ready for the little Sunday nap after biryani over dose. Here is how to do it homestyle. There are a lot of versions of Hyderabadi biryani and this is my version. There is no right and wrong when it comes to recipes. Just follow your heart and do what your family likes at the table.
Here is how to do Mushroom Dum Biryani Recipe / Hyderabadi style Mushroom Biryani Recipe There is a lot of prep work required for making this layered mushroom biryani. The first one is cooking the rice to the desired consistency. For making layer biryani’s, I prefer to use Daawat basmati rice or Lal Qila basmati rice. These two brands work really well and the rice cooks nicely as long grains without becoming mushy.
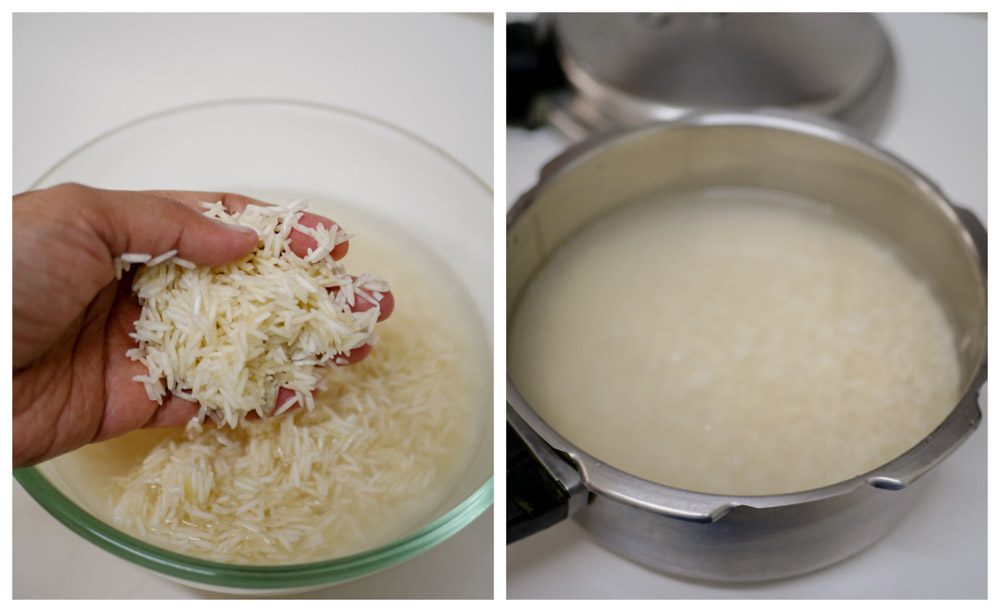
RICE For any biryani, the first step is to soak the rice for at-least 20 minutes to half an hour. The soaking helps in keeping the grains separate when cooked later-on. I have used two cups of basmati rice (approximately about 500 ml). I have used the pressure cooker to cook my rice. After 20 minutes of soaking the rice, gently drain the water. Add it to the pressure cooker and add 2.5 cups of water. For every cup of rice used, I have added 1+1/4 cups of water. Note: You can use the same qty of water and cook the rice in a rice cooker too! It works.
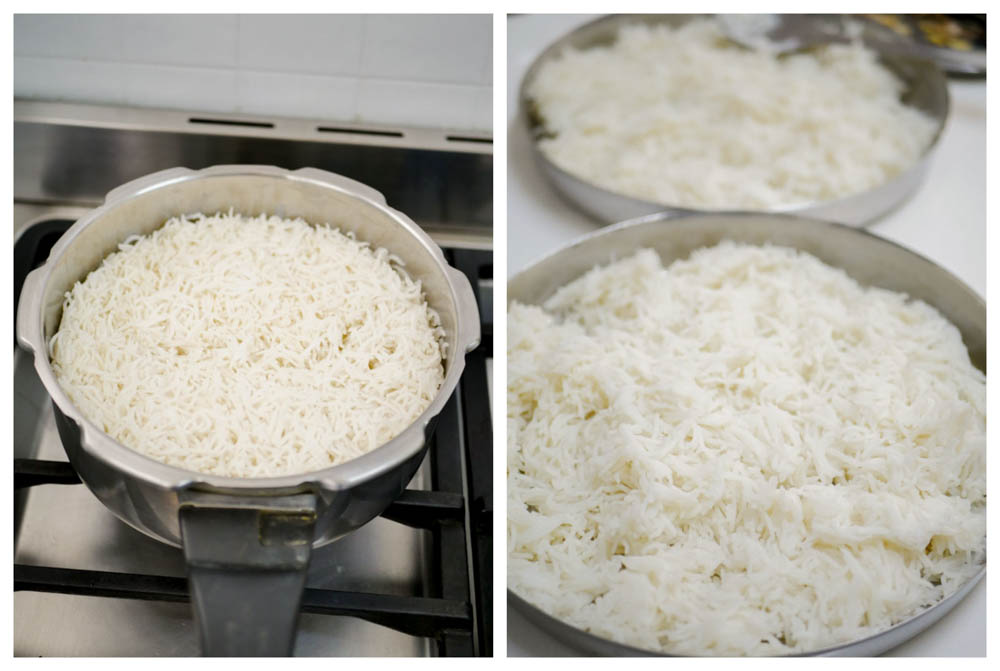
Cook for exactly 2 whistles and switch off the flame. Wait for the pressure in the cooker to settle down. It will take about 10-12 minutes for the pressure to settle. Once the pressure is off, remove the rice from the cooker and spread it on plates to completely cool. By any chance, if the rice is slightly sticky to the touch, don’t worry. The small lumps will go away when we do the final DUM.
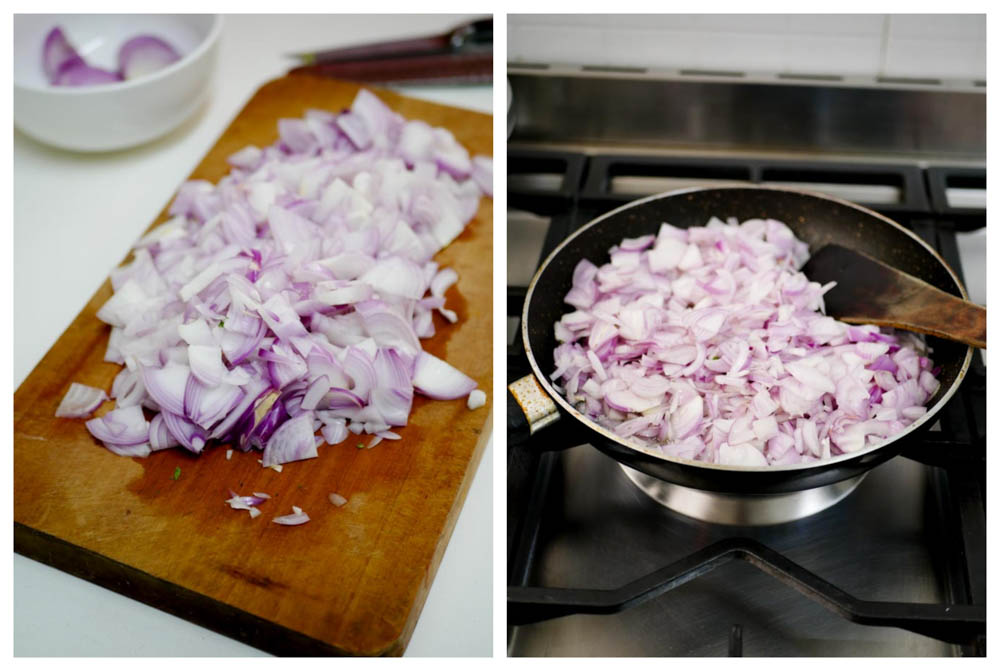
DEEP FRIED ONIONS – BIRISTA Another thing about Hyderabadi style biryani is the addition of the wonderful crispy deep fried onions called the birista or the bristha . Here is how I do it. Take about 500 grams of onions and slice it thinly. Add oil to the pan and add in the onions. Now, fried onions take anywhere between 20-25 minutes to get that deep brown colour. This is the first thing I start in the kitchen when making biryani so I can get all the other prep work done when the onions are cooking and doing its magic.

The onions would slowly start to brown and change colour to a deep cocoa. Keep sauteing every couple of minutes as the onions in the corner of the pan tend to brown faster. So keep moving and mixing things.
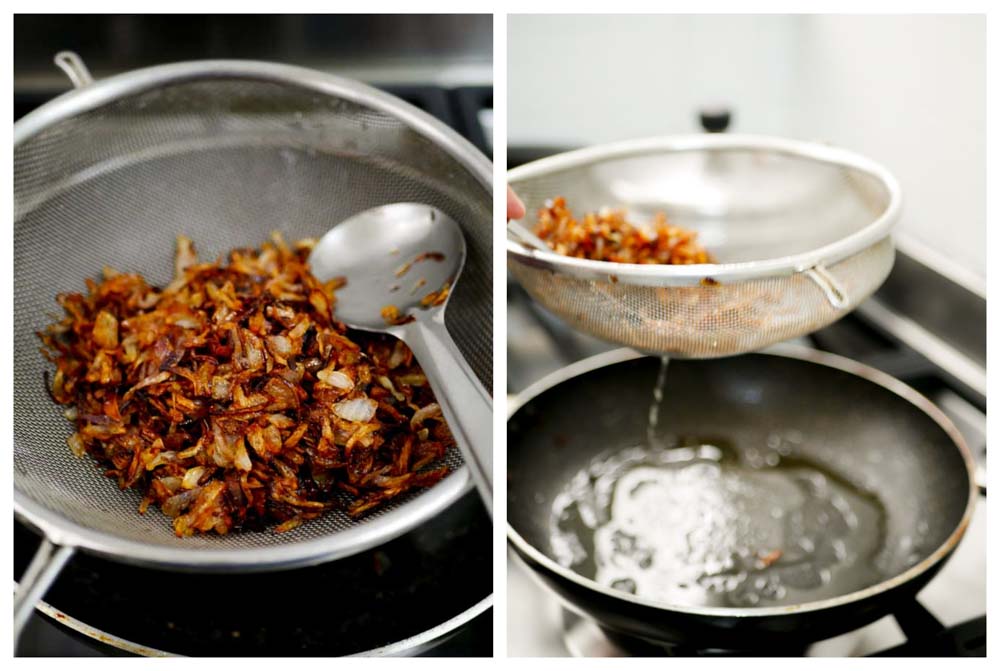
Once the onions are nice and brown, remove the onions and place it on a strainer. Press with a spatula to get rid of all the excess oil. Drain the onions on a paper towel. Set aside.

ROASTING NUTS We will use the same oil that is remaining after frying the onions for frying the cashew-nuts. The leftover oil is very flavorful. Add in the cashews and saute for a couple of minutes till its golden. My son loves to crunch on these cashews. So I always add a little extra. If you do not want a lot of nuts, feel free to add or reduce according to your taste. Drain the cashews on a paper towel and set aside.
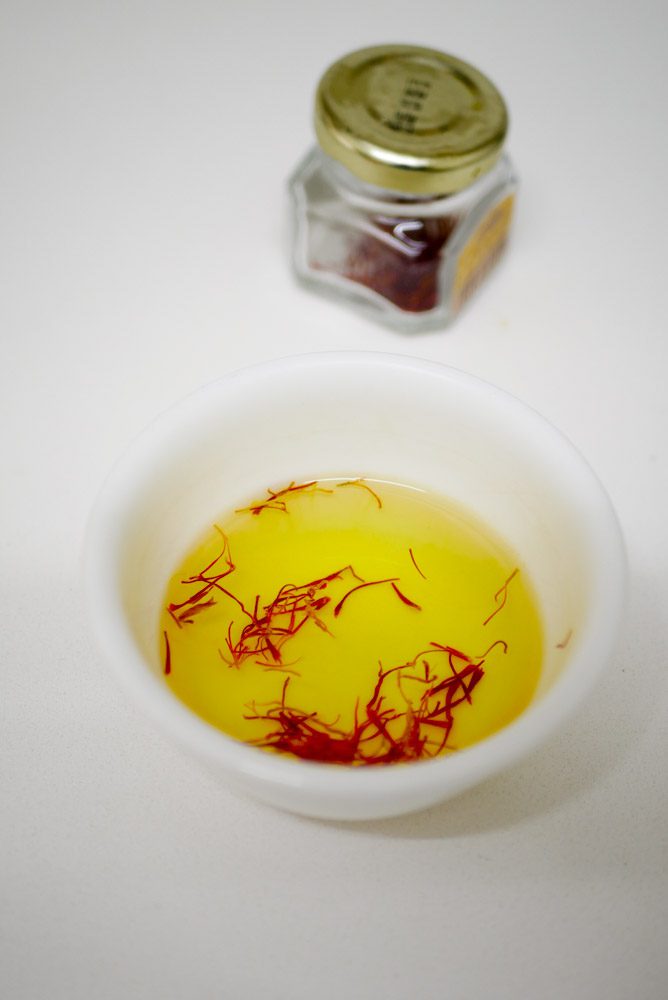
SAFFRON PREP Soak the saffron in quarter cup of really hot water. You can also soak it in milk but I like to do it in hot water.
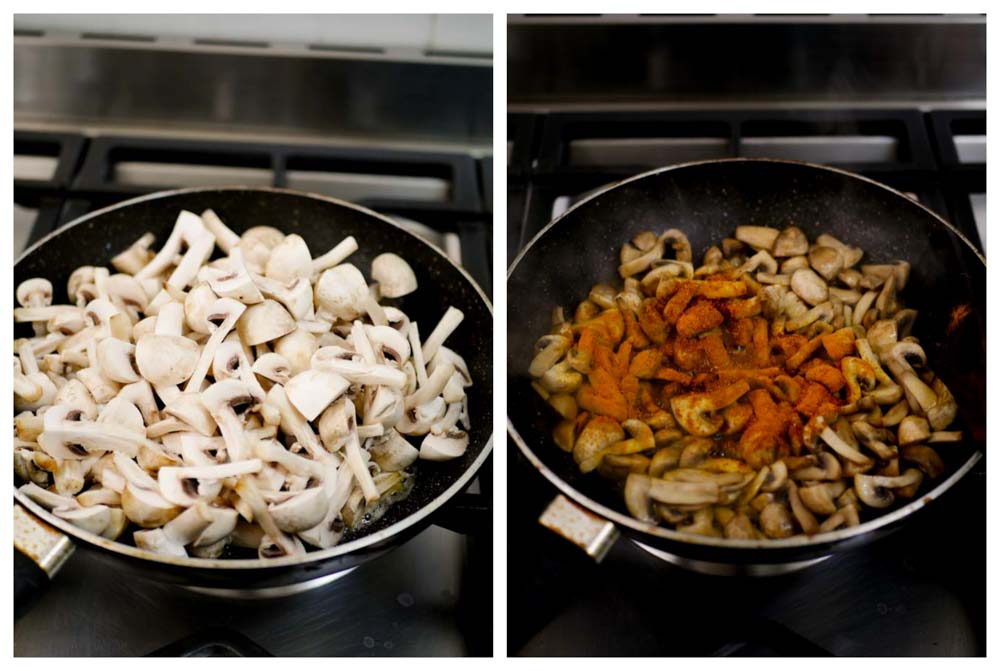
COOKING MUSHROOMS Chop each mushroom into four pieces. Add in the chopped mushrooms to the pan. I have used button mushrooms today. The little oil remaining after frying cashews would suffice. If there is no leftover oil remaining, add in a teaspoon of oil. Add in quarter teaspoon of salt. The mushrooms will start to leave its moisture / water and will start to shrink. Add in the turmeric powder and the biryani masala. Note: I really like the “Kohinoor biryani masala” that is available these days. Another masala brand I use is “Shan Masala”. Use whatever masala you like. Homemade / store-bought – all is OK.
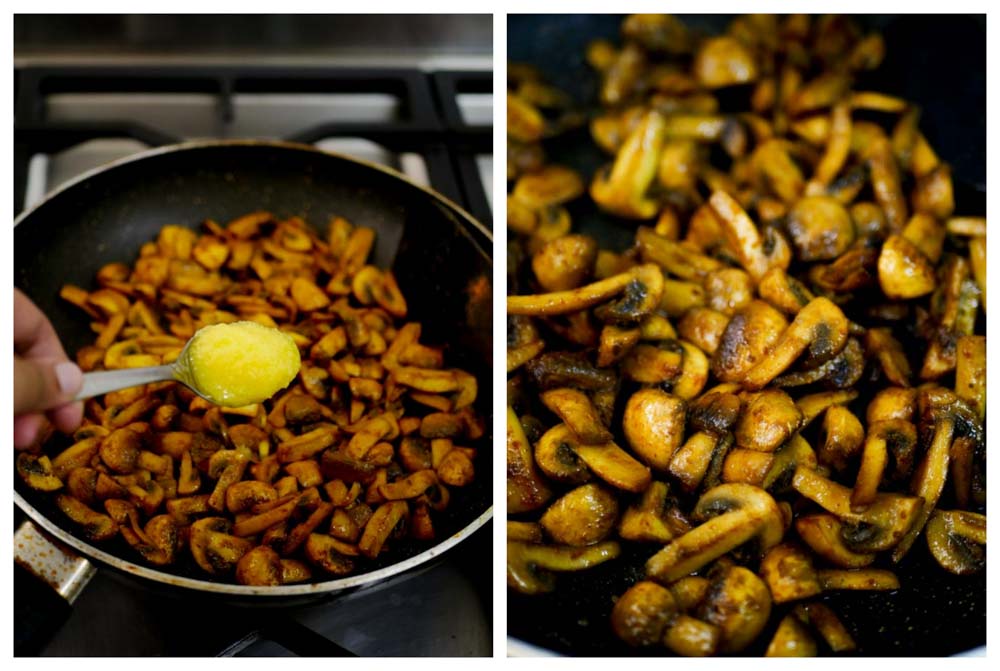
When the water has dried up and the mushrooms have shrunk, add in the ghee. Roast the mushrooms for 2-3 minutes till the mushrooms are charred here and there. Remove the mushrooms and set aside on a plate to cool. Ghee is the only non-vegan thing in this recipe. If you are vegan, substitute the ghee with coconut oil.
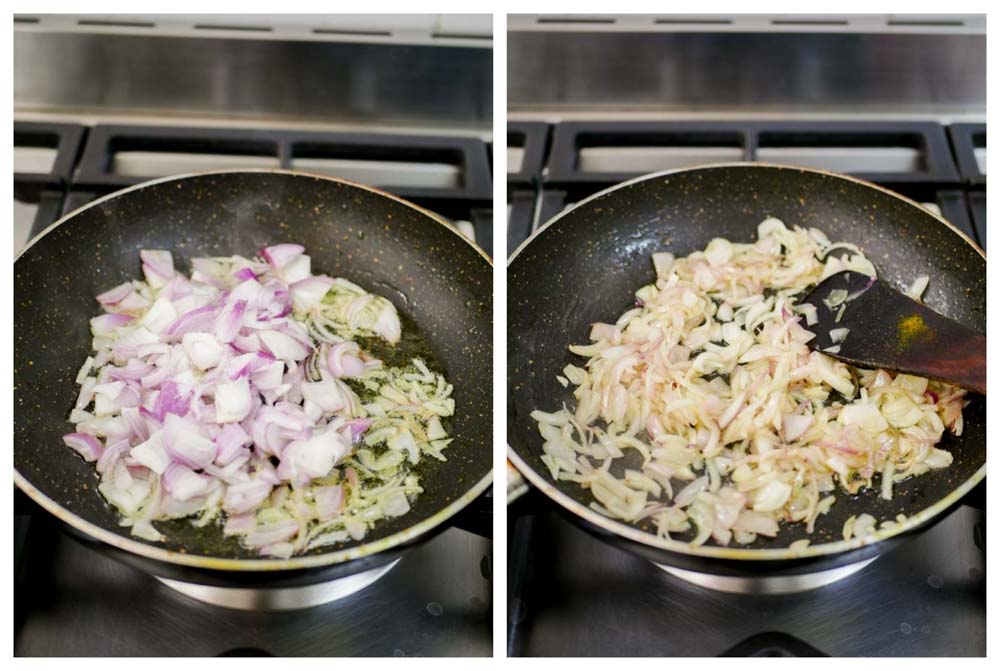
THE BIRYANI GRAVY FOR THE MUSHROOM DUM BIRYANI In the same pan add in a tablespoon of oil. Add in the sliced onions. Saute for a couple of minutes till the onions are soft.
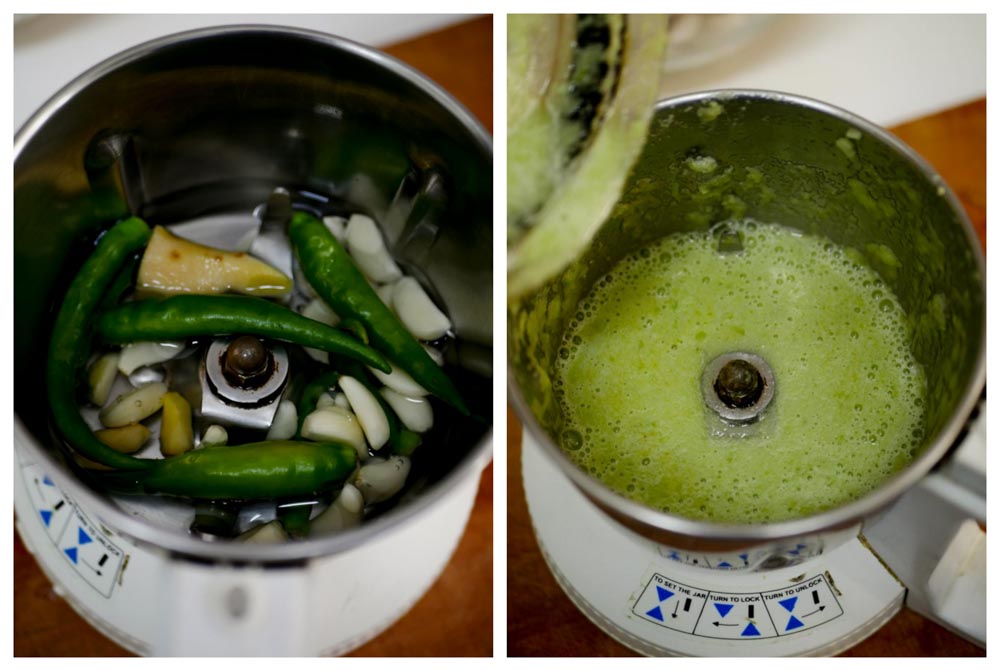
While the onions are sauteing, take a small mixie jar and make a paste of garlic, green chillies and ginger. Add a little water to grind. If you want a spicy biryani, adjust the chillies according to your taste.
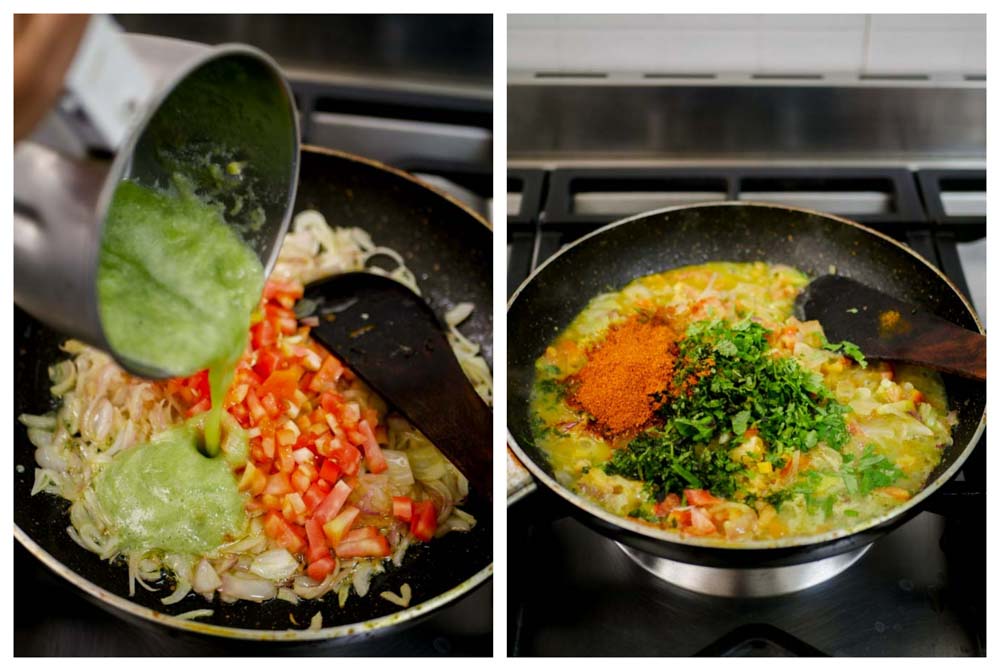
Add in the chopped tomatoes and the ground ginger-garlic-green chilli paste. Wash the mixie with quarter cup of water and add it back to the pan. Add in the mint leaves and coriander leaves. Add in the biryani masala. Add a teaspoon of salt to the gravy. Store bought biryani masala usually has some amount of salt. So go easy on the salt. We can adjust the seasoning later.
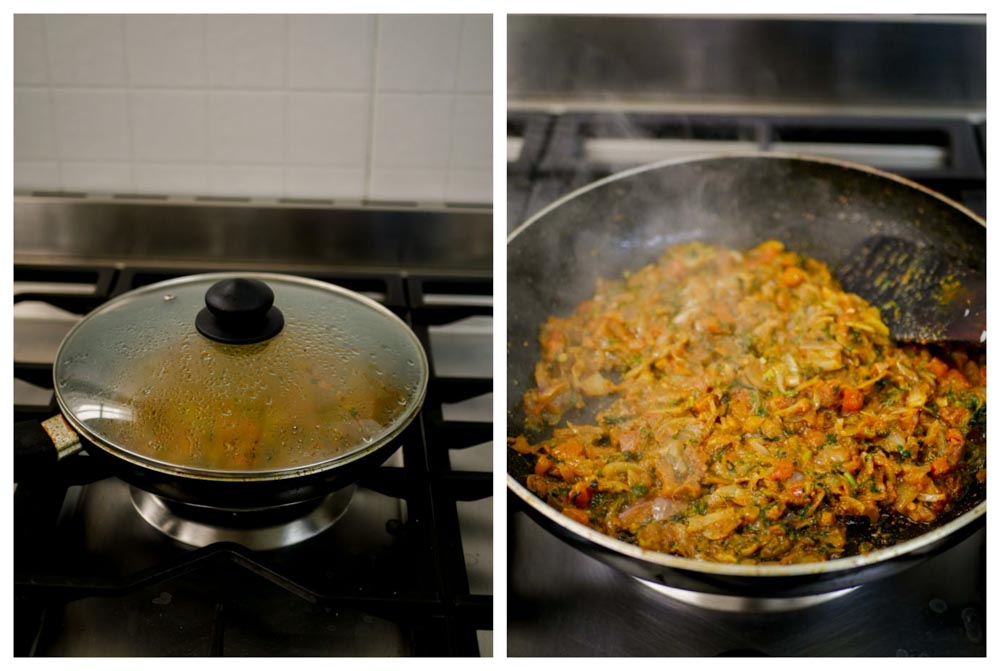
Cover the pan and cook for five minutes till the tomatoes are soft and mushy.
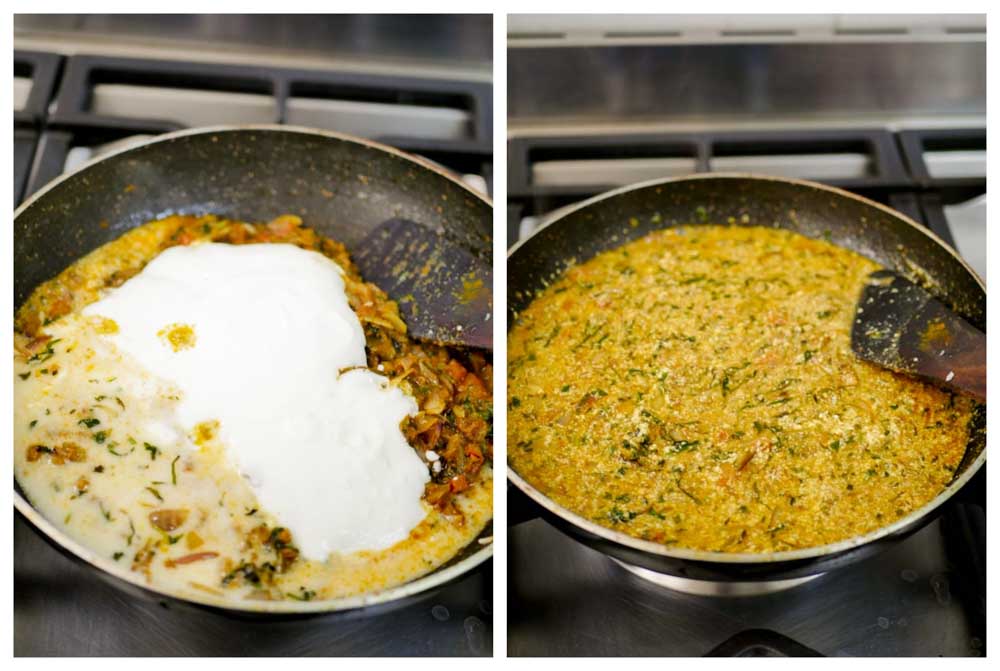
Add in about 200ml of plain yogurt / curd. Whisk the curd and then add to the pan. Add quarter cup of water along. Cover the pan and cook for three – four minutes on a medium flame.
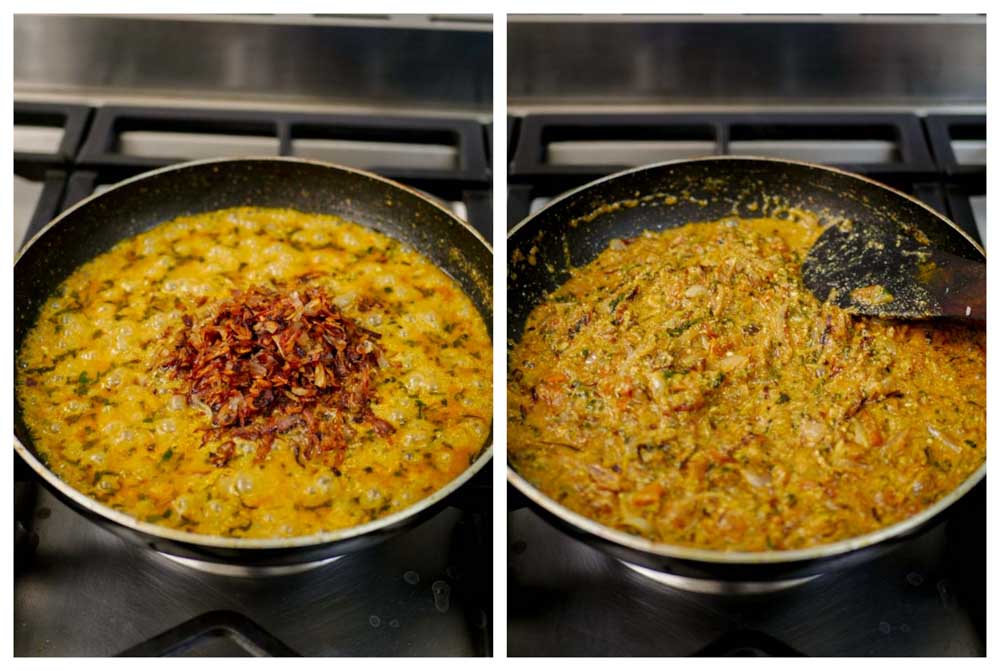
Reserve quarter cup of the fried onions for garnish. Add in the rest of the fried onions / Birista to the pan.
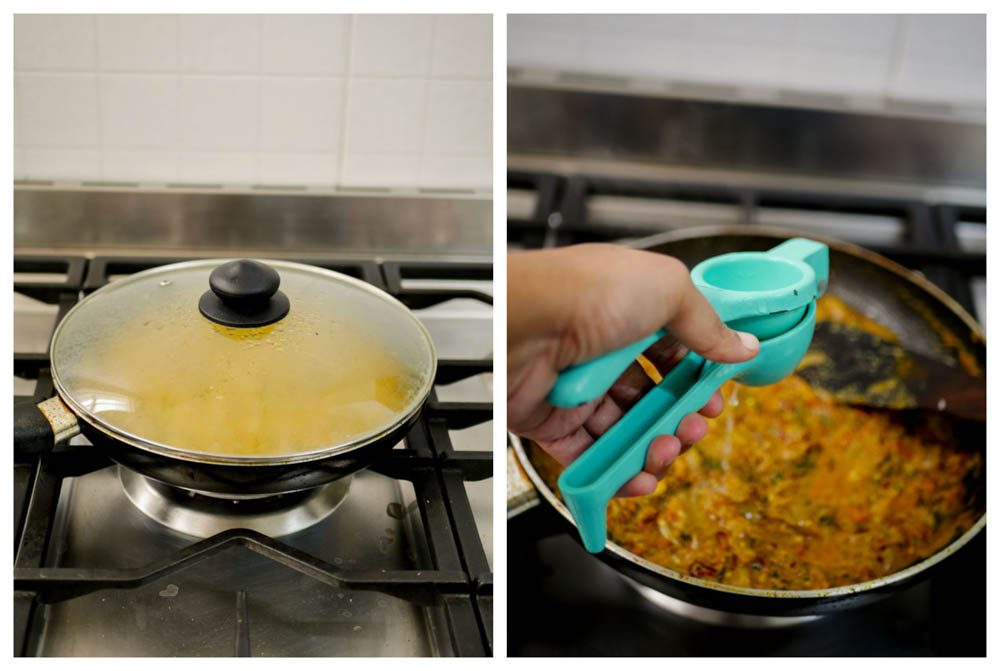
Mix well, cover the pan and let the gravy simmer for another three to four minutes until the gravy is thick. Switch off the flame and add in juice of half a lemon.

Biryani gravy is done. The gravy should not be very watery. Check for seasoning at this stage and add more salt if necessary.
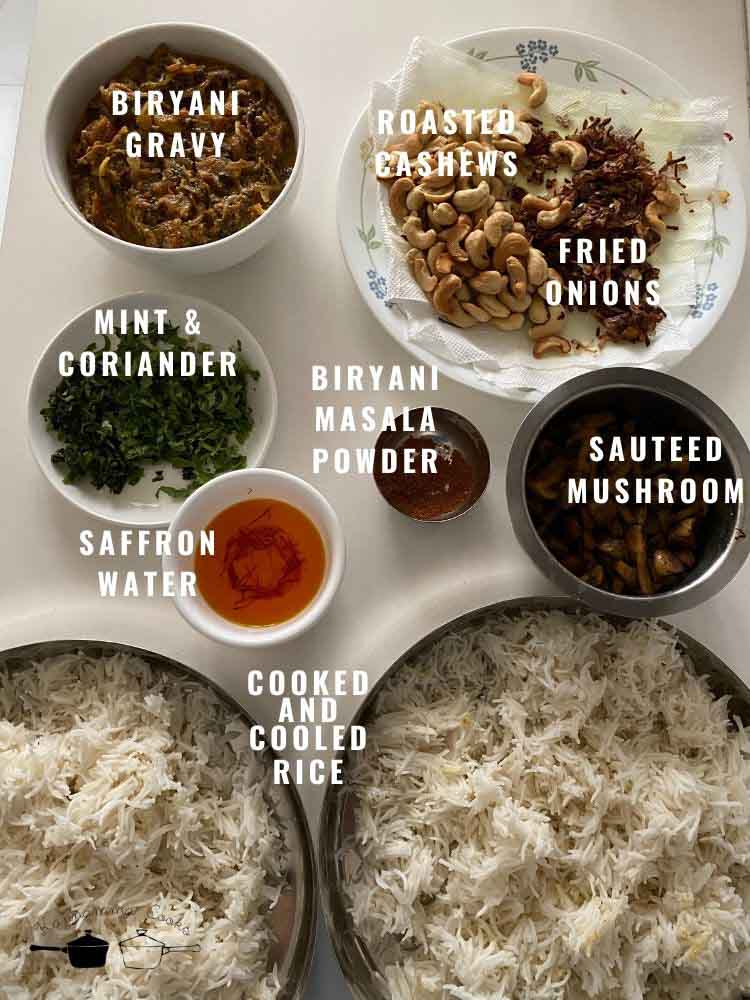
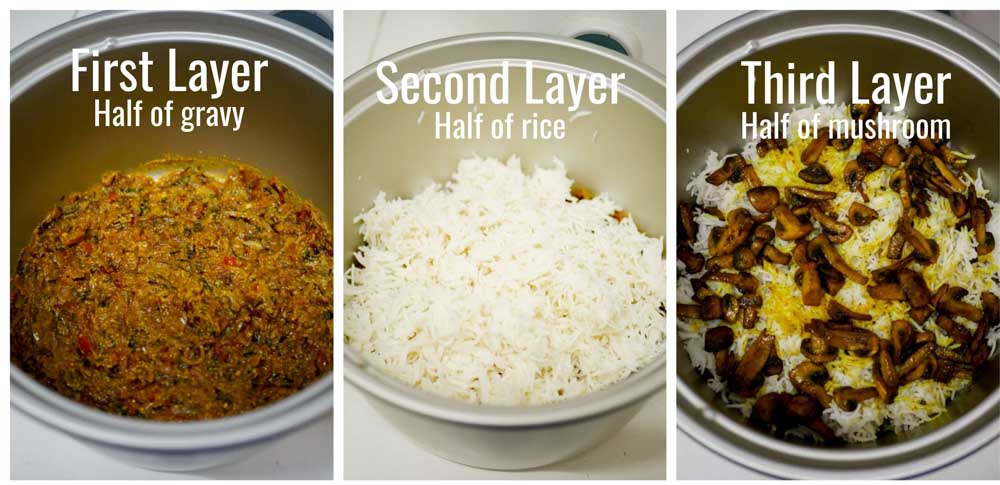
FINAL LAYERING Get all the prepped food ready. We will layer the Mushroom Dum Biryani / Hyderabadi style Mushroom Biryani. Now we will layer and put the biryani on DUM. We will be doing a two parts layered biryani. So we will split all the prepped food in half and start layering. Take a bowl / pan and add in half of the biryani gravy at the bottom of the pan. Spread evenly with a spatula. Top it with half of the rice. Followed by half of the mushrooms. Make sure that the mushrooms are spread evenly and is not concentrated only on one place. Make sure that the whole area in the bowl / pan is covered evenly with mushrooms.
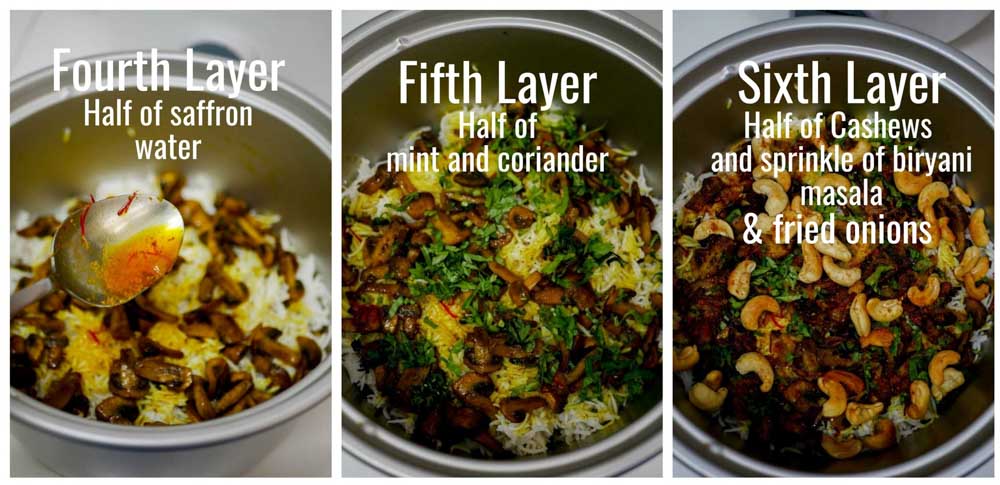
Top the mushrooms with half of the saffron water. Sprinkle the water evenly. Followed by a sprinkle of coriander and mint. Then add in half of the cashews and half of the remaining fried onions. Sprinkle a pinch of biryani masala on top.
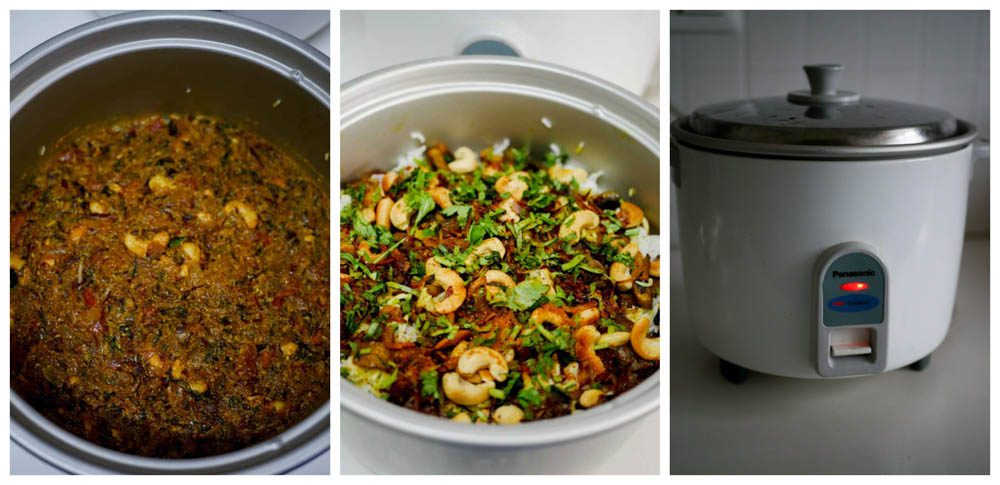
Thats one big “row” of biryani done. Now repeat the layering again. So two “rows” of biryani layering is done. Now the biryani is ready for DUM. The DUM can be done in several ways. I have done it in the rice cooker. Place the layered biryani in a rice cooker for 12 minutes or until the auto switch goes off. Let it rest for another 10 minutes before you serve. Stove top method – Heat a dosa tawa or a griddle. Place the prepared biryani pan on top of the griddle. Keep the flame on a low simmer and let it cook for 15 minutes. Let it rest for another 10 minutes before you serve. Oven Method – Place the biryani bowl in a preheated 200C oven for 15 minutes. Remove from the oven. Let it rest for another 10 minutes before you serve.

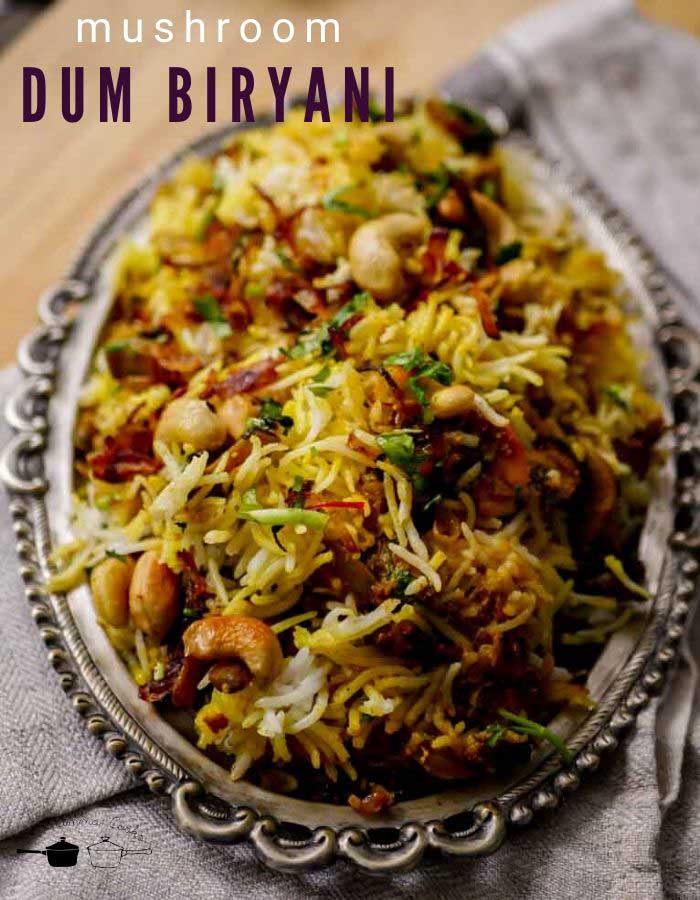
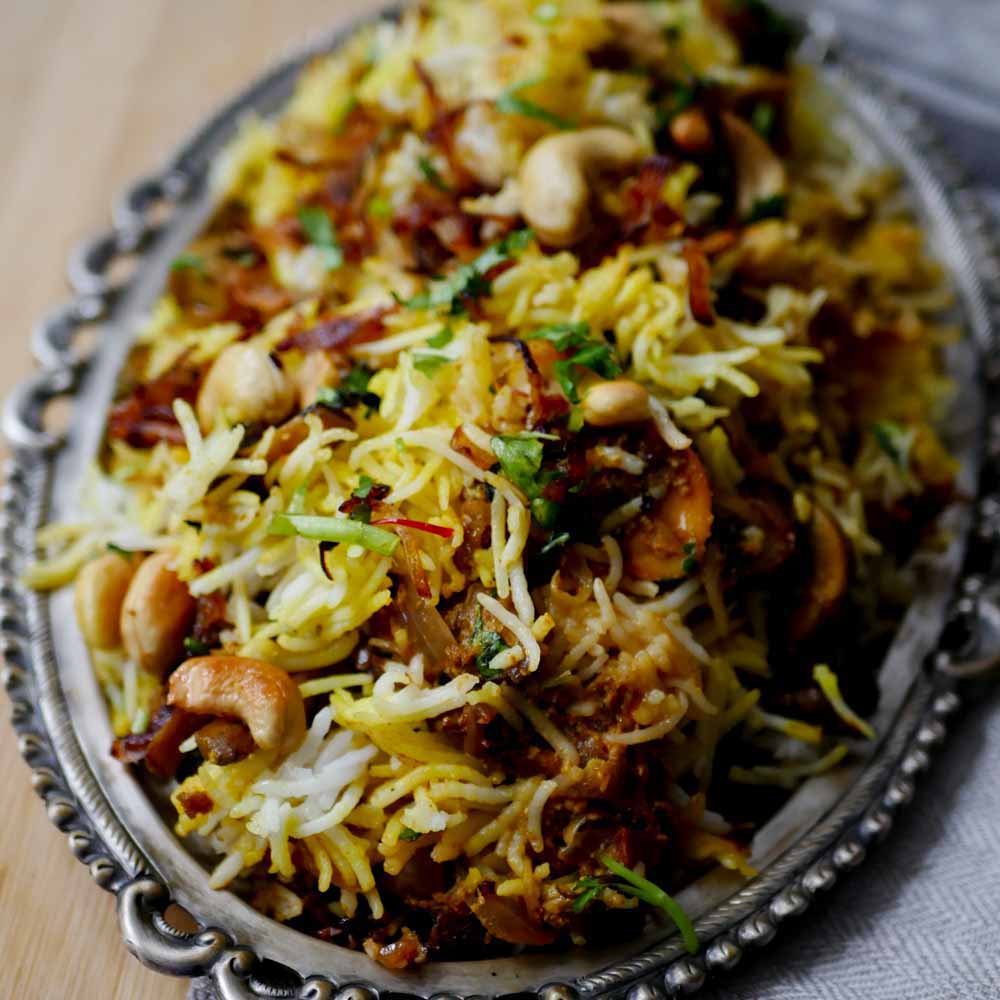
Fantastic Mushroom Dum Biryani / Hyderabadi style Mushroom Biryani Recipe is ready. Serve hot.
Cooking Rice
- 2 cups basmati rice
- 2.5 cups water
Birista / Fried Onions
- 500 grams red onions, sliced
- 1/3 cup vegetable oil
Roasting Nuts
- 1/2 cup to 1 cup cashews
Saffron Water
- a big pinch of saffron
- 1/4 cup of hot water
Cooking Mushrooms
- 400 grams mushroom
- 1/4 teaspoon salt
- 1/2 teaspoon turmeric powder
- 1/2 teaspoon biryani masala
- 1 teaspoon ghee
The biryani gravy
- 1 tablespoon vegetable oil
- 1/2 cup red onions, sliced
- 12 cloves garlic
- 1 inch piece ginger
- 5 green chillies
- 2 tomatoes, chopped
- 1/4 cup chopped mint leaves
- 1/4 cup chopped coriander leaves
- 1 tablespoon biryani masala
- 1 teaspoon salt
- 200 ml plain yogurt / curd
- Juice of 1/2 a lemon
Final Layering
- 2 tablespoon chopped mint leaves
- 2 tablespoon chopped coriander leaves
- 1/4 teaspoon biryani masala
Rice – Soak the rice for 20 minutes. Drain the water and add in 2.5 cups of fresh water. Cook for exactly 2 whistles and switch off the flame. Wait for the pressure in the cooker to settle down. It will take about 10-12 minutes for the pressure to settle. Once the pressure is off, remove the rice from the cooker and spread it on plates to completely cool.
Birista – Another thing about Hyderabadi style biryani is the addition of the wonderful crispy deep fried onions called the birista or the bristha . Here is how I do it. Take about 500 grams of onions and slice it thinly. Add oil to the pan and add in the onions. Now, fried onions take anywhere between 20-25 minutes to get that deep brown colour. This is the first thing I start in the kitchen when making biryani so I can get all the other prep work done when the onions are cooking and doing its magic. The onions would slowly start to brown and change colour to a deep cocoa. Keep sauteing every couple of minutes as the onions in the corner of the pan tend to brown faster. So keep moving and mixing things. Once the onions are nice and brown, remove the onions and place it on a strainer. Press with a spatula to get rid of all the excess oil. Drain the onions on a paper towel. Set aside.
Roast Cashews – We will use the same oil that is remaining after frying the onions for frying the cashew-nuts. The leftover oil is very flavorful. Add in the cashews and saute for a couple of minutes till its golden. My son loves to crunch on these cashews. So I always add a little extra. If you do not want a lot of nuts, feel free to add or reduce according to your taste. Drain the cashews on a paper towel and set aside.
Saffron Water – Soak the saffron in quarter cup of really hot water. You can also soak it in milk but I like to do it in hot water.
Cook the Mushrooms – Chop each mushroom into four pieces. Add in the chopped mushrooms to the pan. I have used button mushrooms today. The little oil remaining after frying cashews would suffice. If there is no leftover oil remaining, add in a teaspoon of oil. Add in quarter teaspoon of salt. The mushrooms will start to leave its moisture / water and will start to shrink. Add in the turmeric powder and the biryani masala. When the water has dried up and the mushrooms have shrunk, add in the ghee. Roast the mushrooms for 2-3 minutes till the mushrooms are charred here and there. Remove the mushrooms and set aside on a plate to cool.
Biryani Gravy – In the same pan add in a tablespoon of oil. Add in the sliced onions. Saute for a couple of minutes till the onions are soft. While the onions are sauteing, take a small mixie jar and make a paste of garlic, green chillies and ginger. Add a little water to grind. If you want a spicy biryani, adjust the chillies according to your taste. Add in the chopped tomatoes and the ground ginger-garlic-green chilli paste. Wash the mixie with quarter cup of water and add it back to the pan. Add in the mint leaves and coriander leaves. Add in the biryani masala. Add a teaspoon of salt to the gravy. Store bought biryani masala usually has some amount of salt. So go easy on the salt. We can adjust the seasoning later.
Cover the pan and cook for five minutes till the tomatoes are soft and mushy. Add in about 200ml of plain yogurt / curd. Whisk the curd and then add to the pan. Add quarter cup of water along. Cover the pan and cook for three – four minutes on a medium flame. Reserve quarter cup of the fried onions for garnish. Add in the rest of the fried onions / Birista to the pan. Mix well, cover the pan and let the gravy simmer for another three to four minutes until the gravy is thick. Switch off the flame and add in juice of half a lemon. Biryani gravy is done. The gravy should not be very watery. Check for seasoning at this stage and add more salt if necessary.
Get all the prepped food ready. We will layer the Mushroom Dum Biryani / Hyderabadi style Mushroom Biryani. We will be doing a two parts layered biryani. So we will split all the prepped food in half and start layering. Take a bowl / pan and add in half of the biryani gravy at the bottom of the pan. Spread evenly with a spatula. Top it with half of the rice. Followed by half of the mushrooms. Make sure that the mushrooms are spread evenly and is not concentrated only on one place. Make sure that the whole area in the bowl / pan is covered evenly with mushrooms. Top the mushrooms with half of the saffron water. Sprinkle the water evenly. Followed by a sprinkle of coriander and mint. Then add in half of the cashews and half of the remaining fried onions. Sprinkle a pinch of biryani masala on top.
Thats one big “row” of biryani done. Now repeat the layering again. So two “rows” of biryani layering is done. Now the biryani is ready for DUM. The DUM can be done in several ways. I have done it in the rice cooker. Place the layered biryani in a rice cooker for 12 minutes or until the auto switch goes off. Let it rest for another 10 minutes before you serve. Stove top method – Heat a dosa tawa or a griddle. Place the prepared biryani pan on top of the griddle. Keep the flame on a low simmer and let it cook for 15 minutes. Let it rest for another 10 minutes before you serve. Oven Method – Place the biryani bowl in a preheated 200C oven for 15 minutes. Remove from the oven. Let it rest for another 10 minutes before you serve.
Fantastic Mushroom Dum Biryani / Hyderabadi style Mushroom Biryani Recipe is ready. Serve hot.
- Author: Suguna Vinodh
- Prep Time: 1 hour
- Cook Time: 30m
