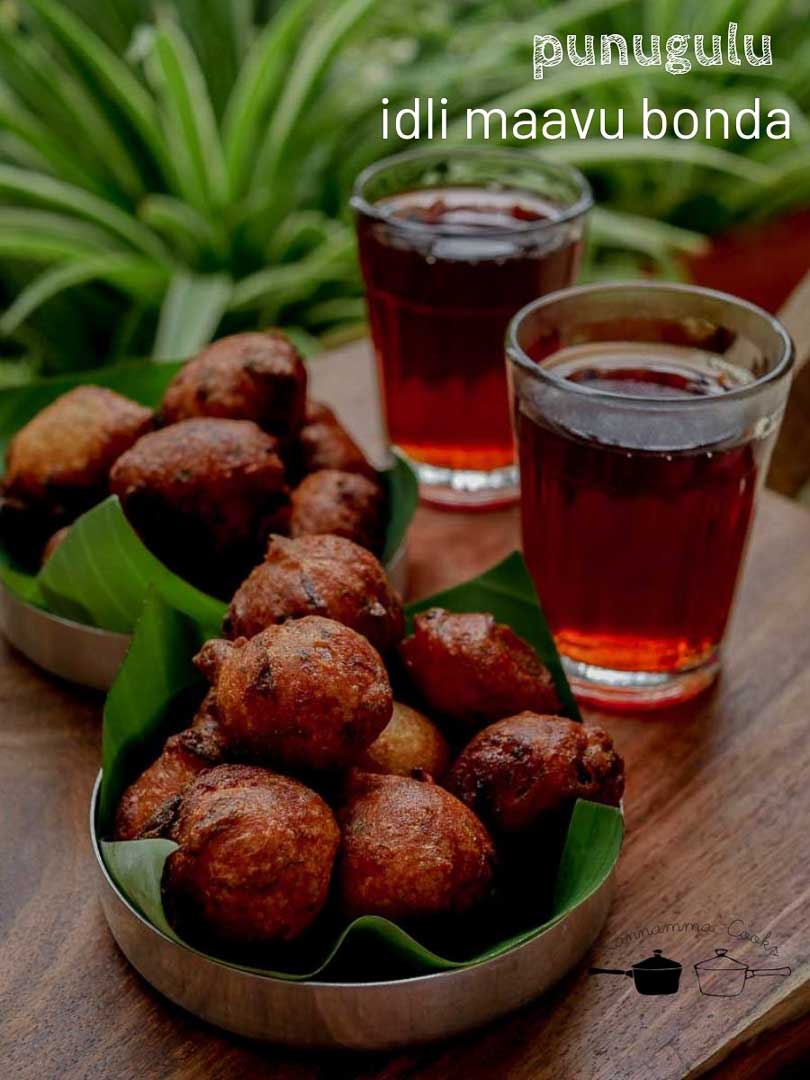
Punugulu Recipe. Punugulu is also called in Tamilnadu as Idli Maavu Bonda. Here is the recipe for making Punugulu / Idli Maavu Bonda from idli-dosa batter.
This is a favorite snack for a lot of South Indians. Whether you call it as punugulu or idli maavu bonda, this is one addictive snack that’s made with old idli dosa batter that has gone a little sour. The batter is mixed with maida or rice flour and made into a thick batter with the addition of sour curd / yogurt. These deep fried babies are very very addictive and makes for an excellent tea time snack. The crisp texture followed by the spicy and sour taste makes this dish a winner. I like to make it extra spicy by adding in a lot of finely chopped green chillies. The batter can take it all. Do try them at home.
The main ingredient in this recipe is the idli-dosa batter. Here is my everyday idli-dosa batter recipe that I use for making both idli and dosai’s. https://www.kannammacooks.com/how-to-make-soft-idli-recipe/ Here is how to make Idly Maavu Bonda / Punugulu Take about 2 cups of idli-dosa batter and add it to a bowl. Preferably 3-4 day old dosa batter. As the idli-dosa batter ages, it becomes a little sour and is perfect for this recipe. In fact, older the better. The bonda / punugulu tastes really good if its a little sour. Add in half a cup of maida and salt. (In some households they add rice flour instead of maida and that gives a different taste. I like the maida version.)
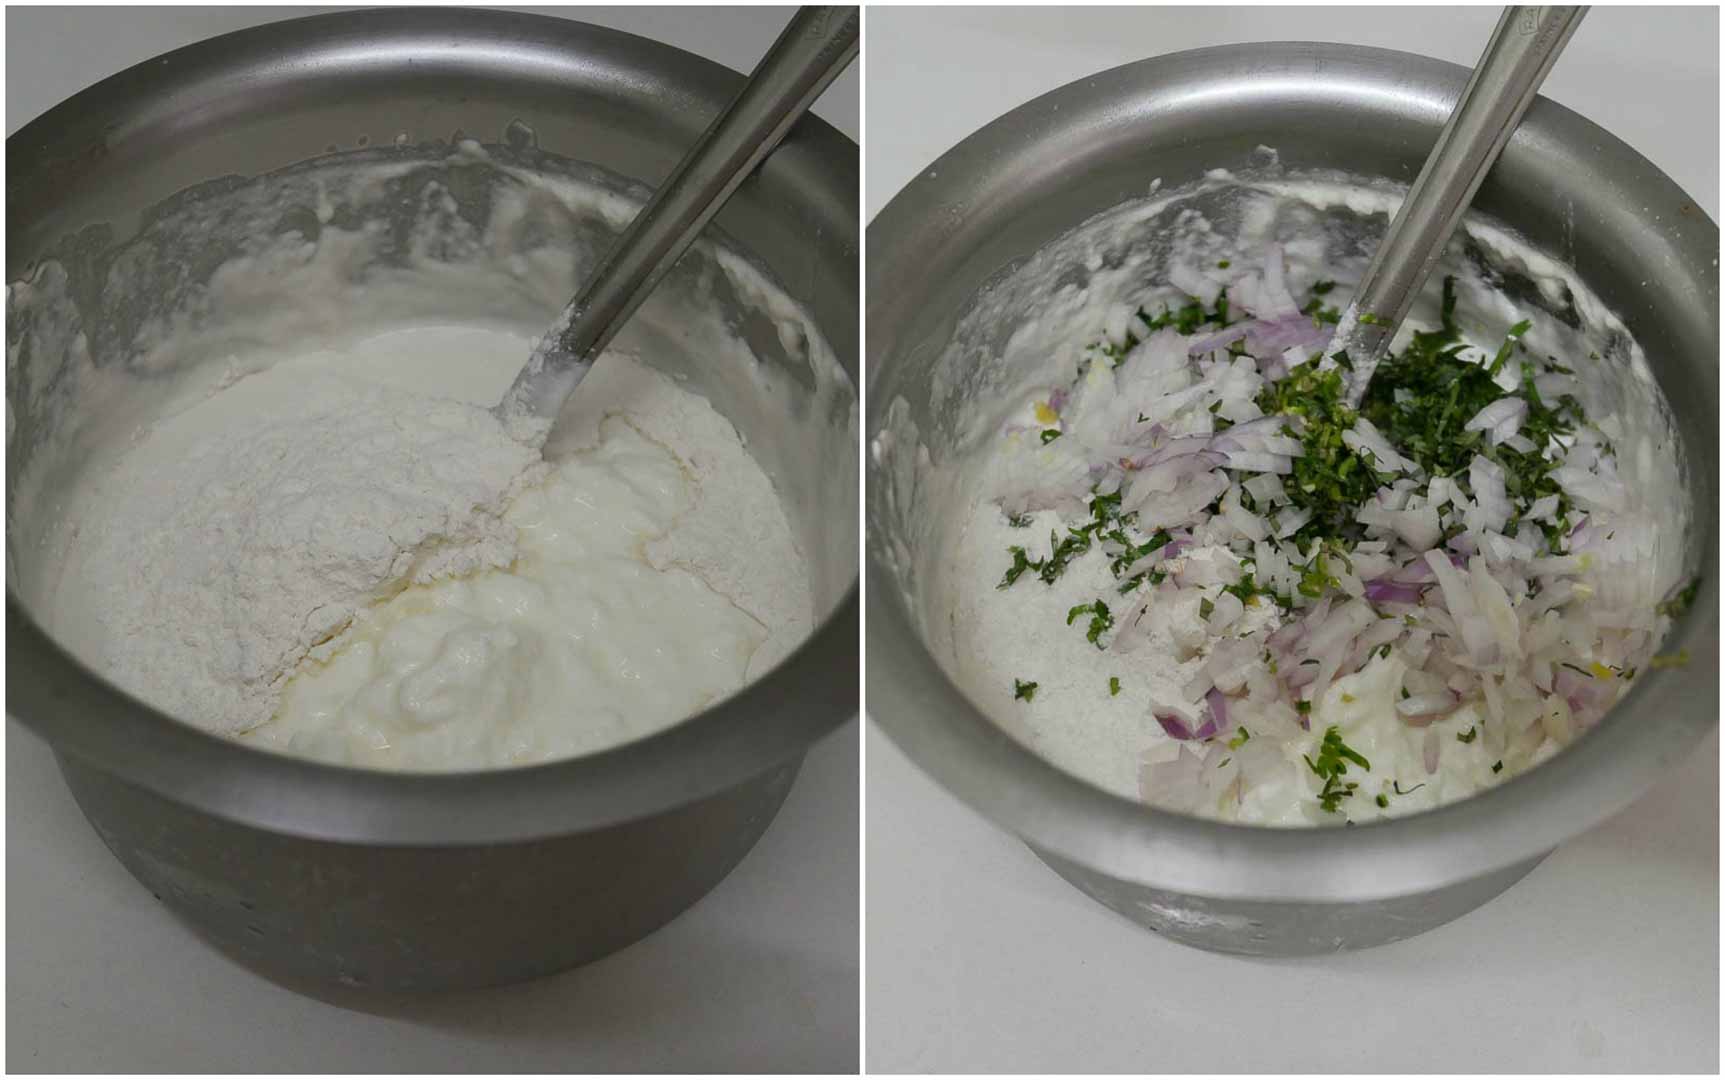
Add in a little hing / asafoetida. Add in a little baking soda too. The baking soda helps in achieving two things. The wonderful golden colour outside and soft and fluffy inside. Add in half a cup of sour curd / yogurt. Little old curd becomes sour and this recipe is perfect to use your old stash of curd from your fridge. Finally add in the veggies. Finely chop all ingredients and add namely onions, green chillies, curry leaves and ginger. I like my bonda / punugulu nice and spicy. So i always add a lot of finely chopped green chillies.
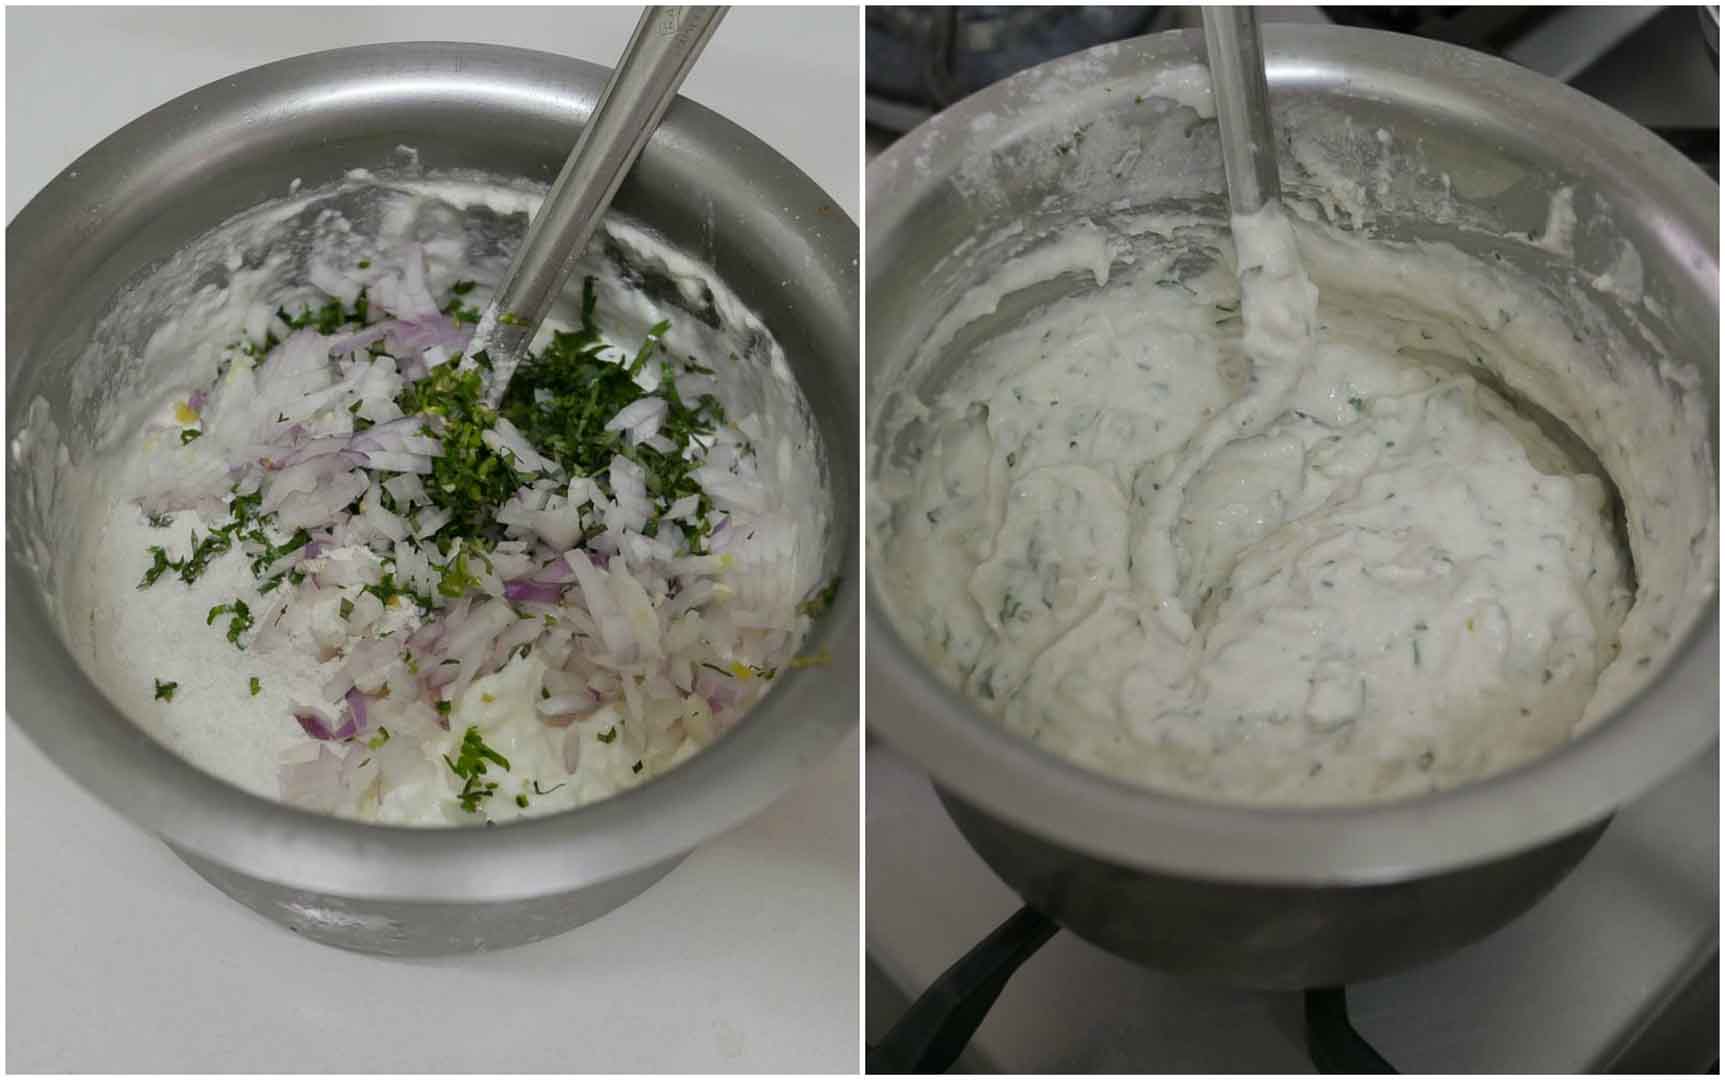
Mix everything well to combine. We are looking for a thick batter. If the mixture is thin, then add in a little maida to adjust the consistency. If the mixture is very thick, add in a little curd to adjust the consistency. If the batter is too watery, it will absorb a lot of oil while frying and will be very greasy. So make sure the batter is not very thin.
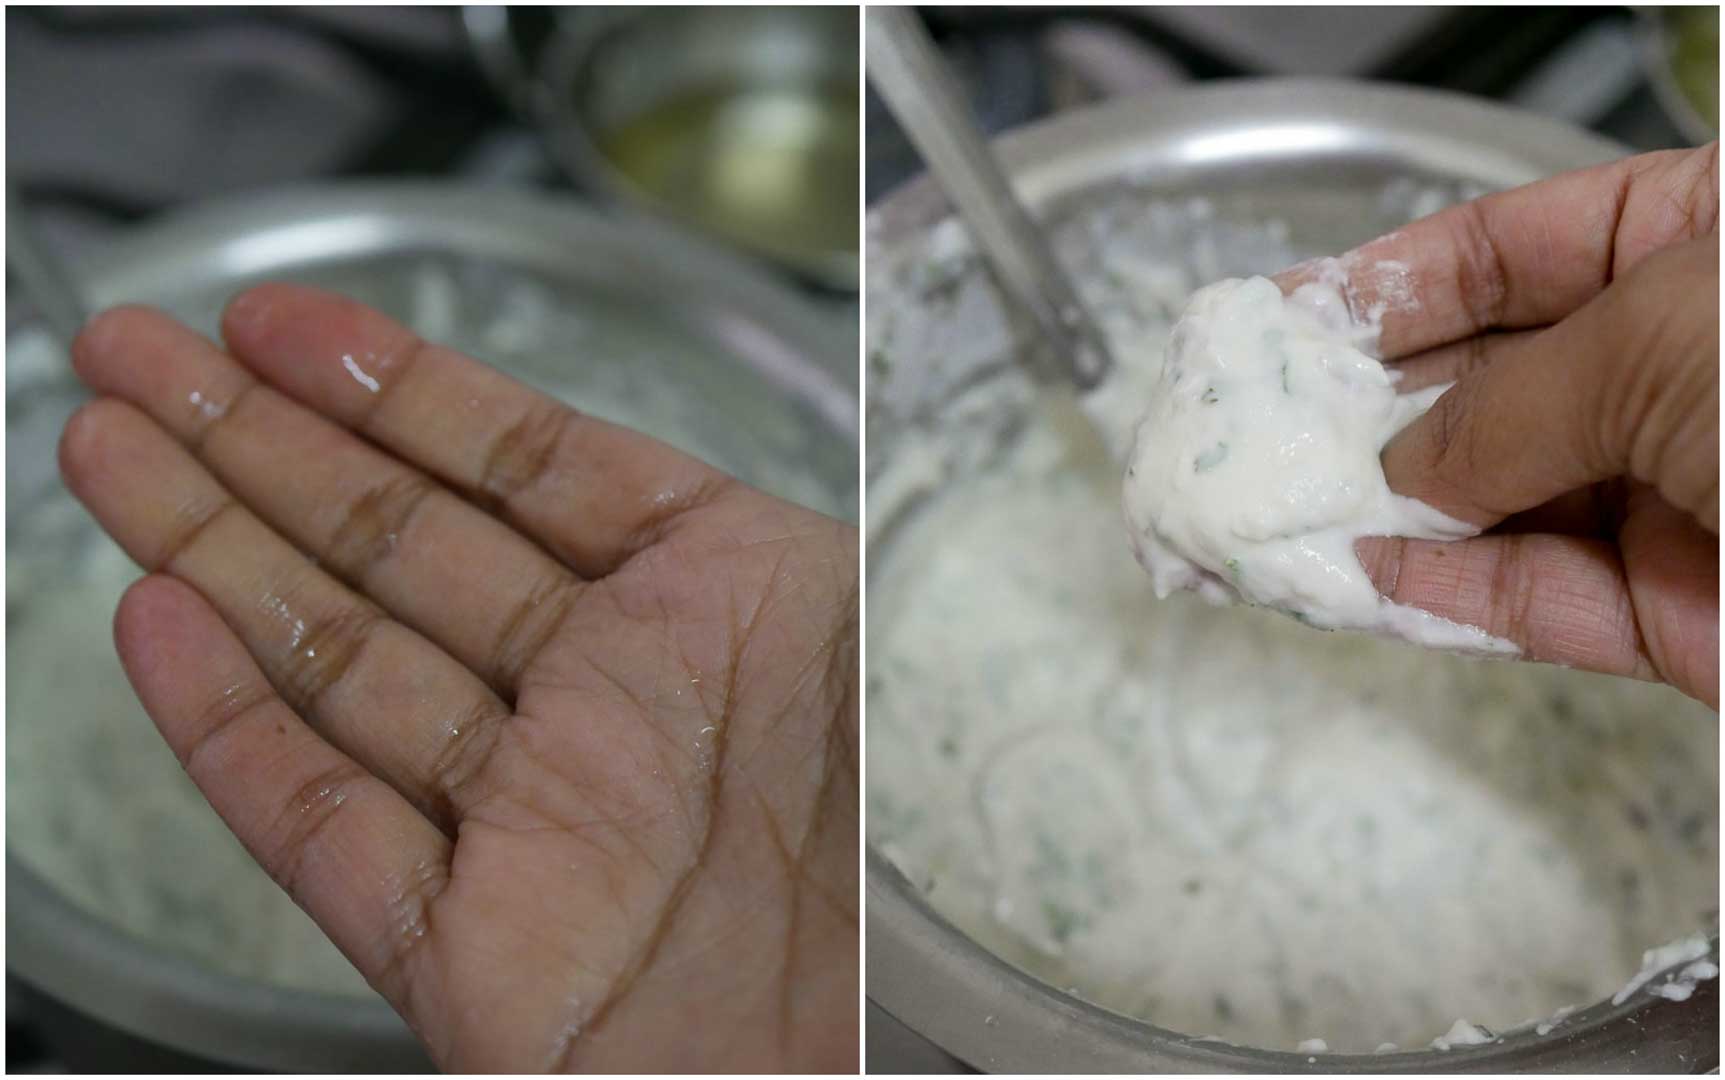
Now, we shall deep fry. When the oil is nice and hot, dip your fingers in water and scoop out a teaspoon of batter in your fingers and gently drop them in oil.
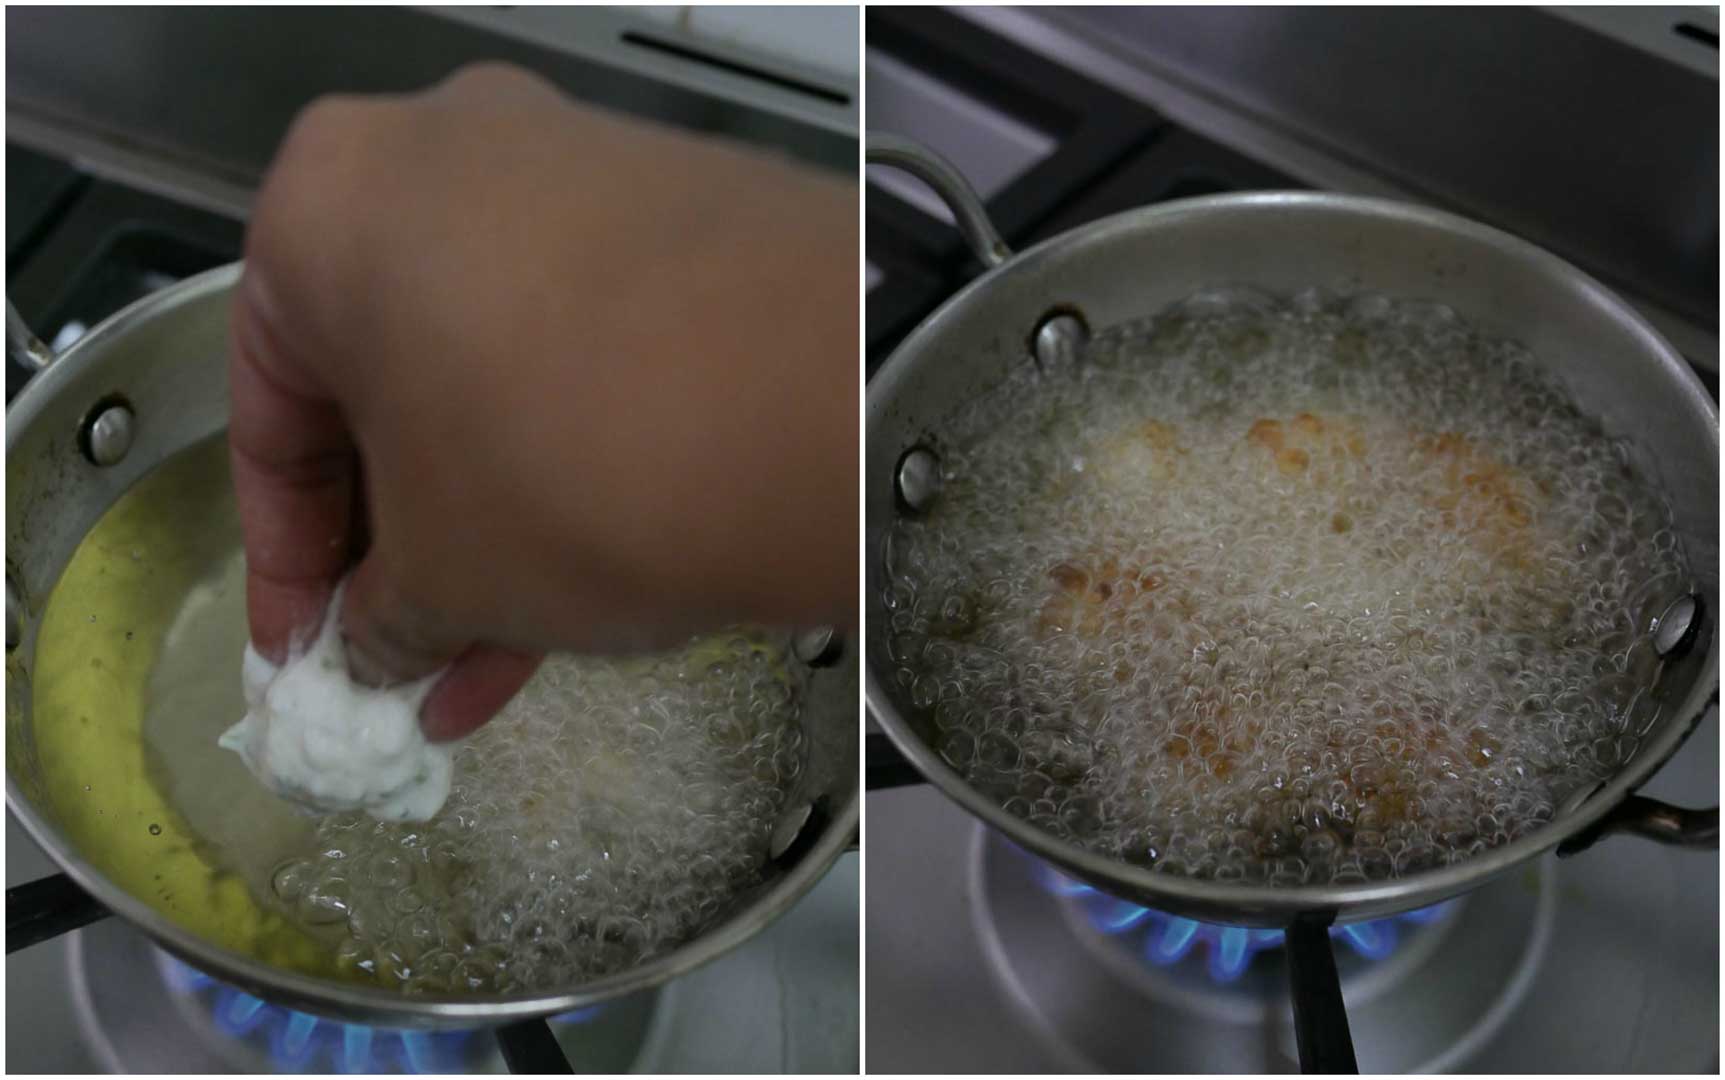
Use your thumb finger to just slide the batter into oil. Make sure the balls are small in size. If the bonda balls are big, the inside tends to remain doughy. So always shape small balls for punugulu. After adding the balls in oil, do not disturb for a minute. Fry for a couple of minutes turning the punugulu. I prefer to use a fork while turning the punugulu.
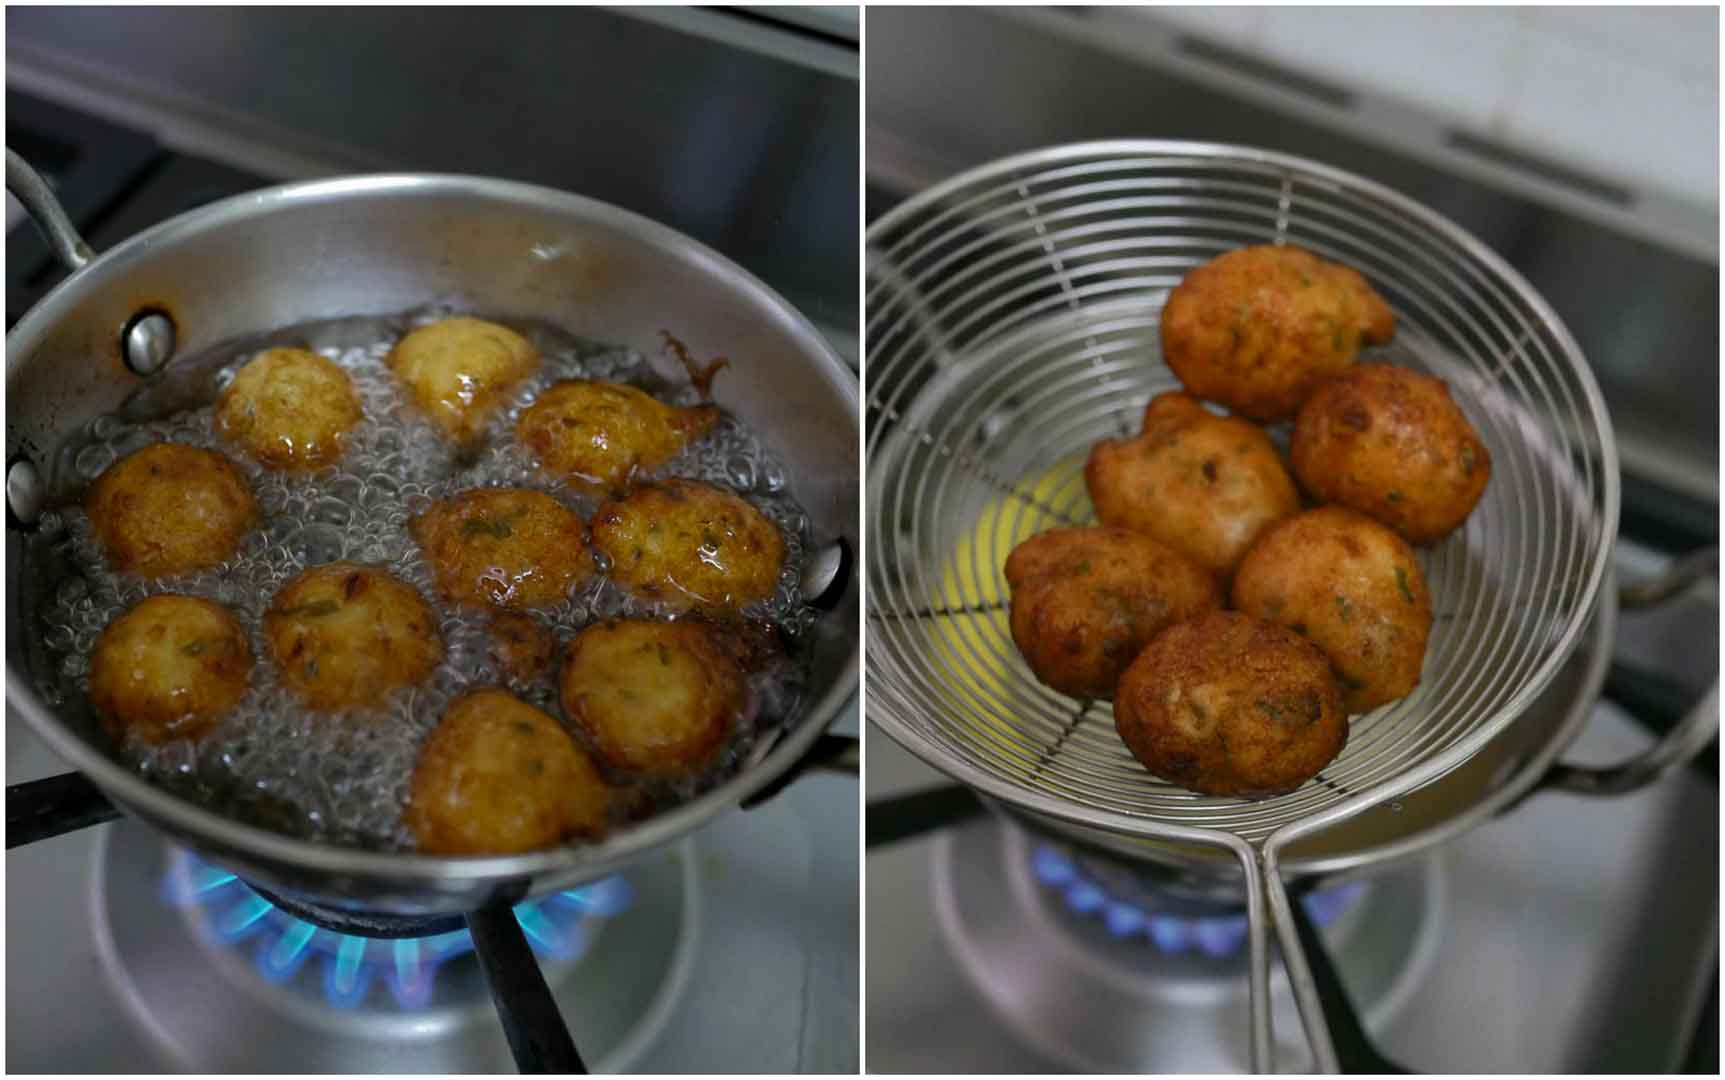
Punugulu needs to be really golden in colour. Crisp punugulu texture is what makes this dish irresistible. After a couple of minutes, the balls should be really golden in colour. Remove from hot oil and drain on paper towels.
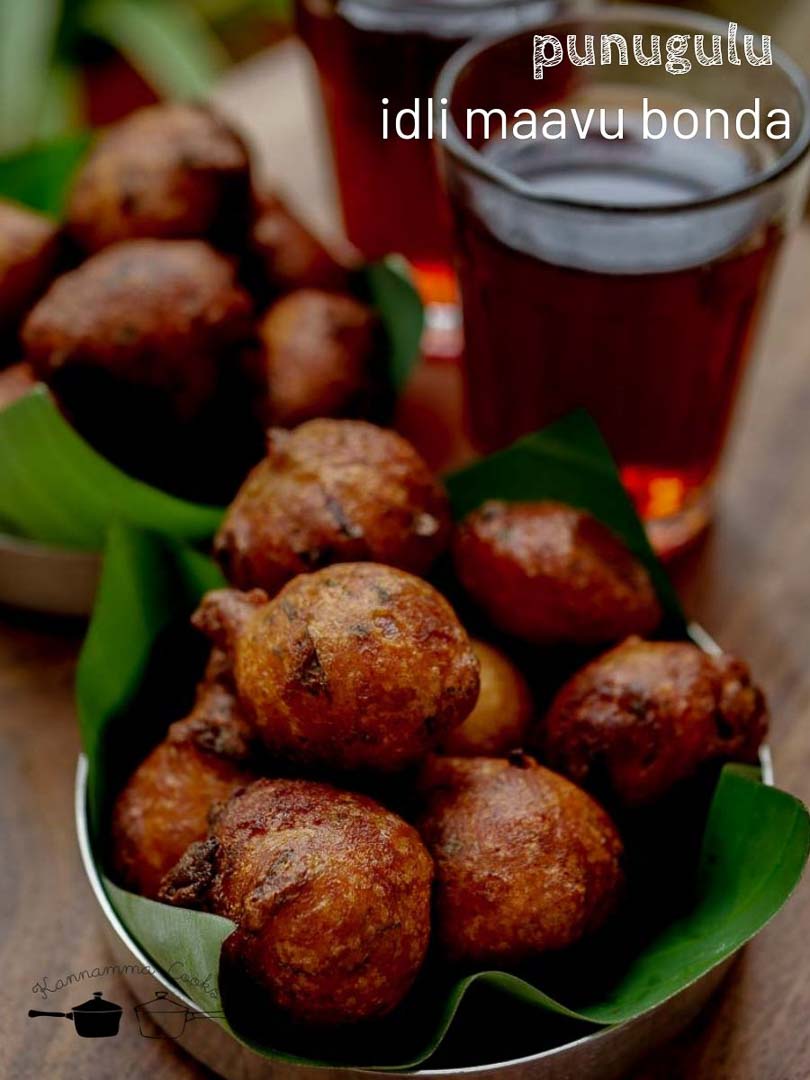
Serve with tea and enjoy your evening! I like to serve it plain while traditionally its served with a spicy tomato chutney or coconut chutney. If you are in the mood for some chutney, do refer to these recipes.

- 2 cups idli-dosa batter (preferably old batter)
- 1/2 cup maida
- 1/2 teaspoon salt
- a pinch of hing / asafoetida
- 1/4 teaspoon baking soda
- 1/2 cup sour curd / yogurt
- 1/2 cup onions,finely chopped
- 4 - 5 green chillies, finely chopped (adjust to your taste)
- 1 sprig curry leaves, finely chopped
- 1/2 inch piece ginger, finely chopped
- Vegetable oil to deep fry
- Take about 2 cups of dosa batter and add it to a bowl.
- Add in half a cup of maida and salt. Add in a little hing / asafoetida. Add in a little baking soda too. Add in half a cup of sour curd / yogurt. Add in the veggies.
- Mix everything well to combine. If the mixture is thin, then add in a little maida to adjust the consistency. If the mixture is thick, add in a little curd to adjust the consistency. If the batter is too watery, it will absorb a lot of oil while frying and will be very greasy. So make sure the batter is not very thin.
- Now, we shall deep fry. When the oil is nice and hot, dip fingers in water and scoop out a teaspoon of batter in your fingers and gently drop them in oil.
- Use your thumb finger to just slide the batter into oil. Make sure the balls are small in size. If the balls are big, the inside tends to remain doughy. So always shape small balls for punugulu. After adding the balls in oil, do not disturb for a minute. Fry for a couple of minutes turning the punugulu.
- Punugulu needs to be really golden in colour. Crisp punugulu texture is what makes this dish irresistible. Remove and drain in paper towels.
- Serve hot!
- Author: Kannamma - Suguna Vinodh
- Prep Time: 5 mins
- Cook Time: 10 mins
- Category: Snacks
- Cuisine: South Indian
Find it online : https://www.kannammacooks.com/punugulu-dli-maavu-bonda/
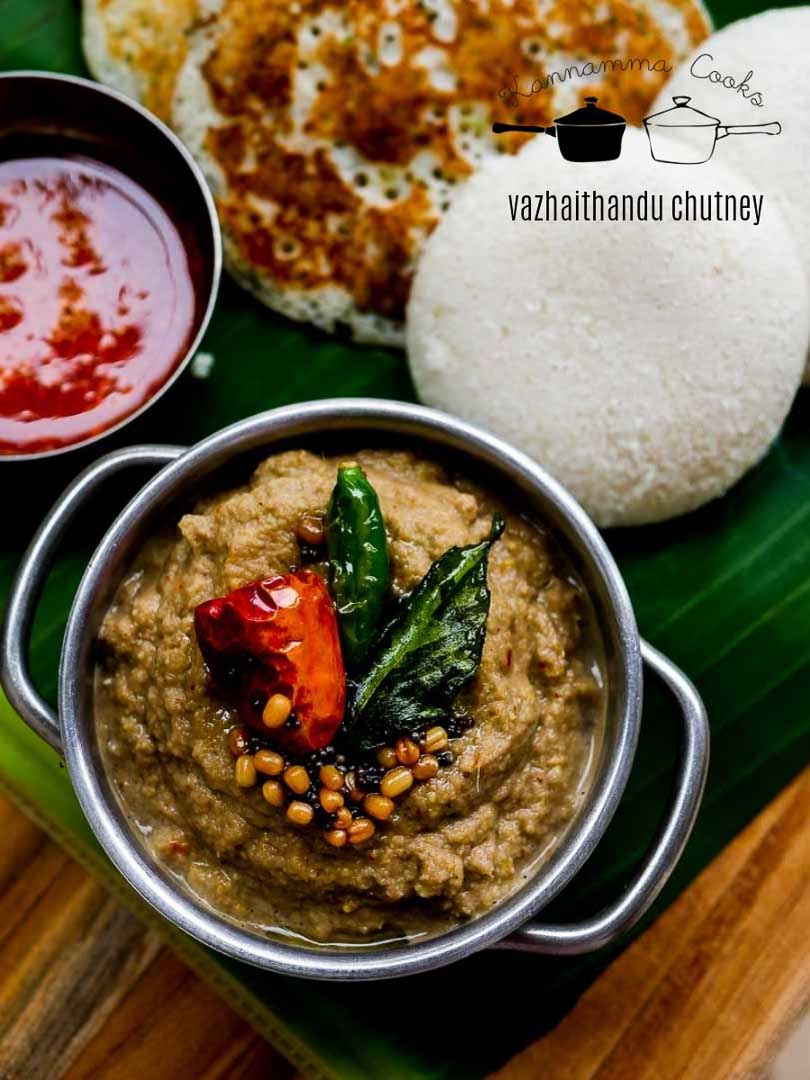
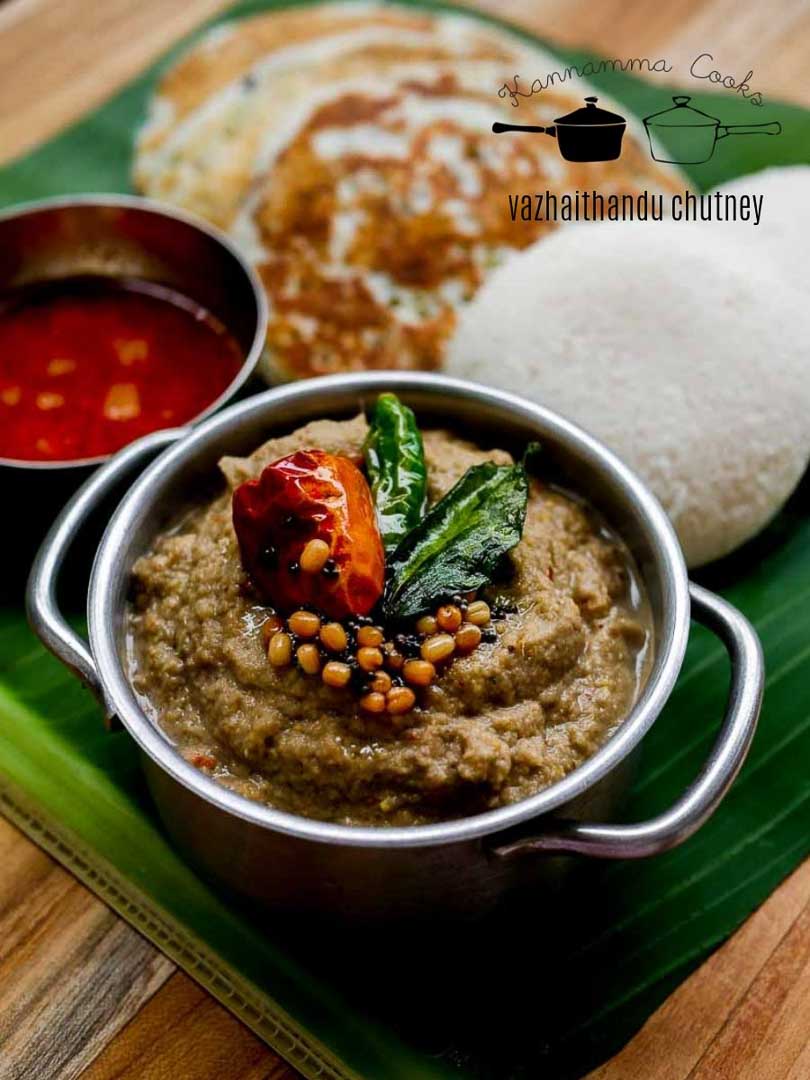
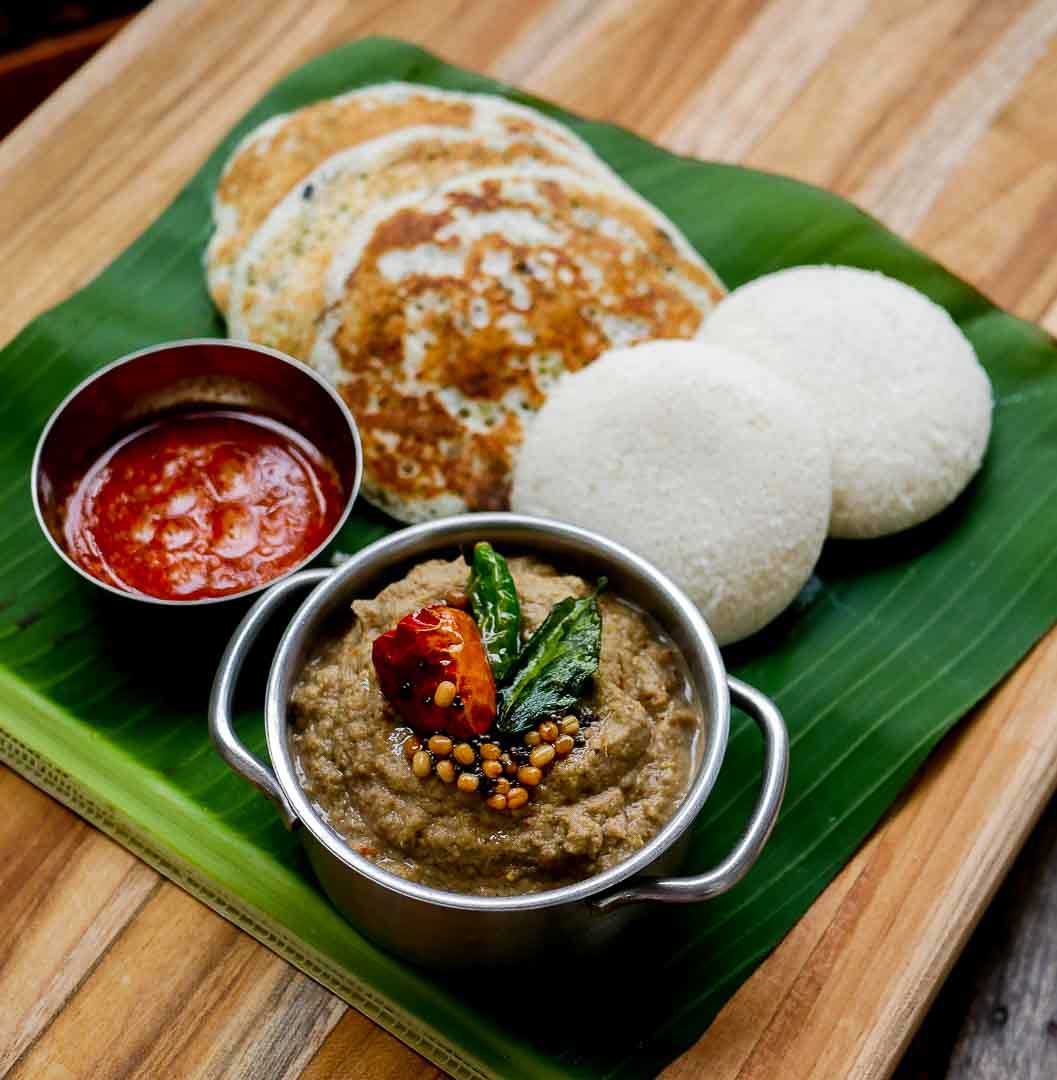
Recipe for a very healthy chutney made with vazhaithandu – banana stem. Recipe with step by step pictures. வாழைத்தண்டு சட்னி
Banana stem is loaded with fibre and is even used to treat kidney stones and urinary tract infection. Including banana stem regularly in one’s diet helps with acidity and gastric problems. It also provides relief from a lot of common problems including constipation. Here is an excellent recipe made with Vazhaithandu Chutney – Banana Stem. This is a very easy to do chutney.
This is a chutney in disguise. This chutney is made with vazhaithandu வாழைத்தண்டு / banana stem. This recipe has very few ingredients and the only prep work required is with the banana stem. This is yet another delicious easy to do chutneys for the busy mornings. Here is how to do Vazhaithandu Chutney – Banana Stem Chutney Recipe.
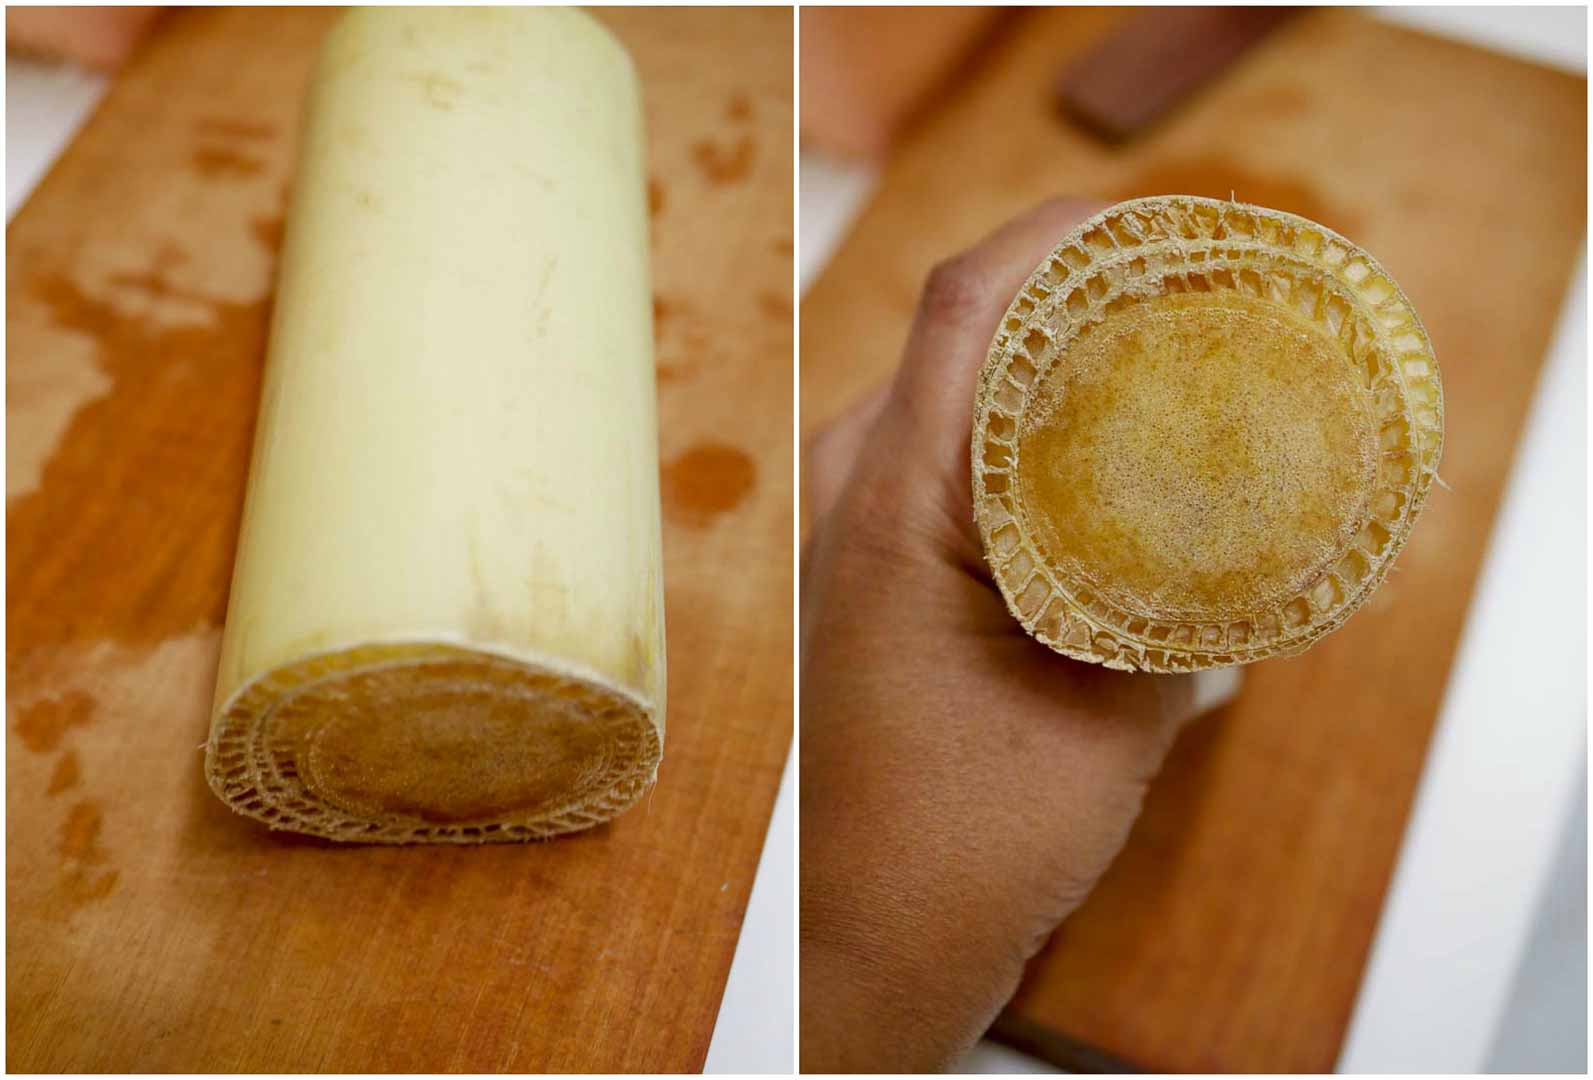
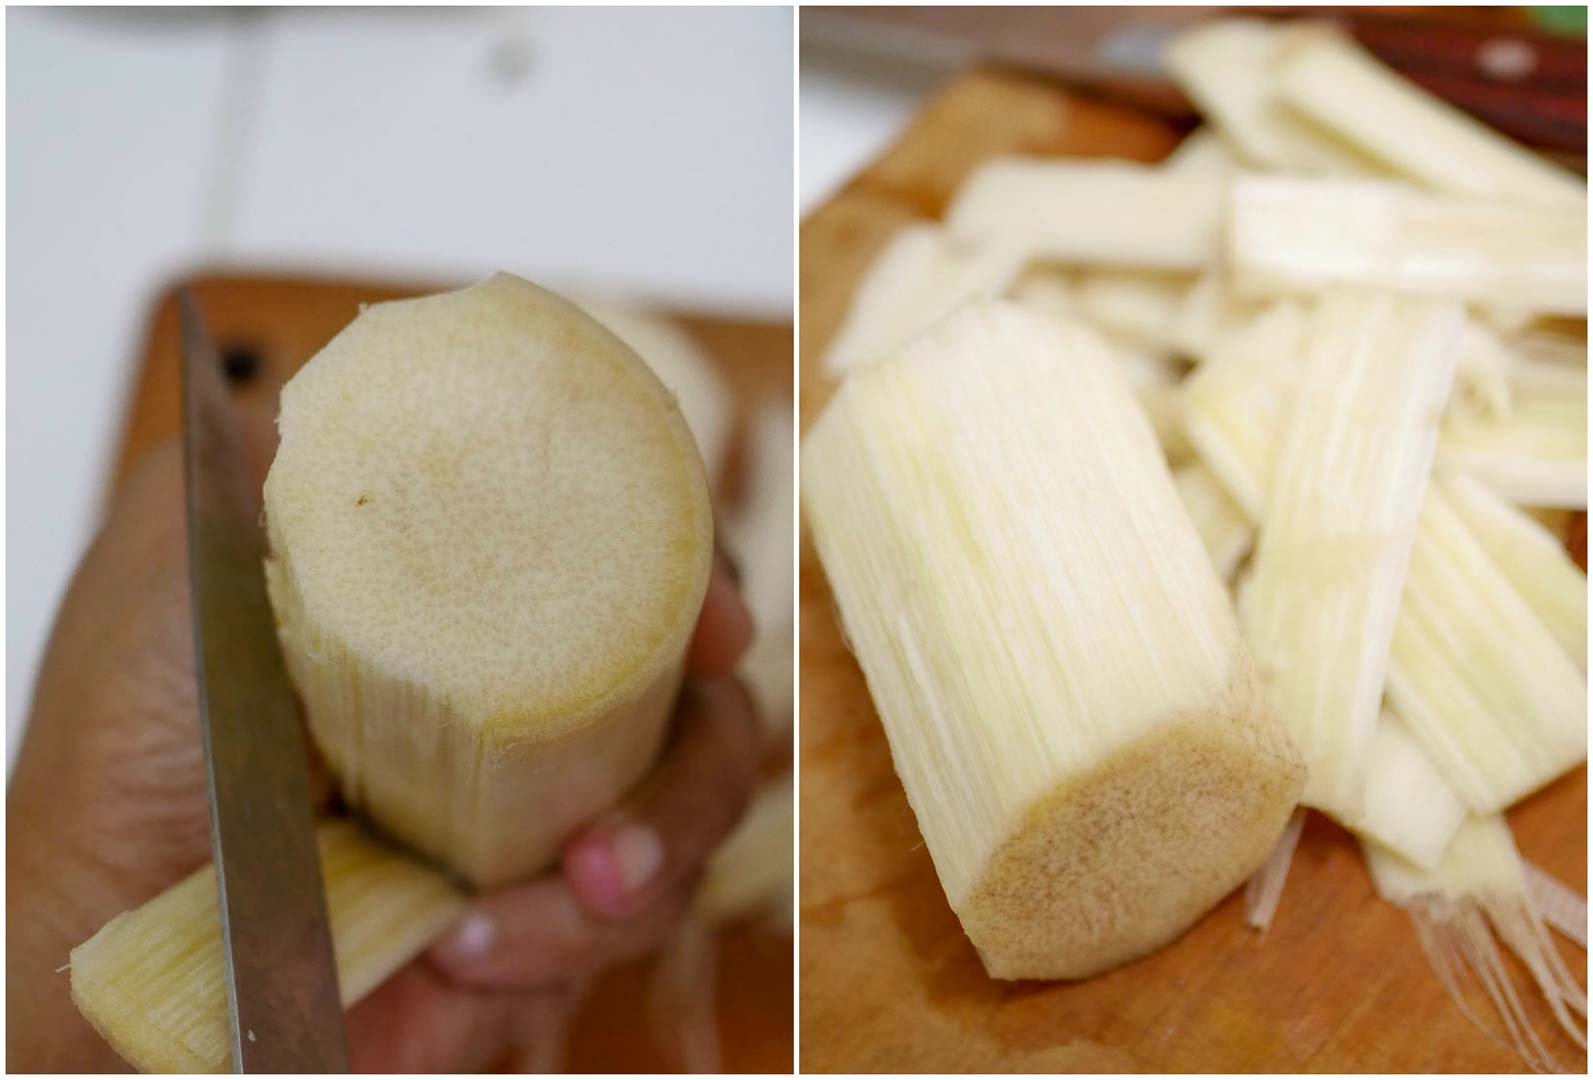
Prepping Banana Stem The outer layer is very fibrous and not edible. Remove the layer. Just peel off the layer with a knife and it should easily come off.
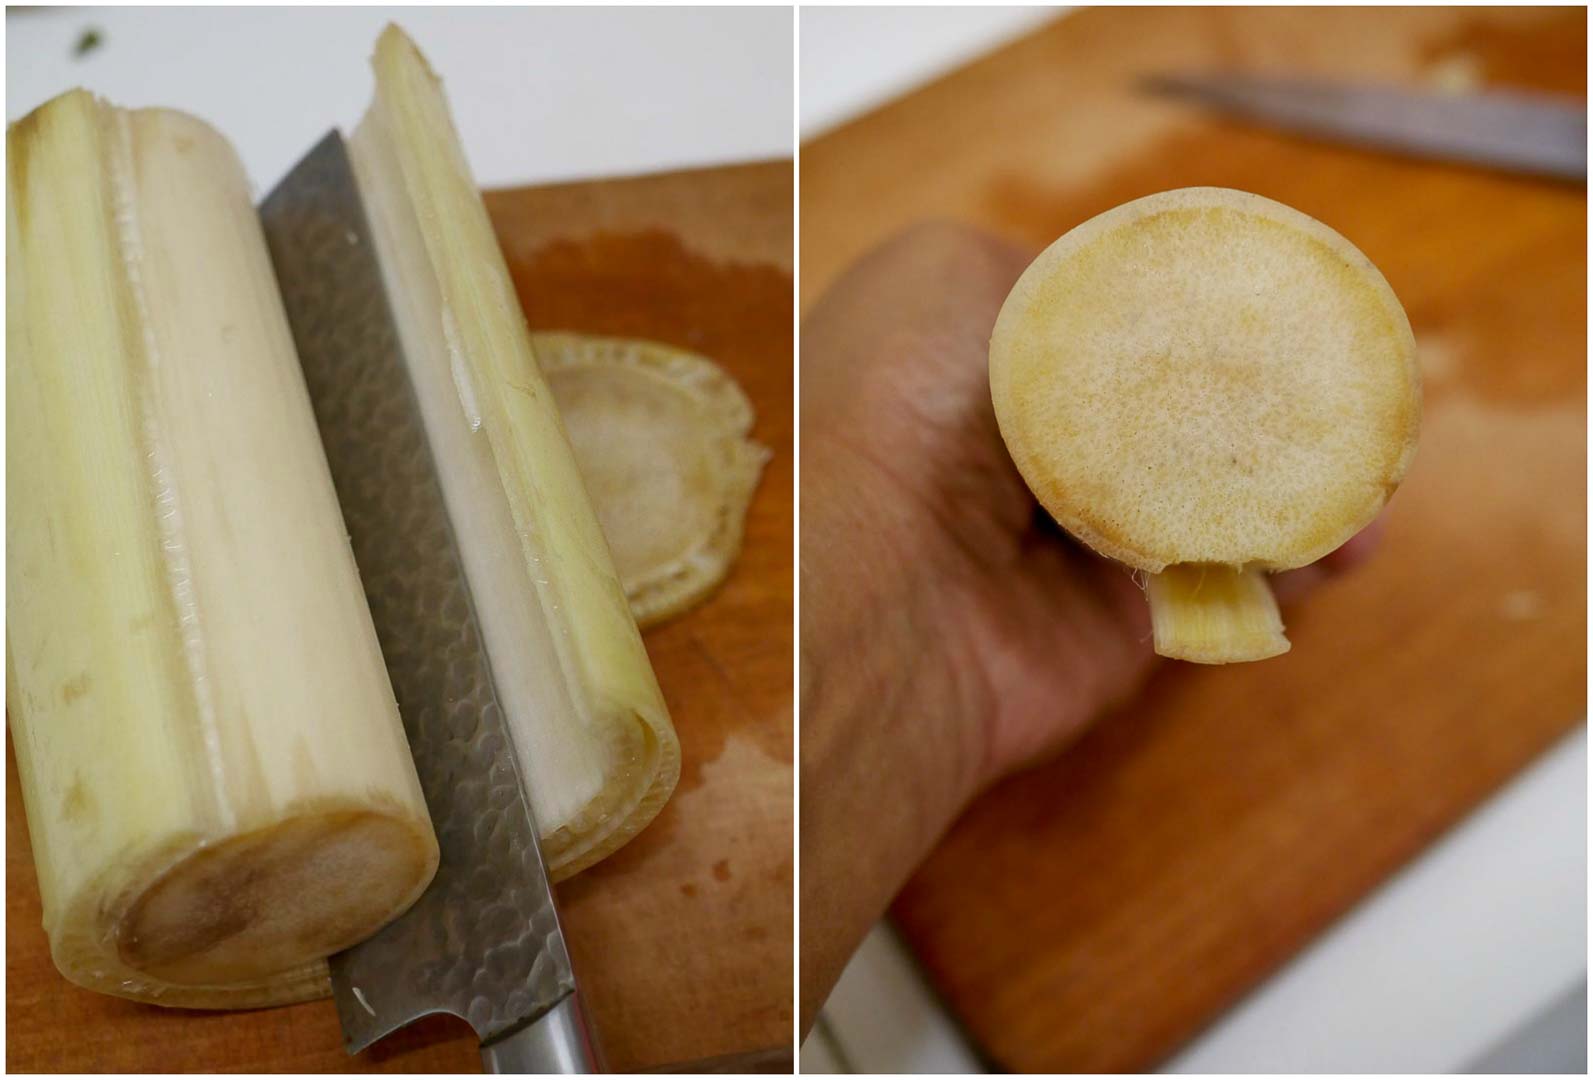
I usually remove the final layer too. I peel off the layer by pulling it with a knife. In some households, they retain this part. Its totally up to you. The threads in the final layer is a little fibrous and we do not like it at home. My mom will be furious if she knows that I remove this. She would say, that’s where all the fibre is. But hey, this is now my kitchen and I get to do what I like. Traditionally, the banana stem is cut into discs and the excess fibre is removed by running the finger on the disc in a circular motion. So its up to you.
Its almost done.
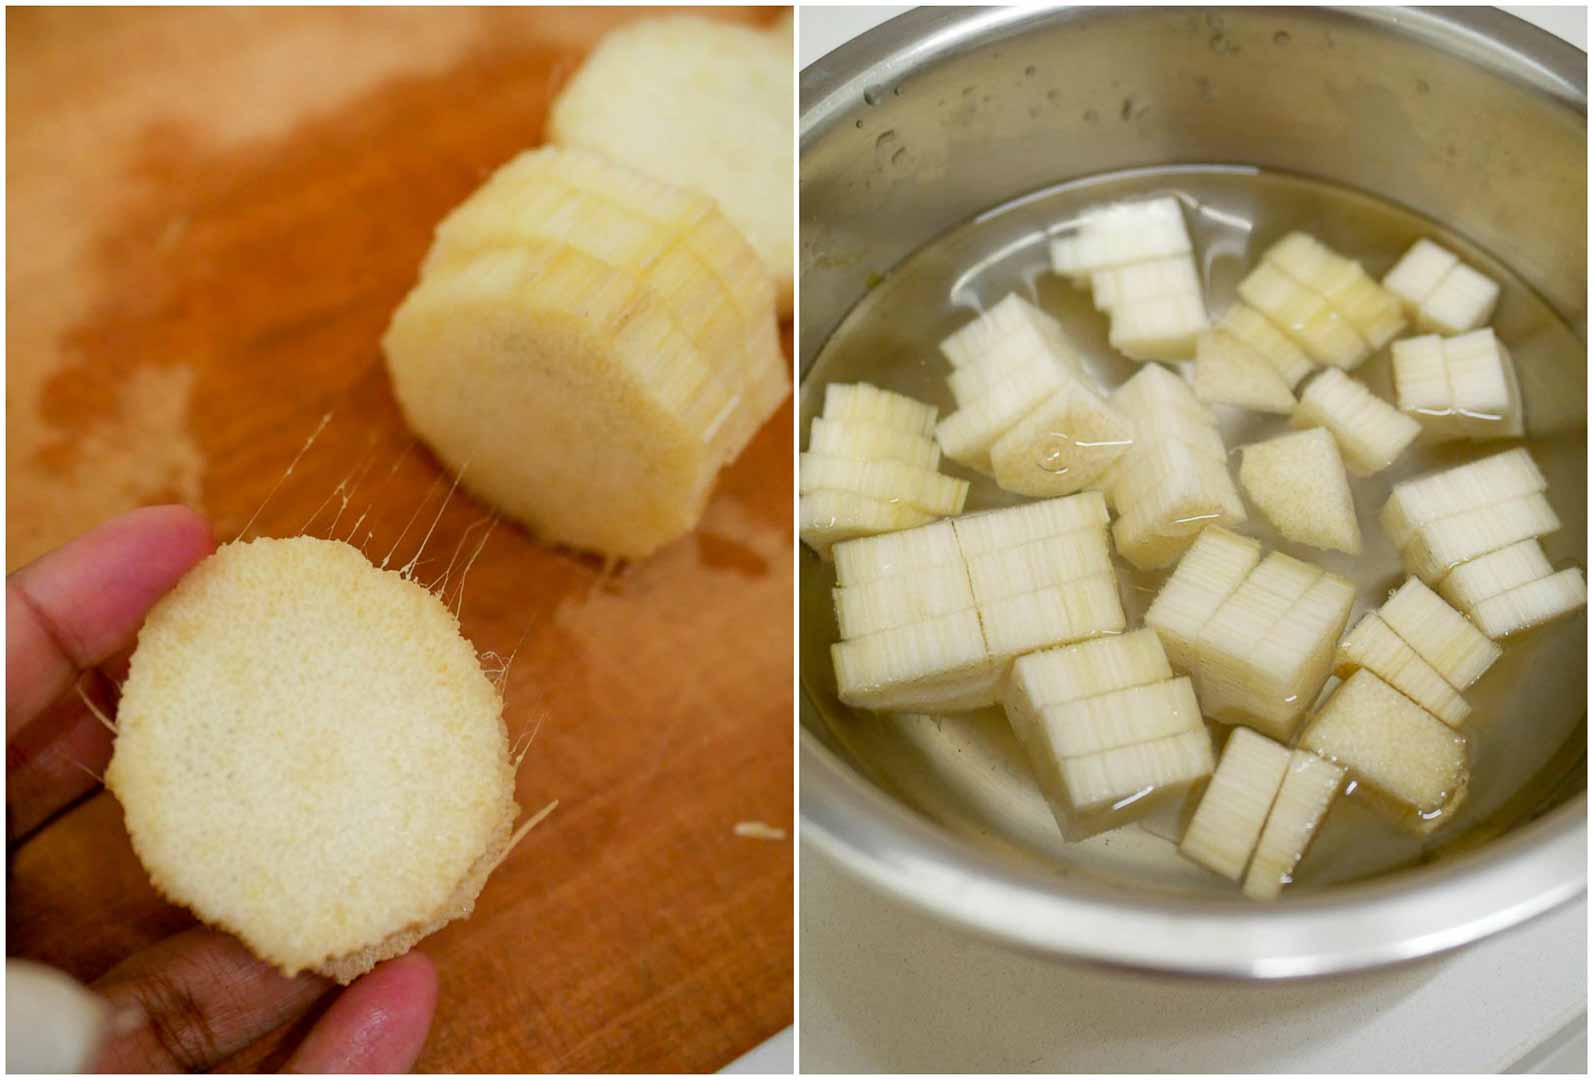
Chop the banana stem into discs and then rough chop the discs. Add the chopped stem to a bowl filled with water. You can see the fibre when you cut it into discs. Its perfectly fine. Just add everything to a bowl filled with water. I add a little vinegar / buttermilk to the water to avoid the banana stem from getting discoloured. Today I added a teaspoon of vinegar to the water.
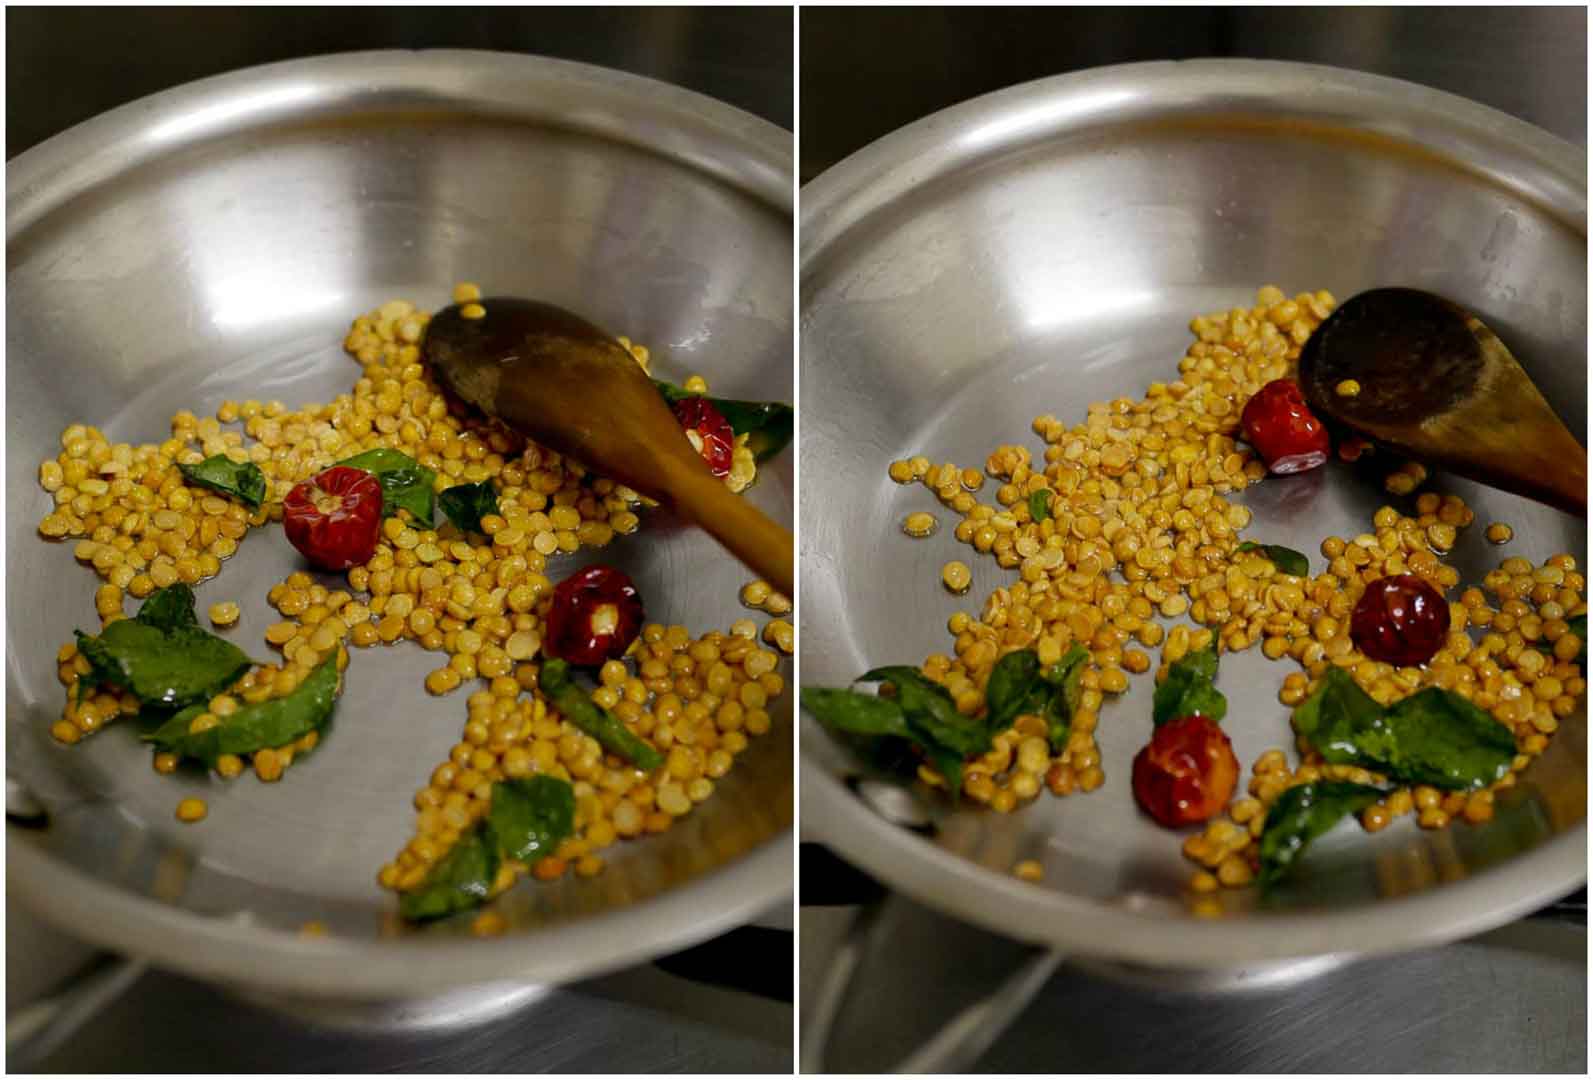
Making the chutney Heat sesame oil (Indian gingely oil) in a pan and add in the curry leaves, toor dal and dried red chillies. Saute on a low flame till the dal is slightly roasted and brown in colour. Roast the ingredients on a low flame so the lentils don’t burn. Adjust the chillies according to your taste. If you want a spicy chutney, add in a couple of more chillies.
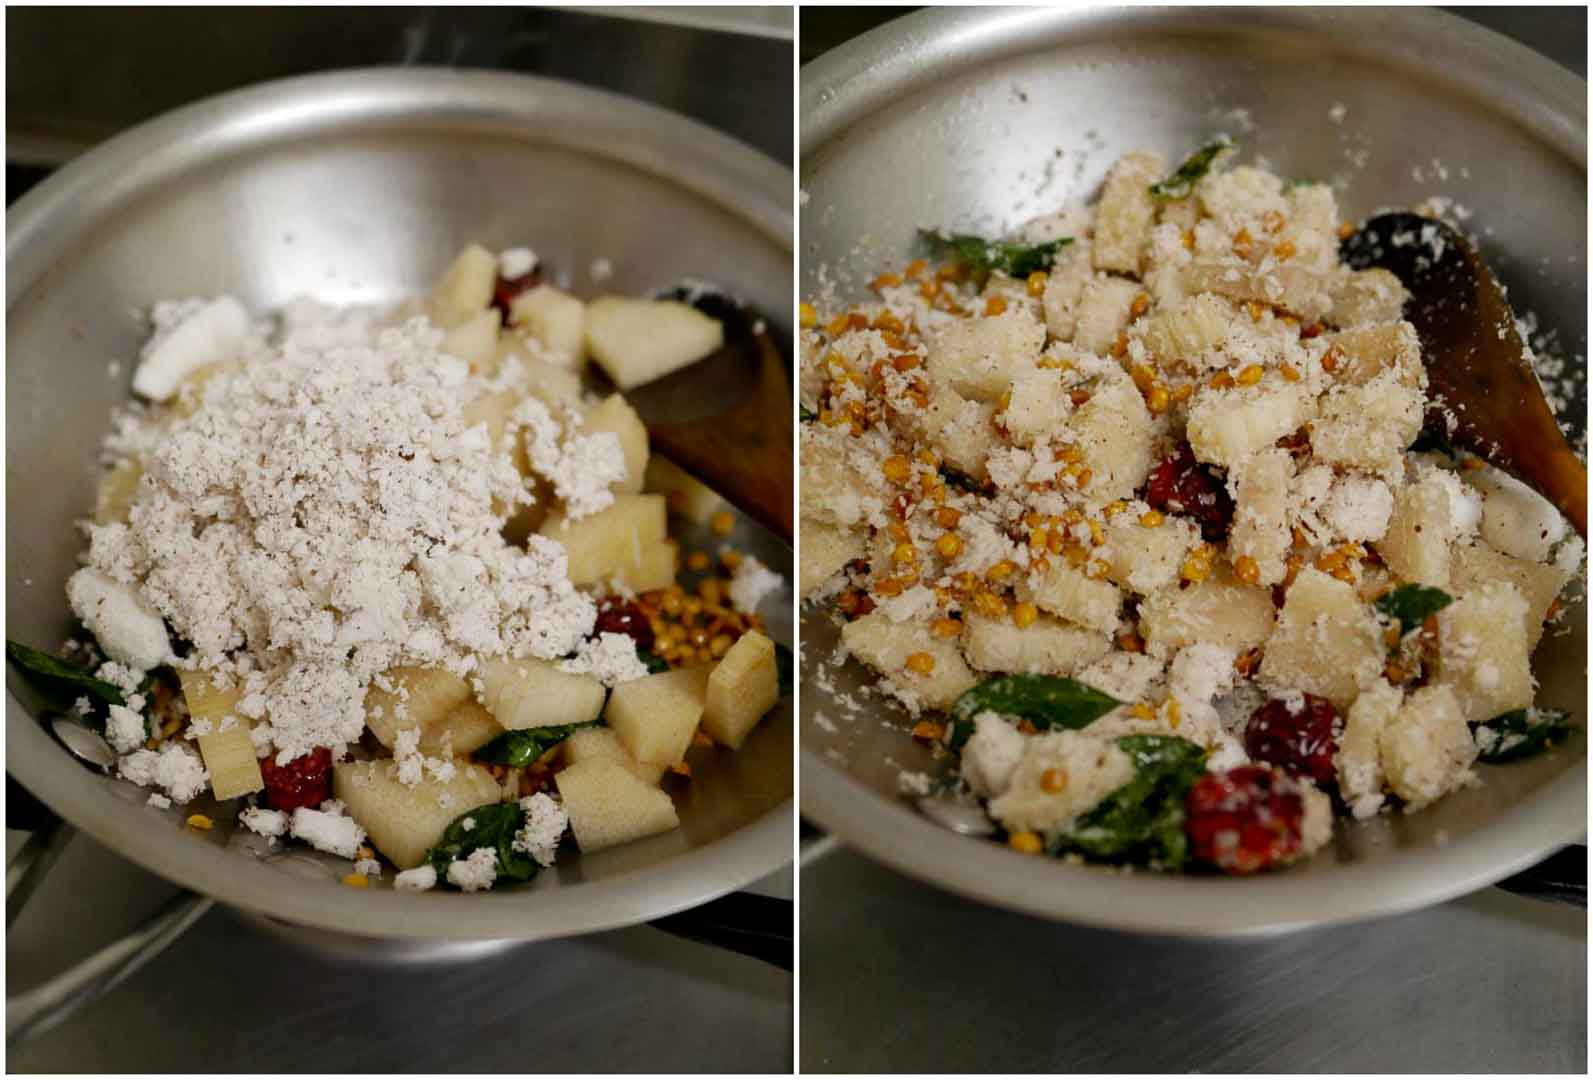
Add in the fresh shredded coconut and the cut banana stem. Just saute for a minute. Add in the salt and tamarind. The banana stem will still be raw and that is fine. Remove from heat and transfer the ingredients to a mixie.
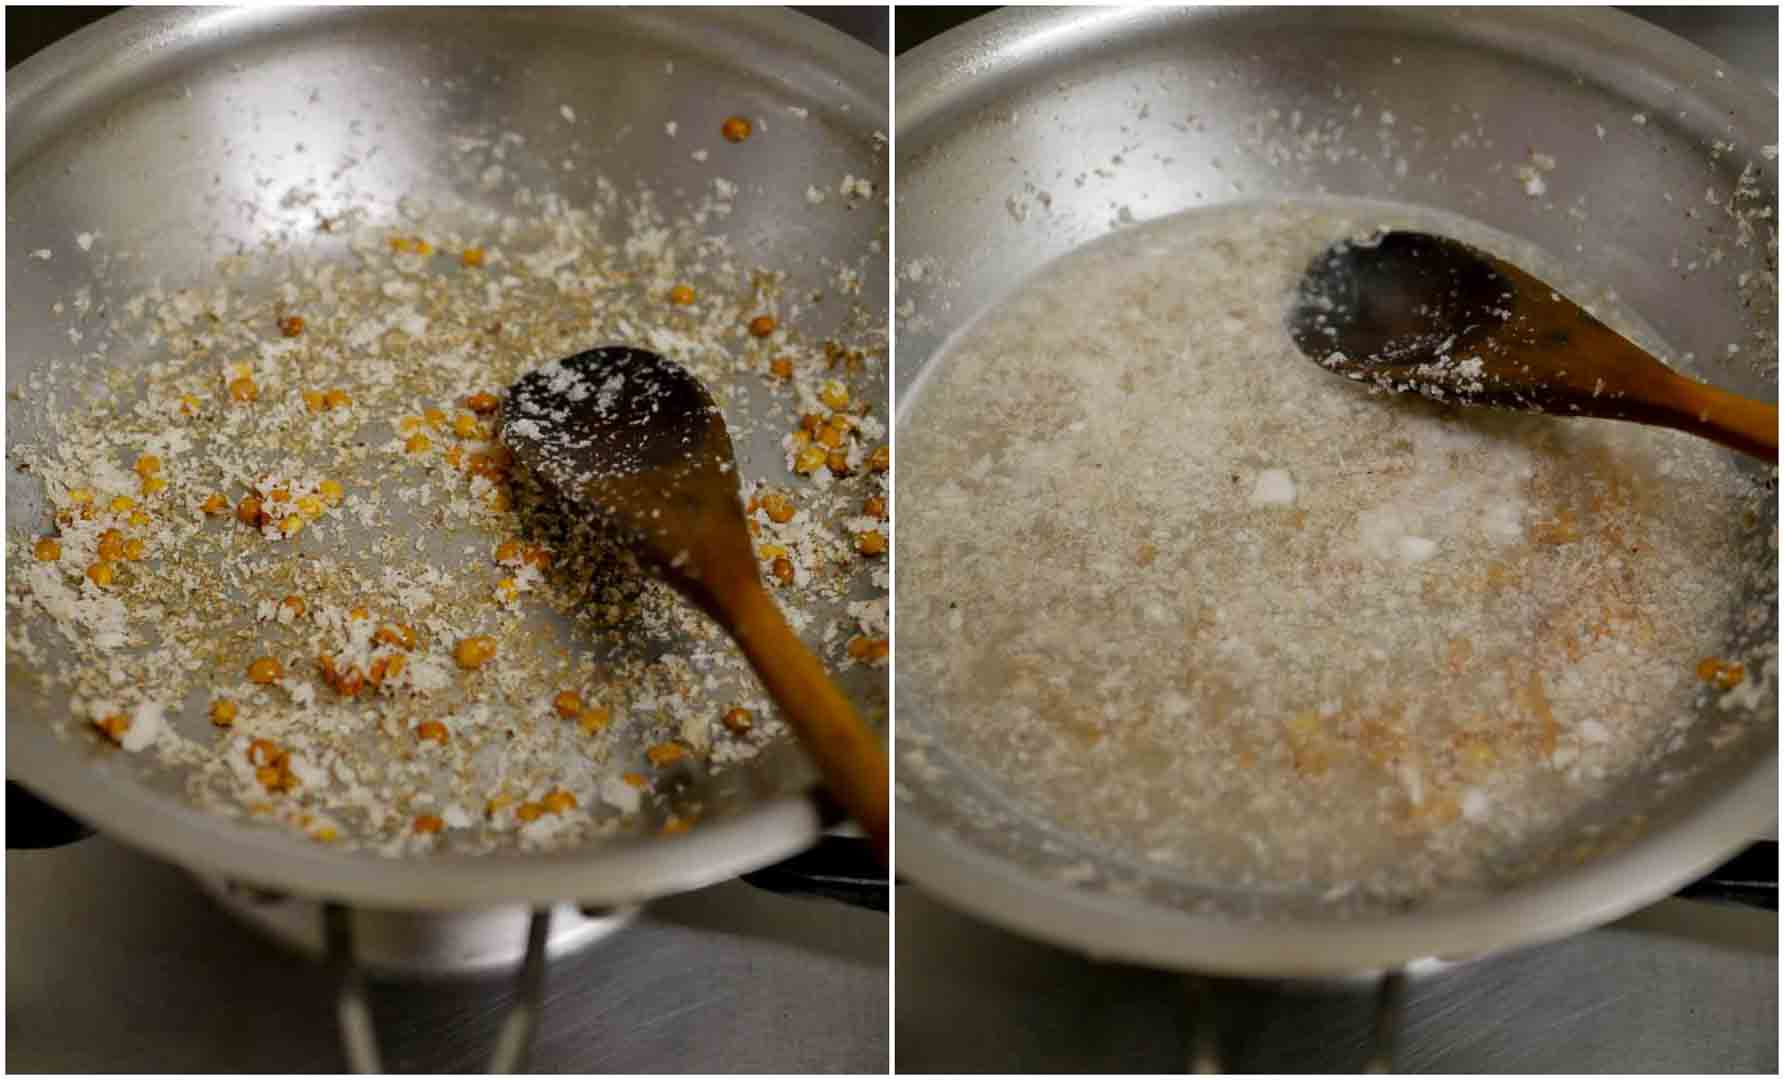
Add half cup of water to the pan and wash (deglaze), add it back to the mixie.
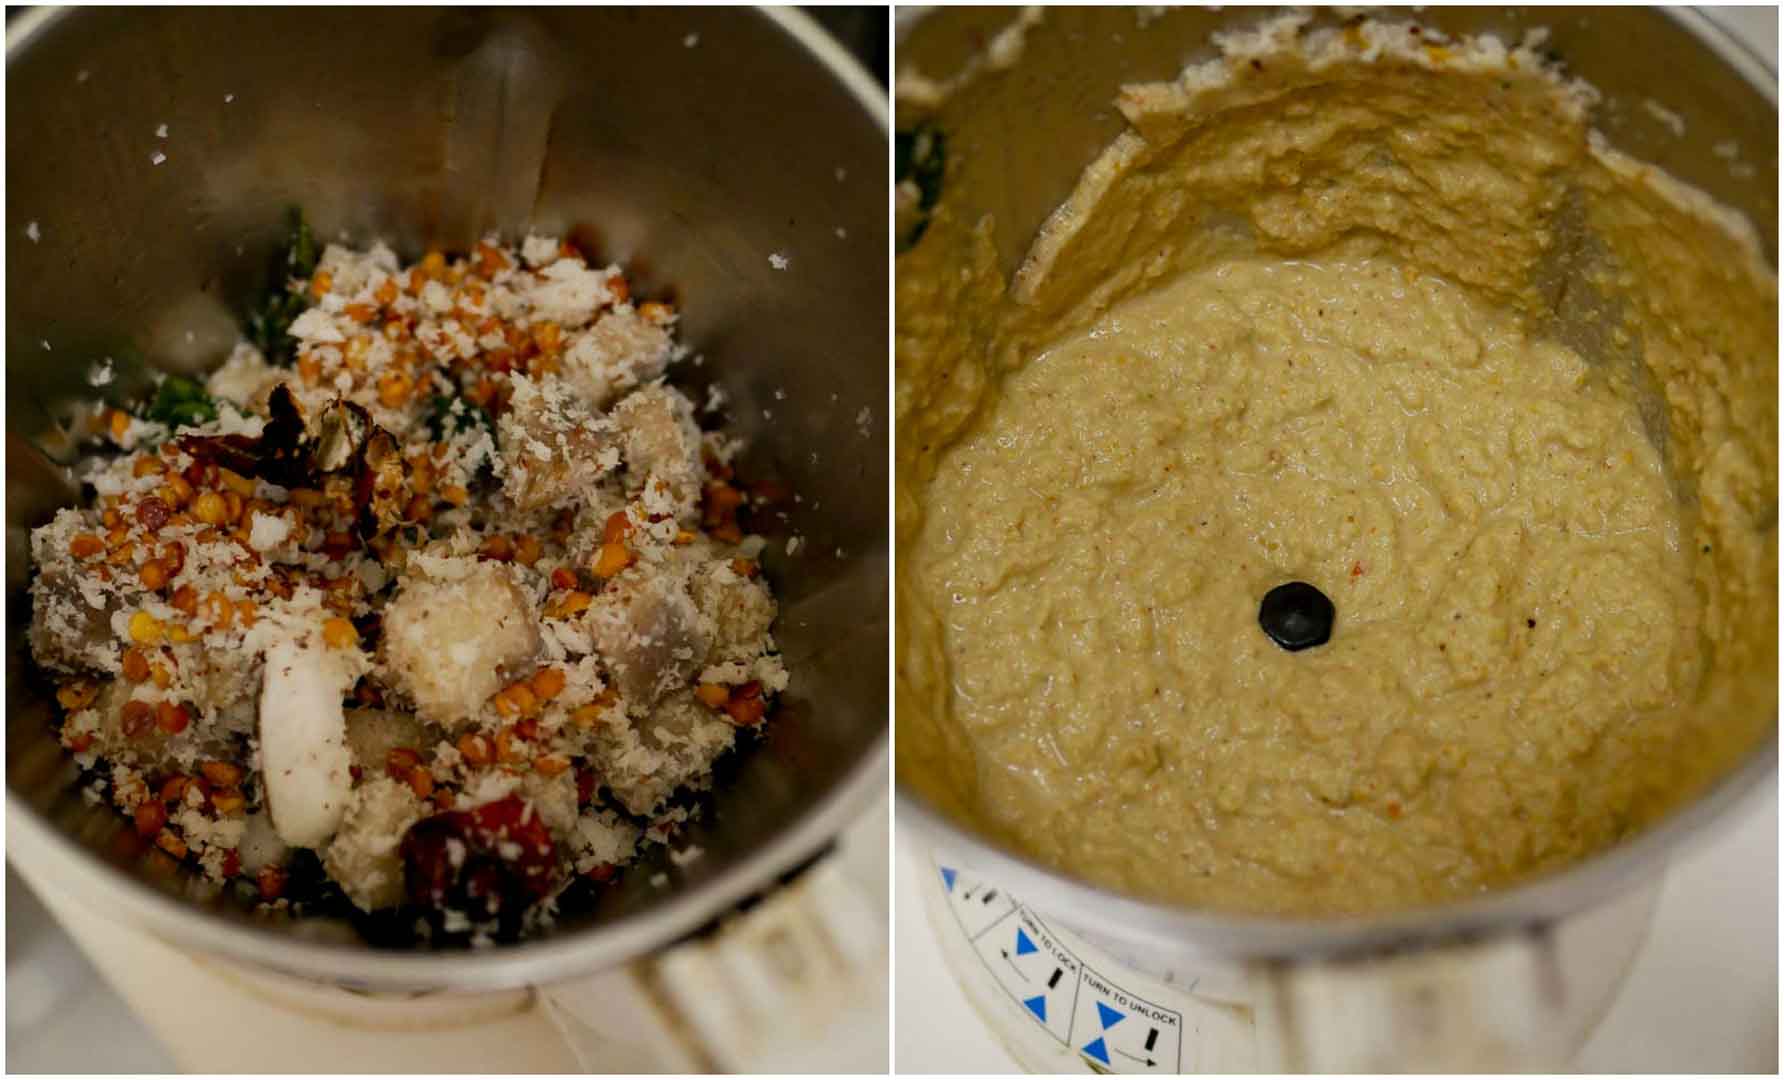
Now grind the ingredients in the mixie to a paste.
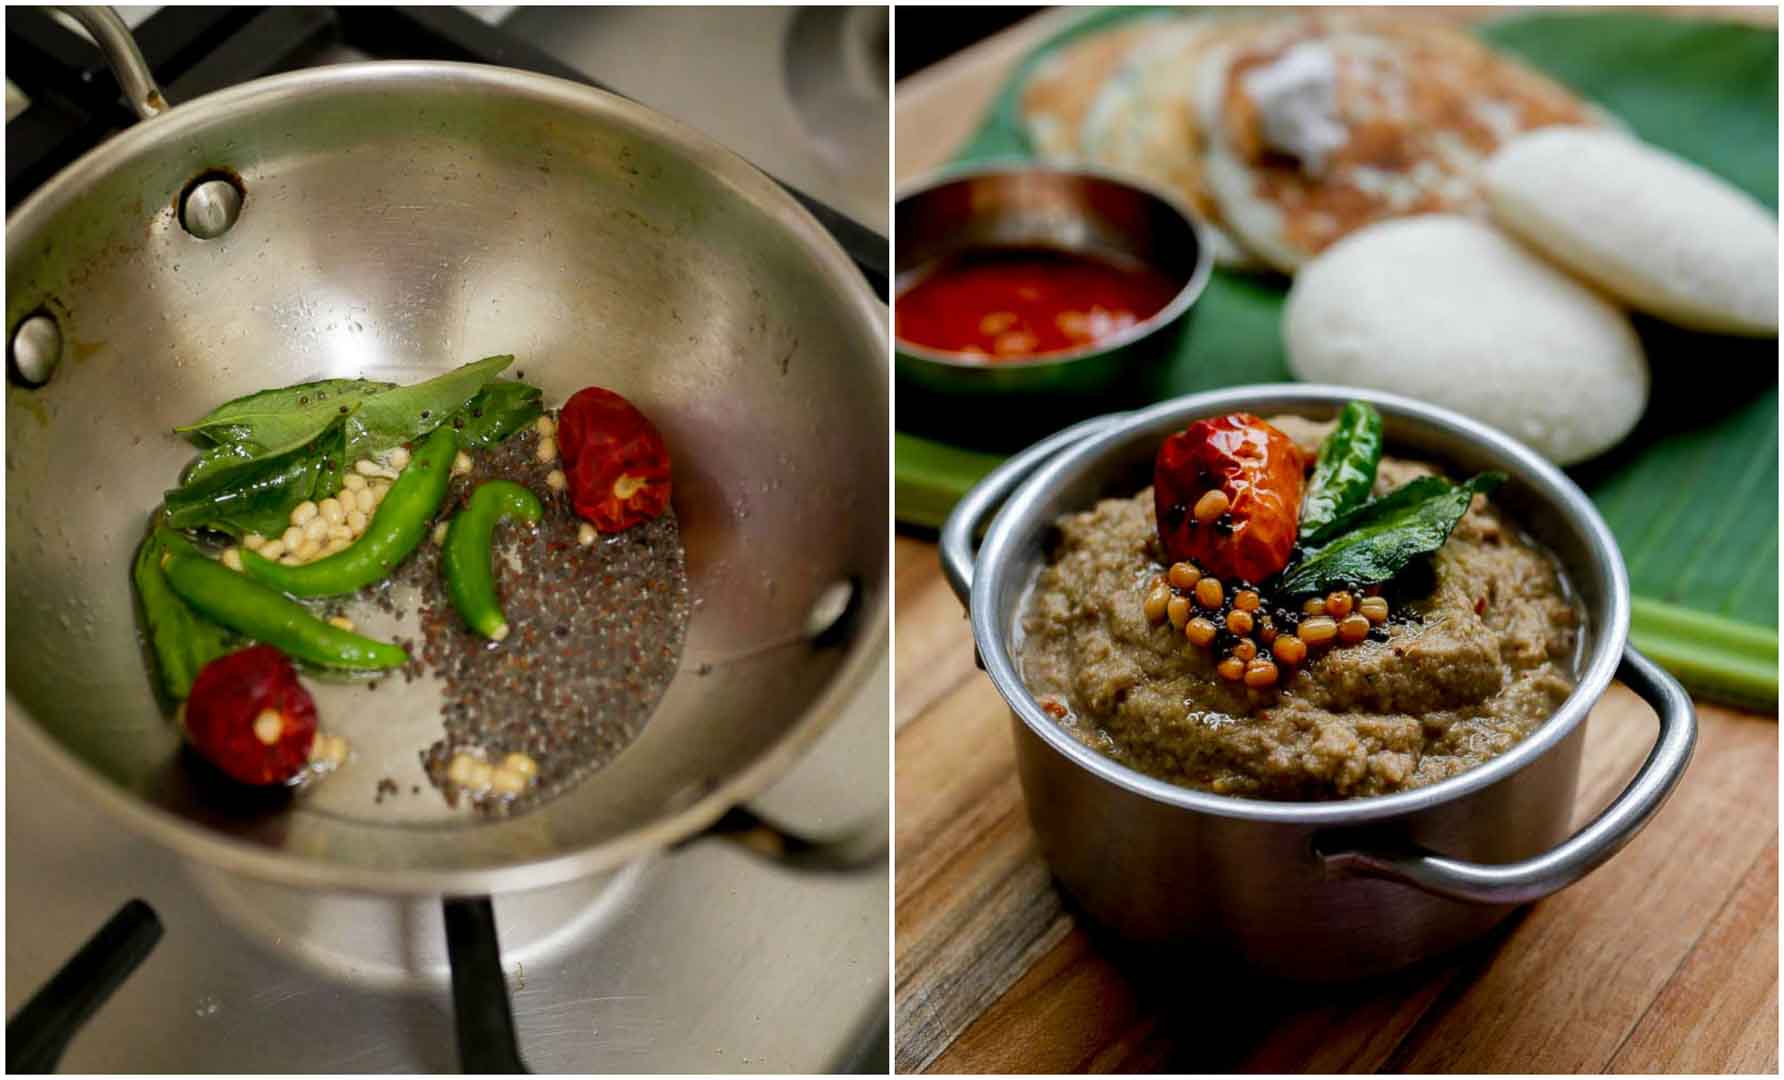
Tempering Heat oil in a pan and add in the urad dal, mustard seeds, curry leaves, green chillies, red chillies and a pinch of asafoetida. Let the mustard seeds crackle. Saute till the dal is roasted and brown. Add it to the chutney. Keep the chillies whole. The roasted green chillies add a nice aroma to the chutney. Also if you want a very spicy chutney, you can bite a little bit of the nicely roasted green chilli.
Serve the chutney with idli and dosai.
For the chutney
- 1 cup chopped vazhaithandu / banana stem
- 1 teaspoon Indian sesame oil (gingely oil)
- 1 sprig curry leaves
- 2 tablespoon toor dal
- 3 - 4 dried chillies
- 1/2 cup fresh shredded coconut
- 1/2 teaspoon rock salt
- a small marble size tamarind
For the tempering
- 1 teaspoon Indian sesame oil (gingely oil)
- 1/2 teaspoon urad dal
- 1/4 teaspoon mustard seeds
- 1 sprig curry leaves
- 2 - 3 green chillies
- 2 dried red chillies
- a pinch of asafoetida
For the chutney
- Clean, prep and chop the banana stem and add it to water. I add a little vinegar / buttermilk to the water to avoid the banana stem from getting discoloured.
- Heat sesame oil (Indian gingely oil) in a pan and add in the curry leaves, toor dal and dried red chillies. Saute on a low flame till the dal is slightly roasted and brown in colour.
- Add in the fresh shredded coconut and the cut banana stem. Just saute for a minute. Add in the salt and tamarind. Remove from heat and transfer the ingredients to a mixie.
- Add half cup of water to the pan and wash (deglaze), add it back to the mixie.
- Grind everything to a fine paste.
Tempering
- Heat oil in a pan and add in the urad dal, mustard seeds, curry leaves, green chillies, red chillies and a pinch of asafoetida. Let the mustard seeds crackle. Add it to the chutney.
- Author: Kannamma - Suguna Vinodh
- Prep Time: 10 mins
- Cook Time: 5 mins
- Category: Chutney
- Cuisine: Tamilnadu
