Recipe for home made turmeric powder. Can be used at home for cooking, face / face mask and other applications. Turmeric powder made from boiled and dried turmeric. Made with fresh turmeric roots.
I have always been eyeing on making my own turmeric powder and it finally happened this year. Fresh turmeric is abundantly available in January during pongal time in Tamilnadu and other southern states. Fresh turmeric needs to be cured before it can be dried and powdered. Turmeric is boiled and then dried in the sun. Boiling enables the starch in the turmeric to gelatinize and also helps in intensifying the color and in uniform distribution of color throughout the rhizome. Once completely dried, its then powdered. The process of making it at home is pretty simple. If making in bigger quantities, the dried turmeric can be sent to a flour mill to make it into a powder. Since I made a small batch, I ground the dried bits in a heavy duty Indian mixie. The aroma of homemade turmeric is so concentrated. I should also mention the colour. The orangish yellow is so vibrant and so different from store bought turmeric. I am going to take the effort to make my own turmeric from now on. Store bought turmeric is no contest in front of this one. Do try it at home to believe it. Its not difficult at all.
Turmeric மஞ்சள் is beneficial in many ways and is helpful in fighting inflammation, arthritis, weight loss, cancer, etc.. to name a few. Making turmeric powder at home is easy. Its pure and can be stored for up to 3 months without losing its aroma. If making in bulk, its better to store it in the freezer as it stays fresh for up to an year in the freezer.
Here is how to make turmeric powder at home from fresh turmeric root.
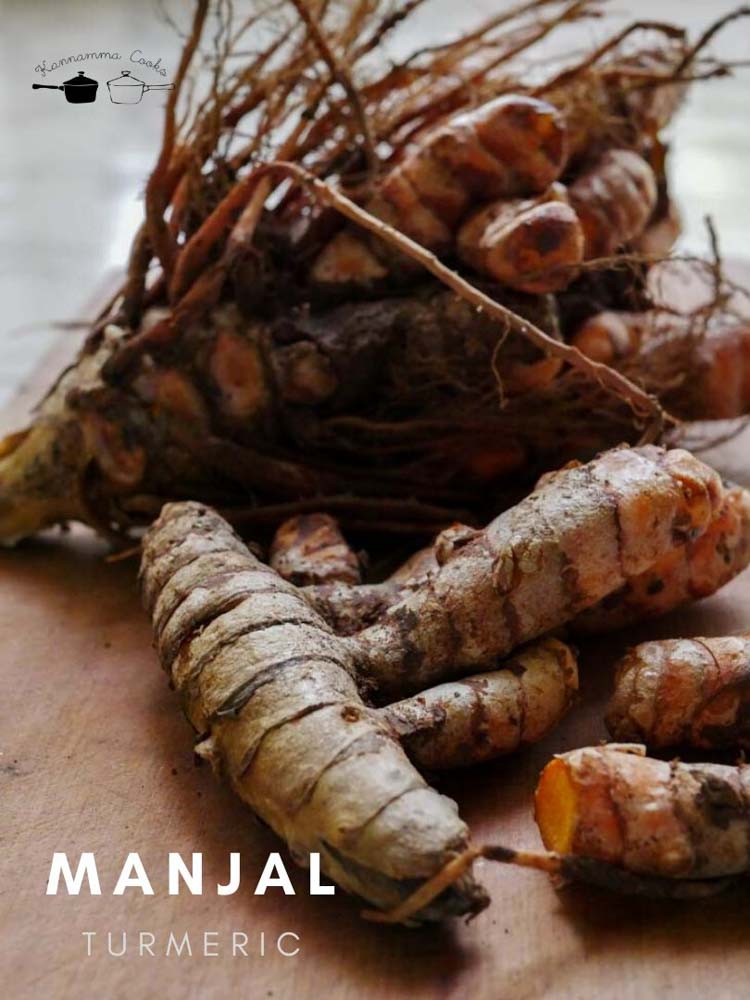
I have taken about 250 grams of raw turmeric for this recipe. Turmeric is called as Manjal மஞ்சள் in Tamil.
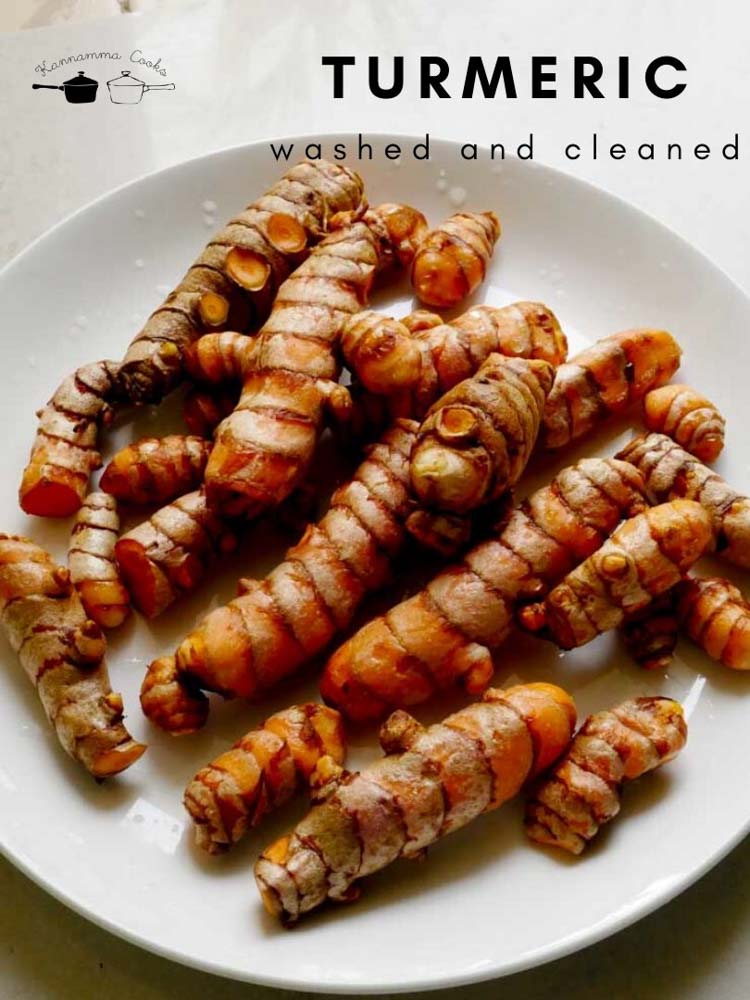
Remove the root stalks (the thick hairy attachments to the roots) and break the turmeric root bulbs into small pieces. Discard the stalks. Wash them well to get rid of sand. If the roots are muddy, soak them in water for 10 minutes and then thoroughly wash them. No need to peel the skin. The skin stays intact.
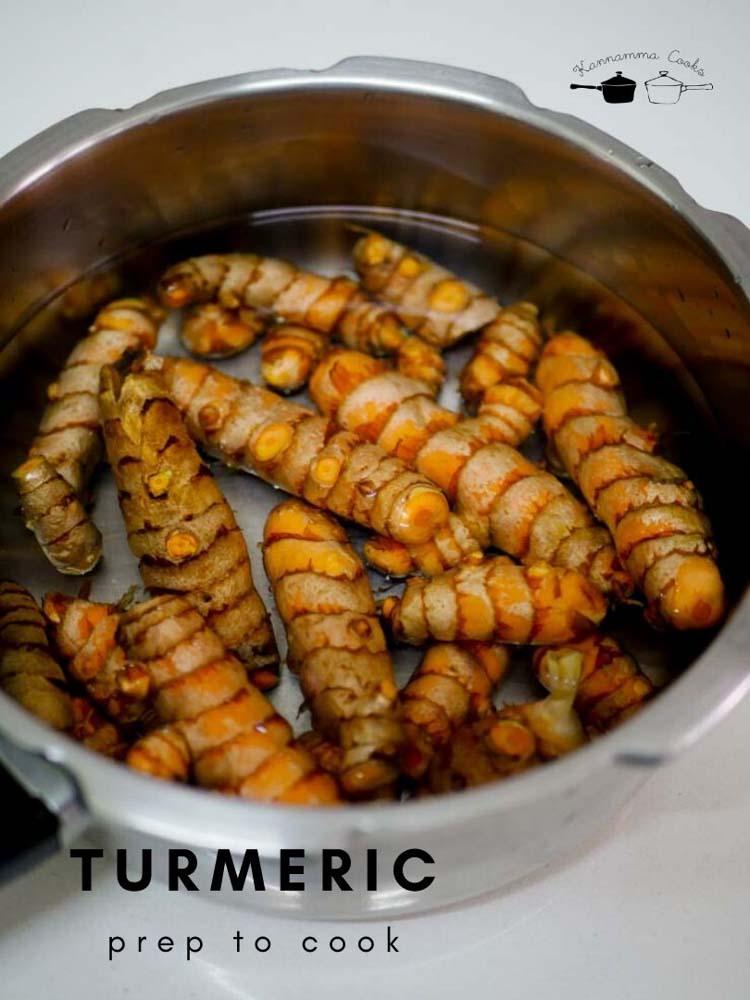
Curing Turmeric Turmeric needs to be cured by boiling them briefly. Curing enables uniform distribution of colour and also intesifies the color and aroma. The drying is quicker too. Just take a pressure cooker and cover the turmeric with water until all the rhizomes are completely immersed in water.
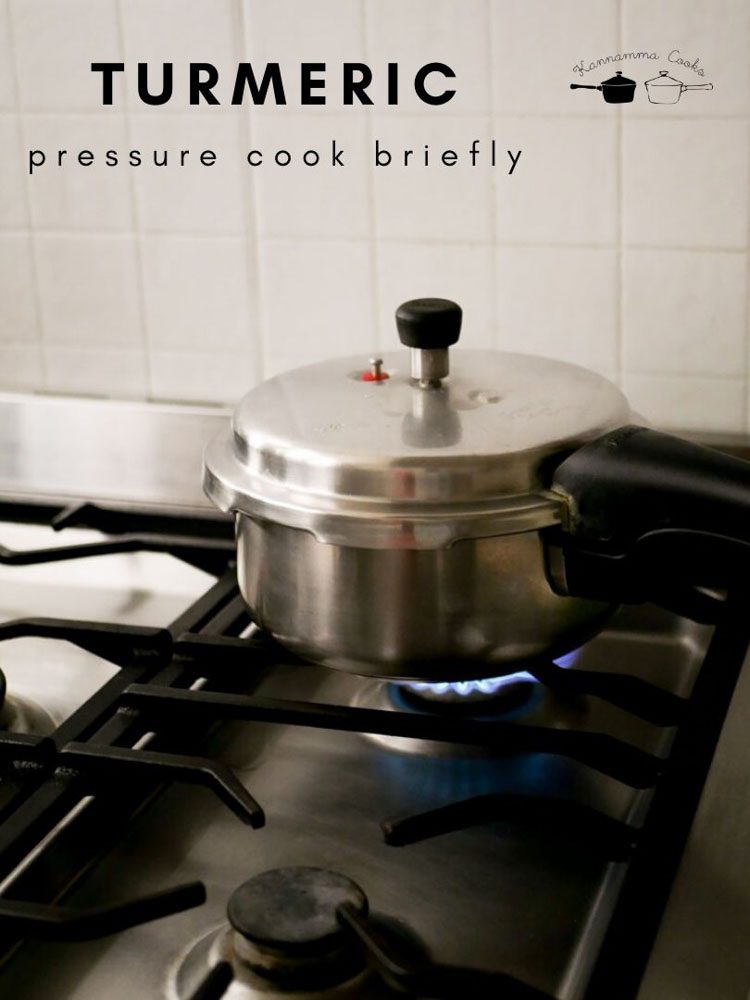
I cooked in a pressure cooker for just one whistle and allowed the pressure to settle naturally. If doing on stove top, cook the turmeric for 20 minutes and then remove from heat.
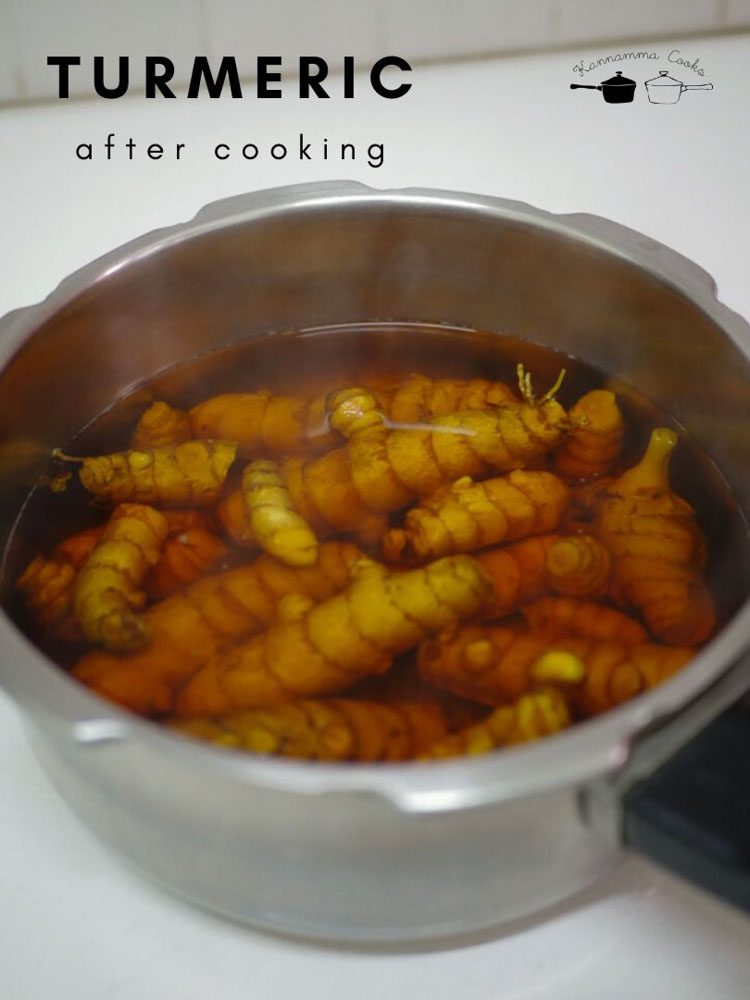
Strain the water from the cooked turmeric. At this stage your kitchen will start to smell like turmeric.
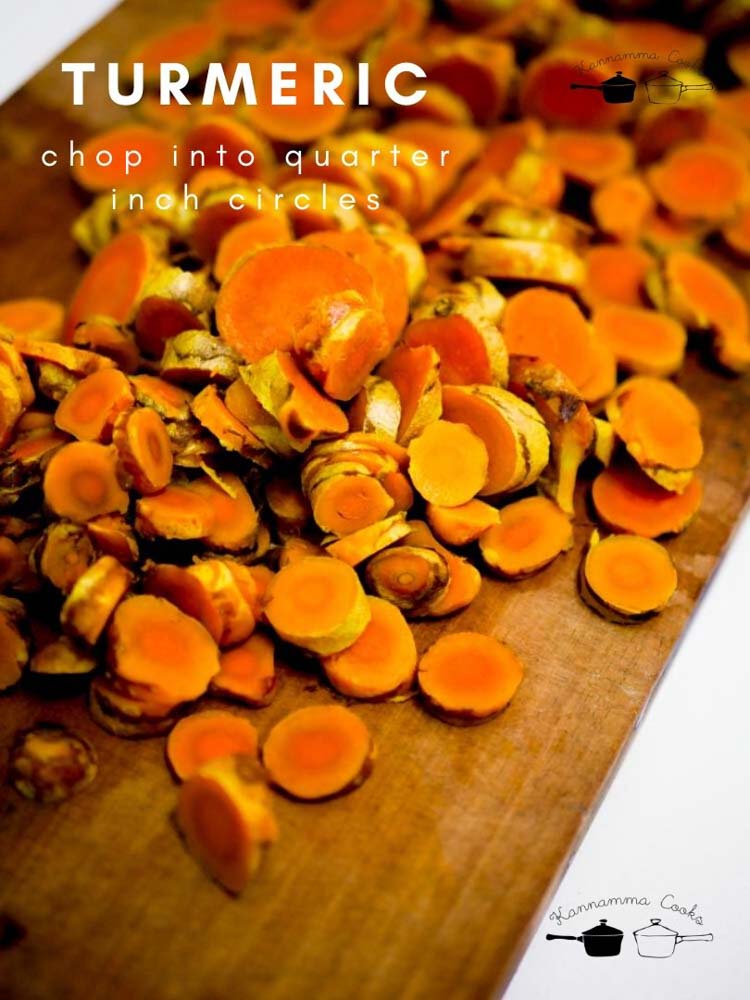
Now cut the cooked turmeric roots into quarter inch pieces.
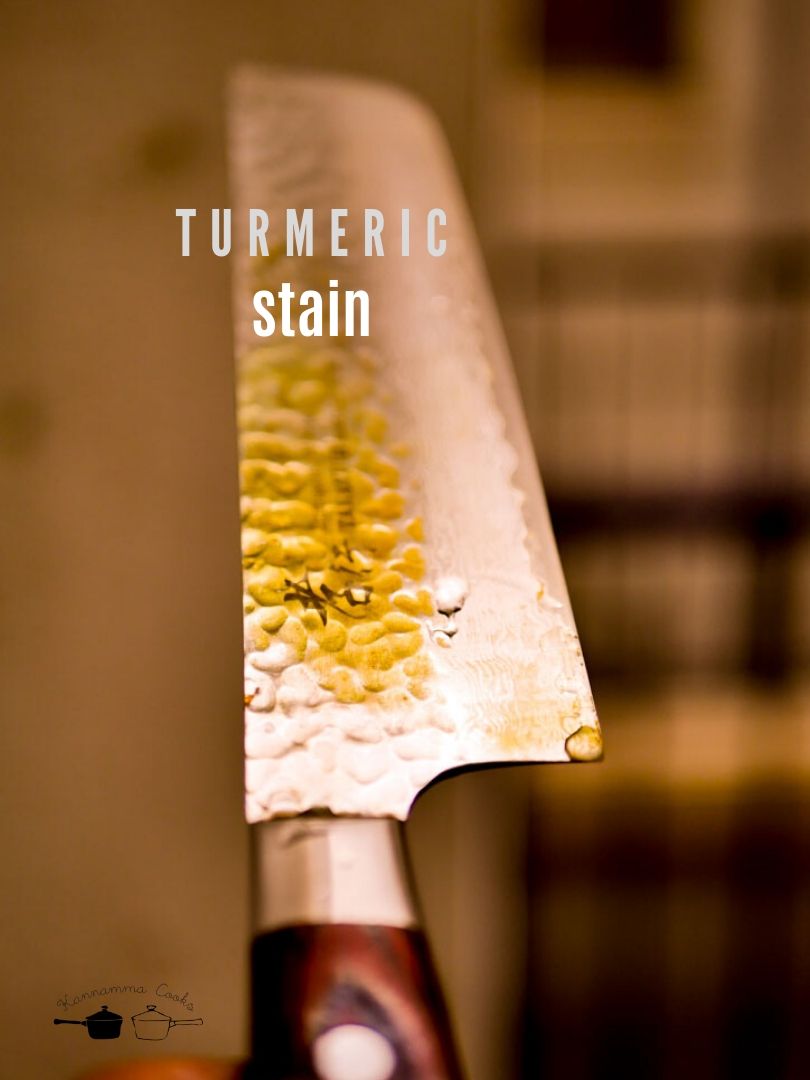
Heads up – Your favorite knife is going to stain.
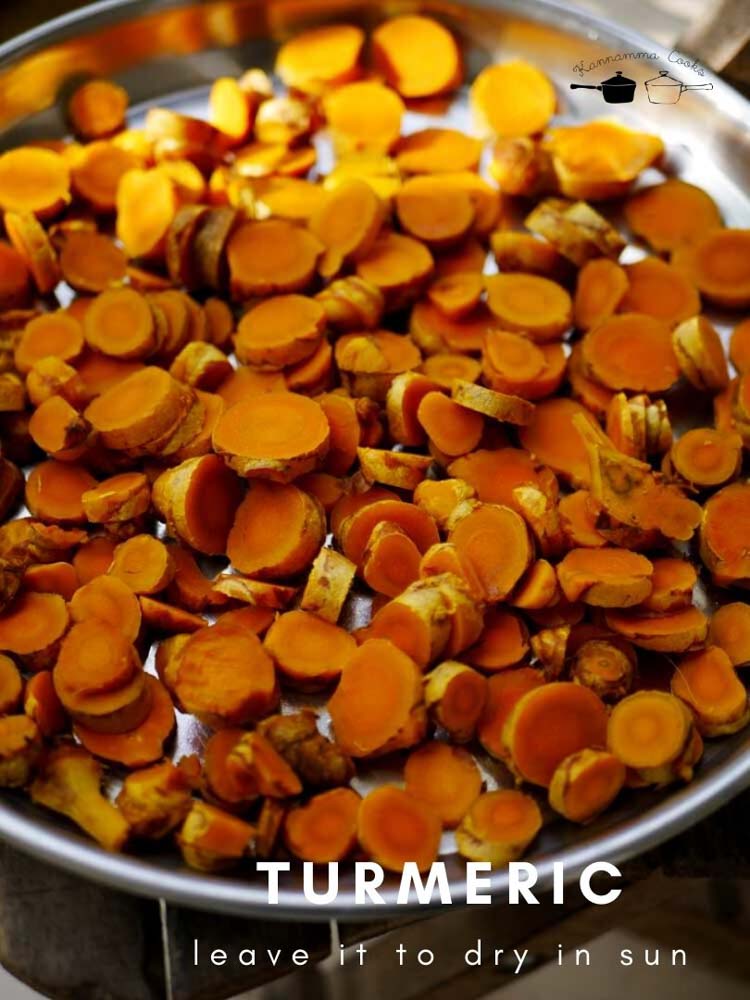
Drying Place the cut turmeric in a plate or a sheet pan and allow it to dry in the sun.

It took two days for the turmeric to dry for me. It might take longer or shorter depending on where you live. At the end of each day, bring the turmeric inside the house. The next day, keep it in sun again. The turmeric would shrink and be bone dry.
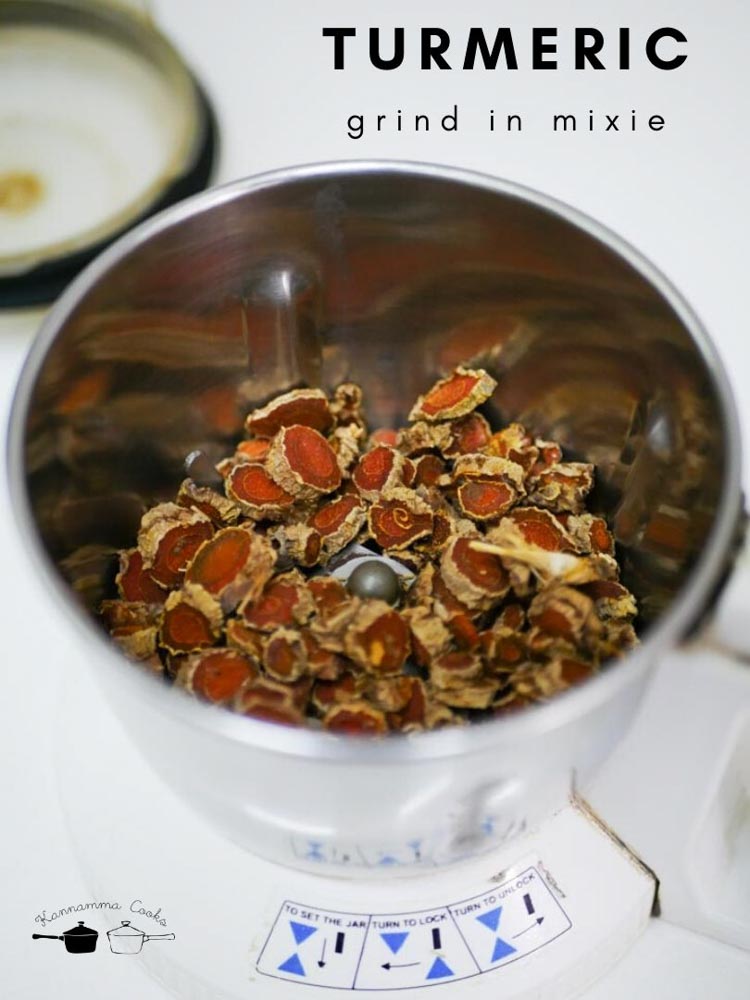
Grinding A note on mixie: This has to be done only in a heavy duty mixie else you might run the risk of breaking the blades. In doubt, please grind it in a neighbourhood flour mill. Now lets grind the dried turmeric bits. You will need a heavy duty Indian style mixie or a coffee grinder to grind them into a powder. I have a panasonic mixie and I am happy with it for grinding masalas.
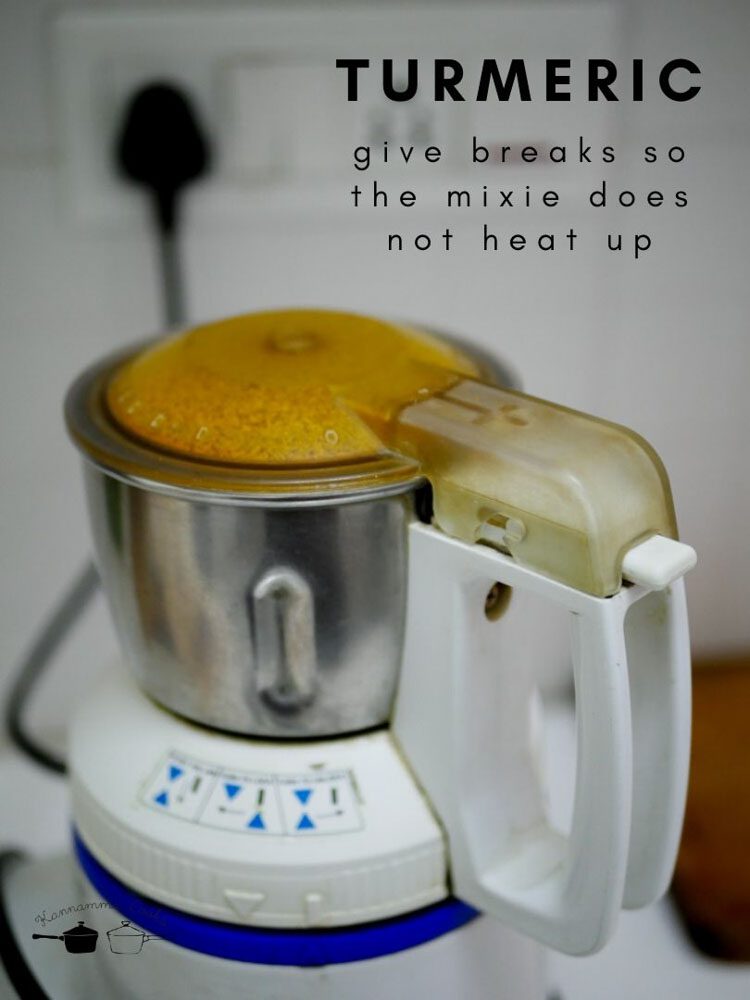
Grind for a minute. Give a break for a couple of minutes and grind again for another minute. The mixie jar might get hot if ground continously. So grind giving enough breaks.
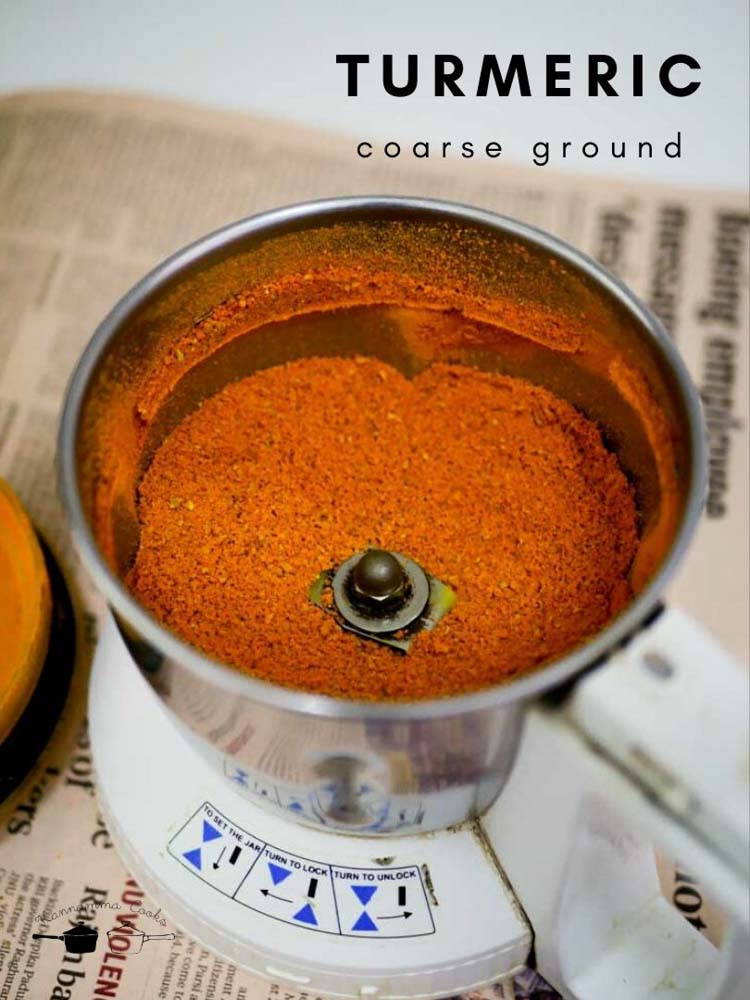
After couple of minutes the turmeric will be coarsely ground.

Sieve the turmeric to get only the fine dust. Whatever is leftover in the sieve, grind again.
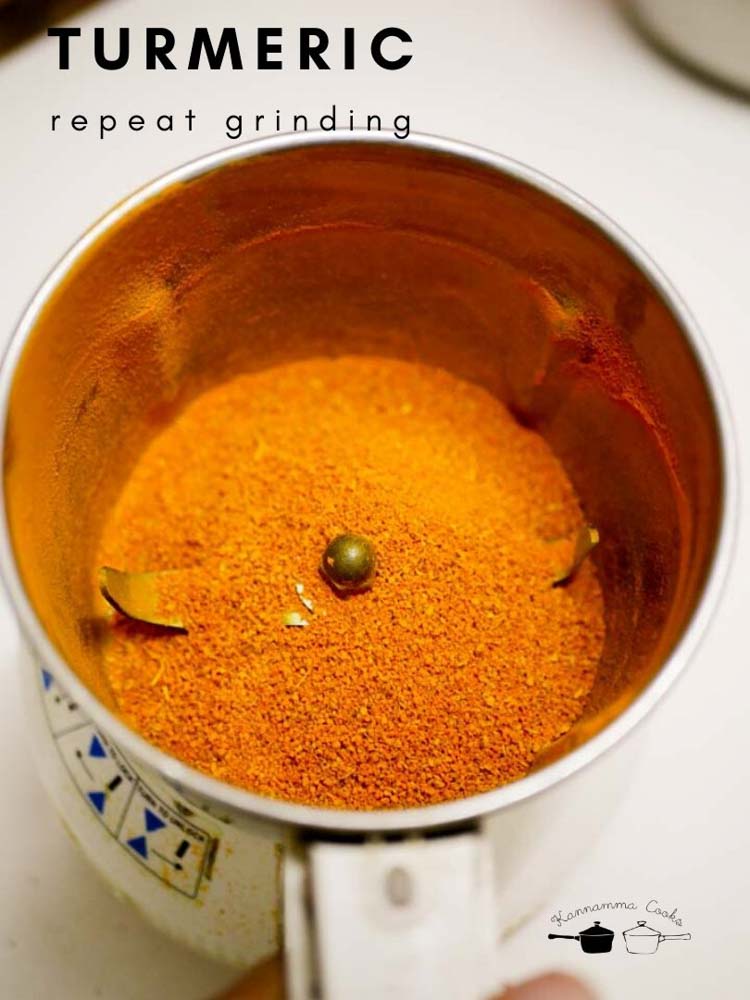
The leftover bits are ground again. Repeat the process of sieving and grinding the bits as necessary.
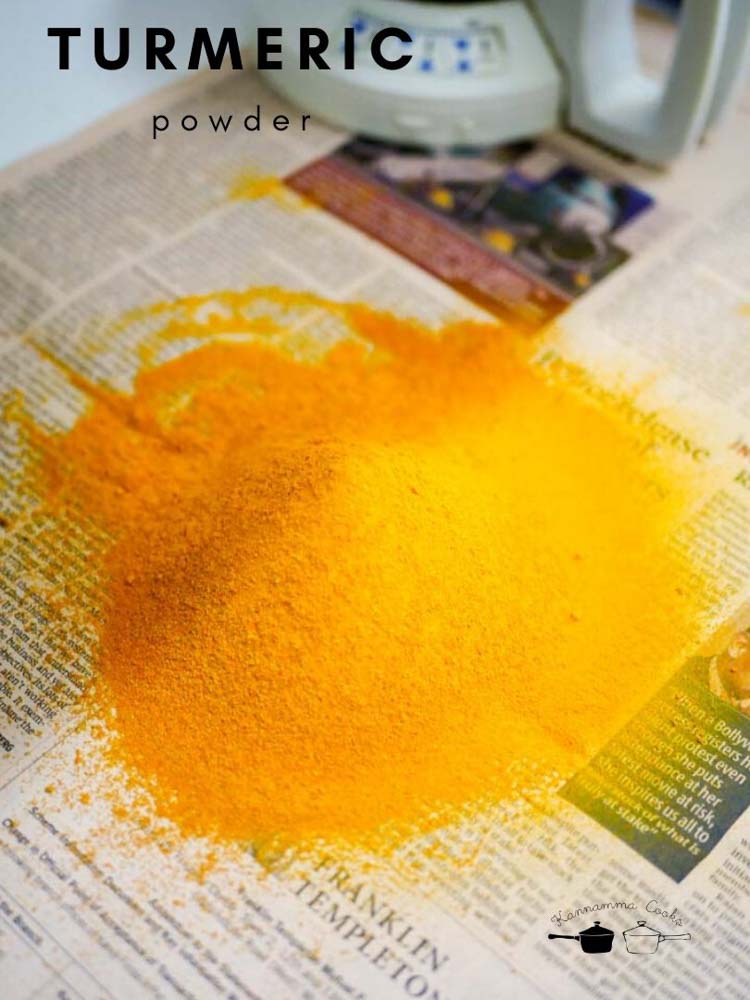
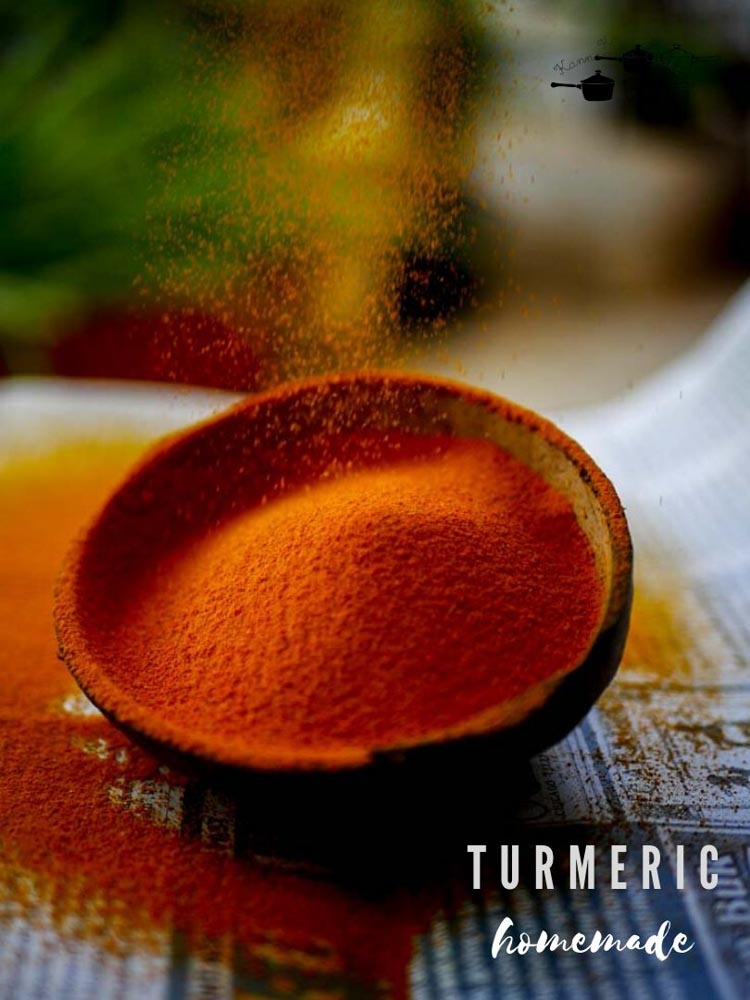
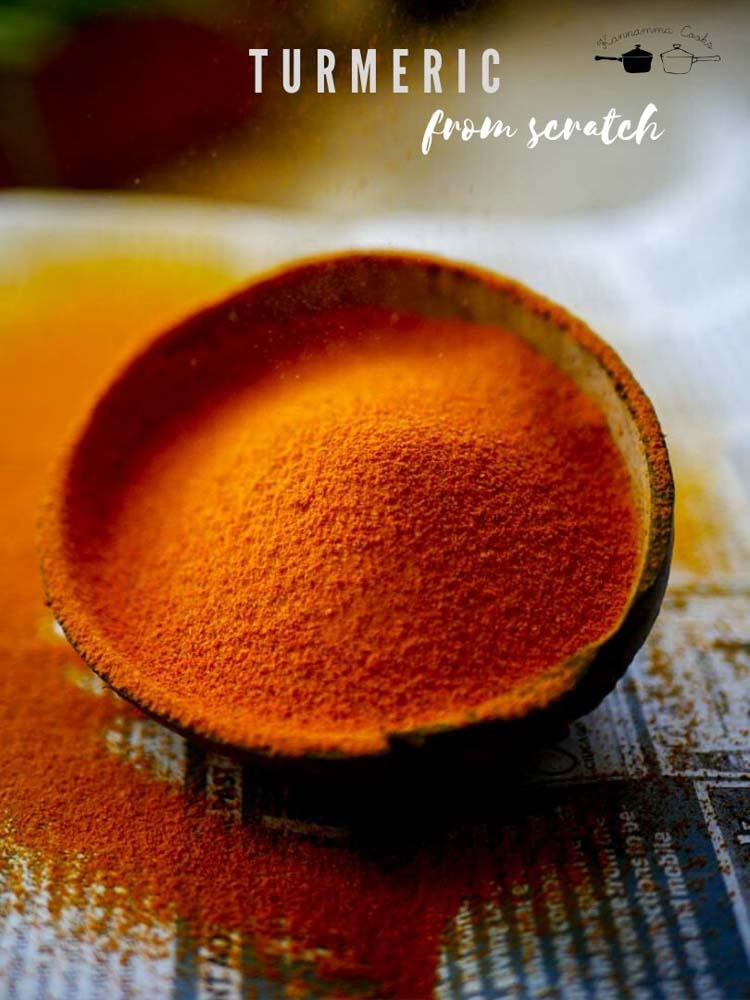
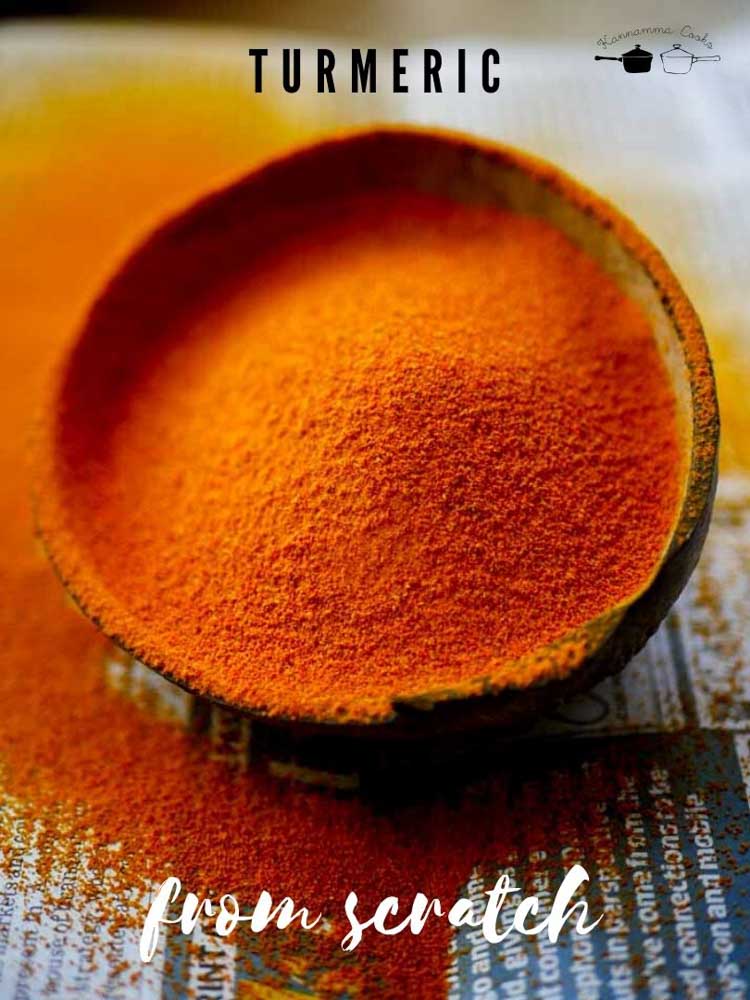
Our labour of love is ready
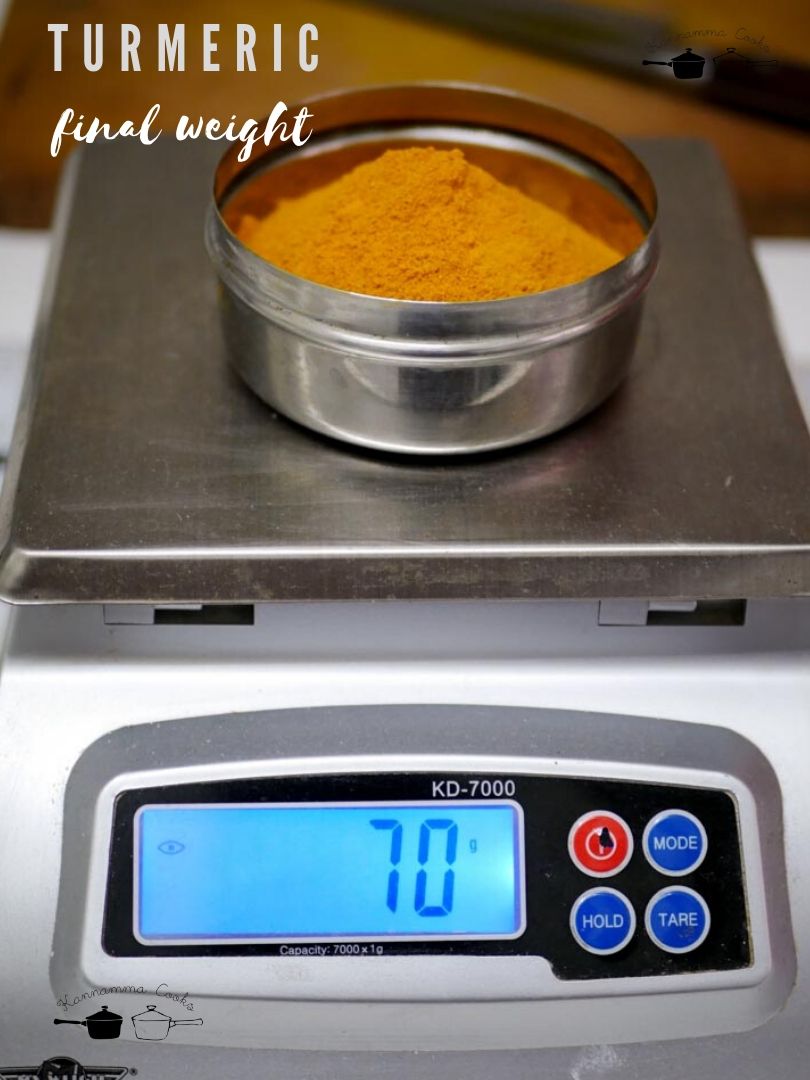
I used 250 grams of fresh turmeric and ended up with 70 grams of turmeric powder.
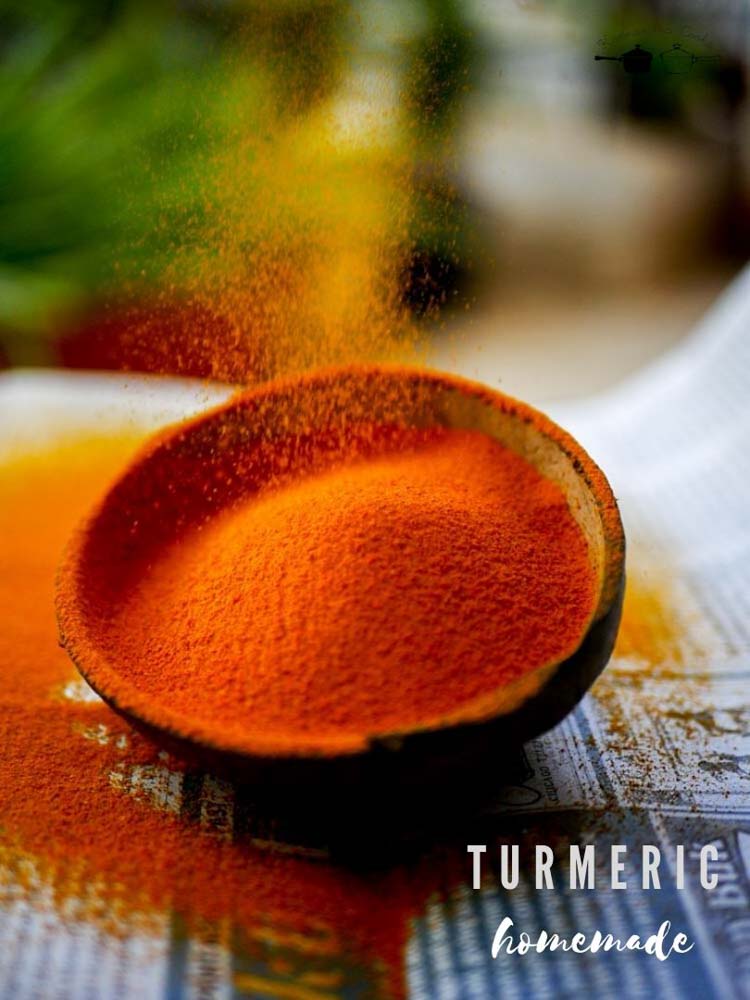
Freshly made turmeric powder is ready. Store in an airtight container and use it for up to 3 months. It can be stored in the freezer for up to an year.
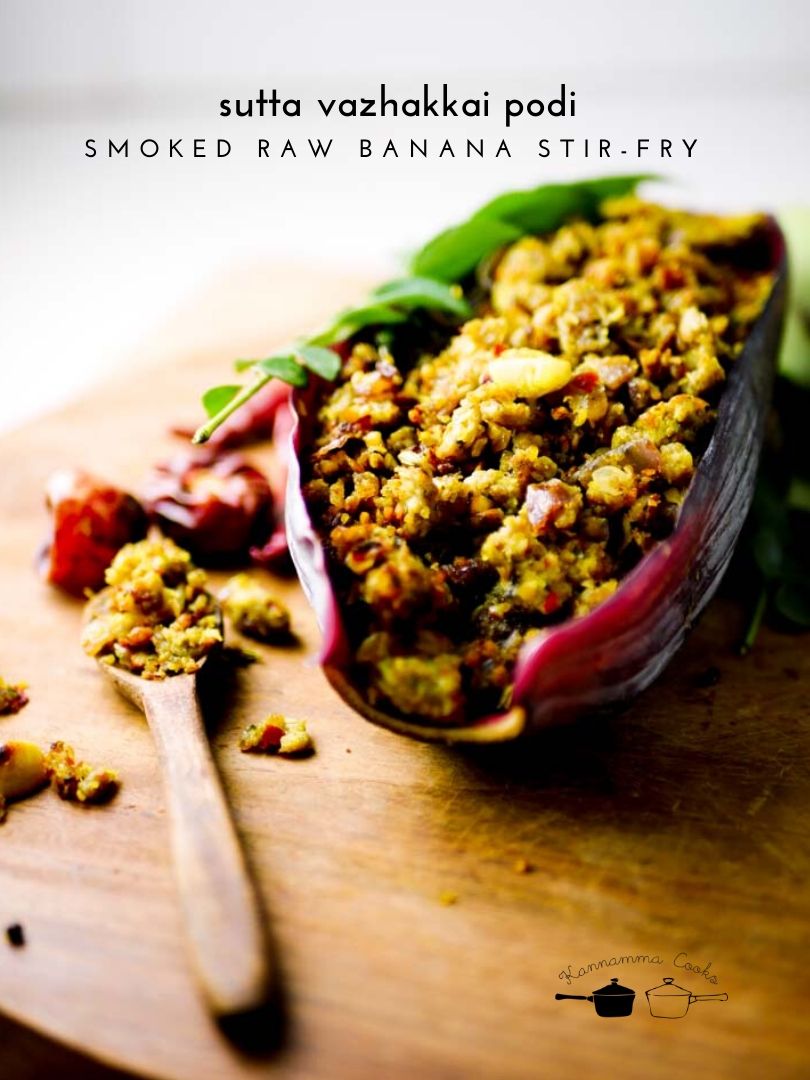
Tamil style recipe for Sutta Vazhakkai Podi – Smoked Raw Banana Stir Fry Recipe made with onions and spices. Raw Banana Podimas fry / spiced roast recipe.
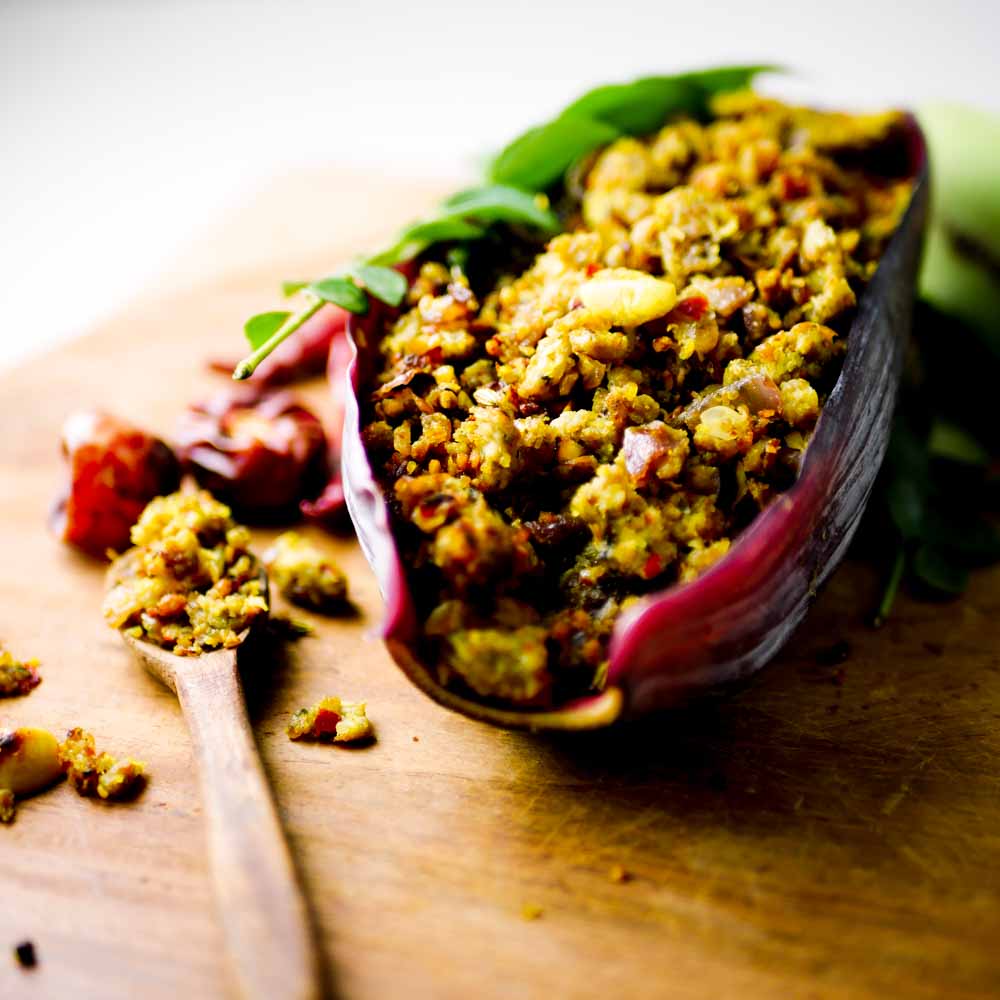
Sutta Vazhakkai podi is an excellent side dish for rice. The raw bananas are smoked and then roasted in a spice mix until it resembles a coarse idli podi. Its so flavorful and goes extremely well with rice. Here is the recipe for Sutta Vazhakkai Podi – Smoked Raw Banana Stir Fry.
Here is the video of how to make Sutta Vazhakkai Podi. Click the link to view the video.
Click the link below to find the recipes on the site that uses the main ingredient as raw banana / vazhakkai. Recipes using Plantain / Raw bananas
Here are some of the equipment, utensils and gadgets that will be useful for making this Sutta Vazhakkai podi recipe. Click the link to buy them online. Heavy Stainless Steel Saute / Fry Pan Heavy Duty Indian Mixie Non Stick Frying Pan Mixing Bowls Paring Knife / Small Knife Tongs Spatula Prep / Cutting Board
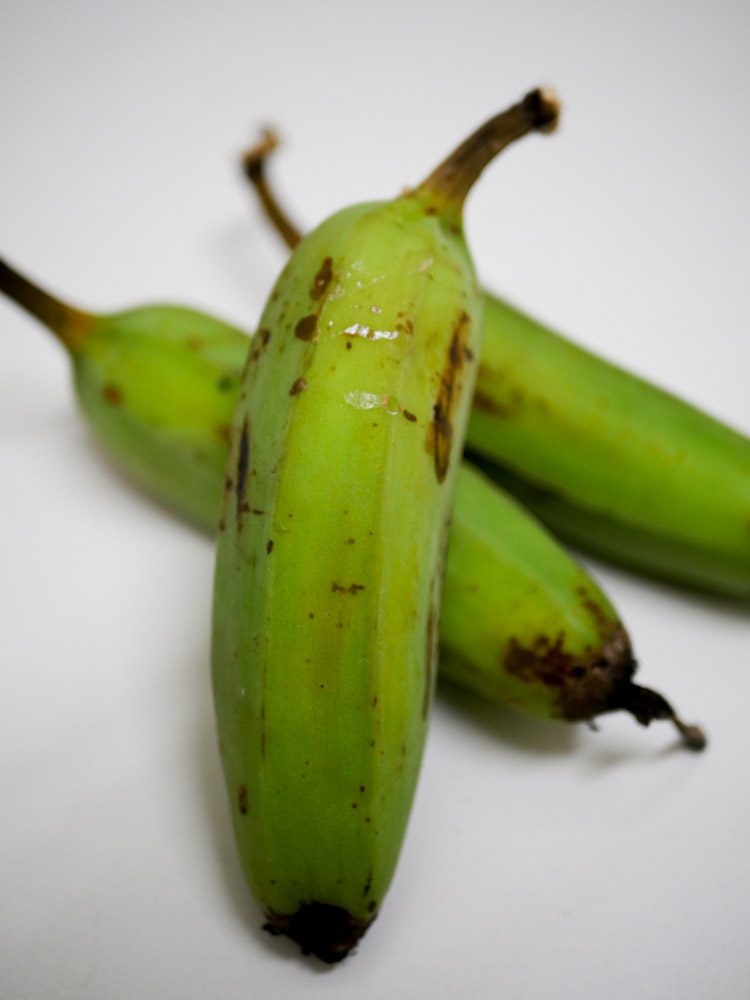
Charring the Vazhakkai / Raw banana for Sutta Vazhakkai Podi First lets prep the vazhakkai / raw banana. You will need the raw plantain variety for this recipe. Wash and clean the raw banana. Apply a little oil to the skin for it to roast evenly.
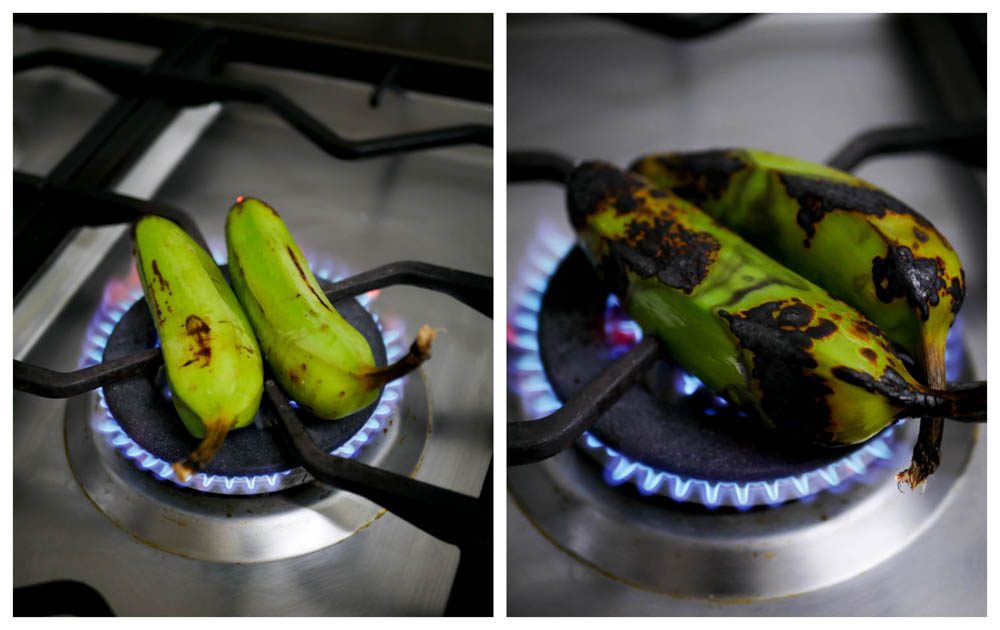
Keep the oiled raw banana directly on a gas flame. Keep turning the raw banana every couple of minutes so it gets charred evenly. If you do not like the smoky flavour, you can also steam the raw bananas and proceed with the recipe. At home, I love smoked anything while my husband and son vehemently refuse as they hate the smoky flavour.
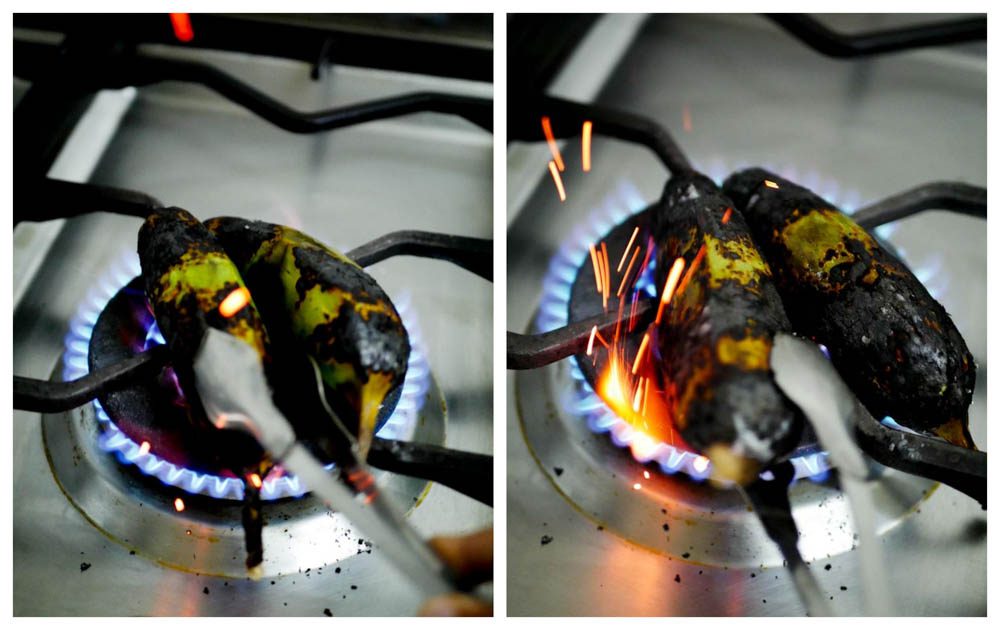
It will take about 5-6 minutes for the raw bananas to be completely charred. Note: The gas stove and the burner are going to be a little messy with the charred ash. A little clean up will be due. Heads up on that.
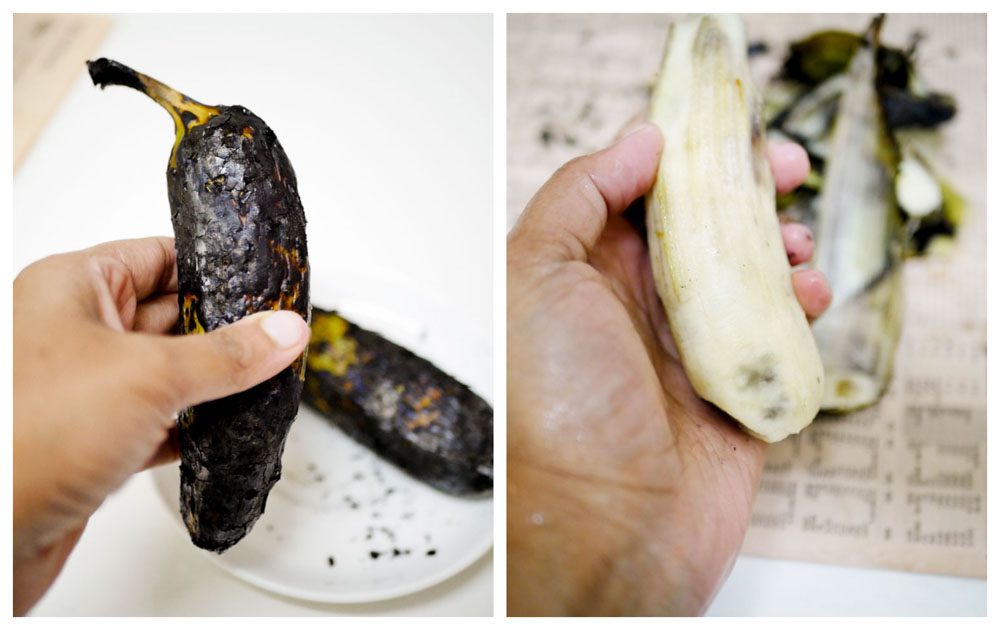
Once the raw bananas are charred, remove from flame and let it rest on a plate for a couple of minutes. Peel the skin with a knife. Wash the raw banana if the ash is sticking to the flesh. Set aside.
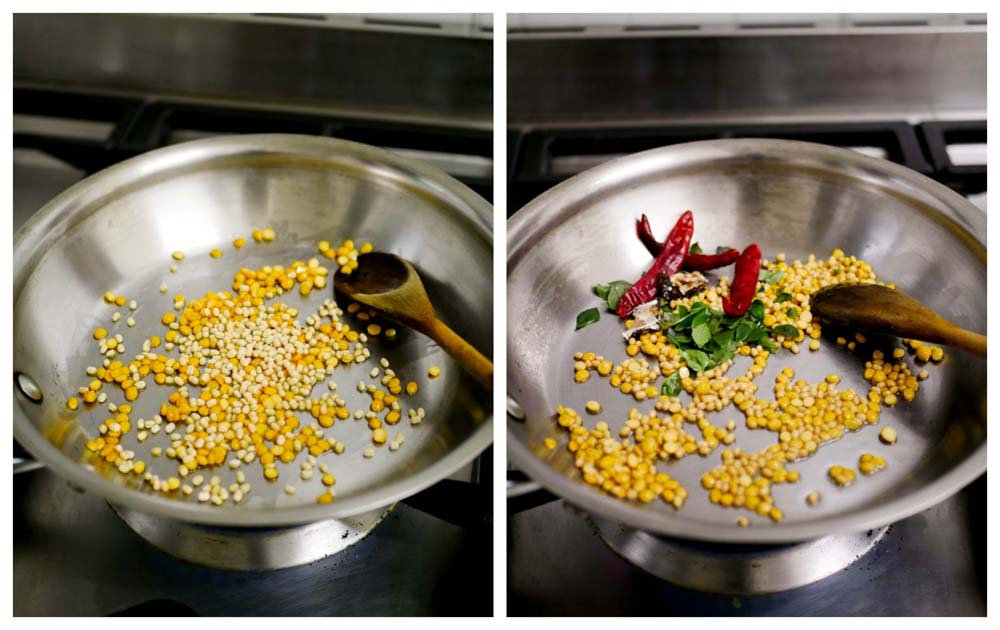
Masala for Sutta Vazhakkai Podi Heat coconut oil in a pan and add in the chana dal and the urad dal. Roast on a low flame. Add in the dried red chillies, curry leaves and tamarind when the lentils are roasted half way.
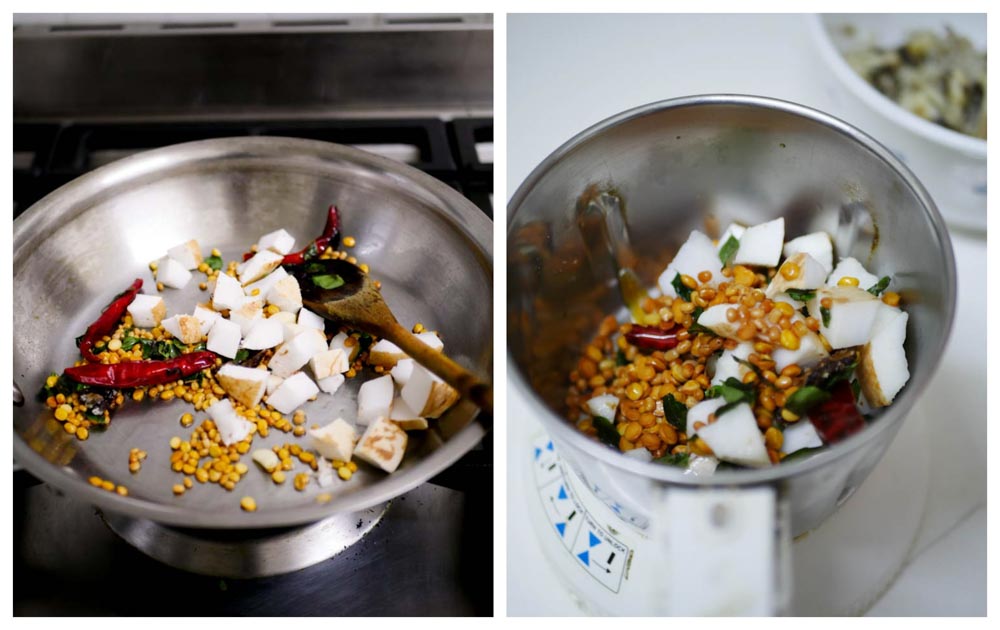
Once the lentils are nice and golden, add in the coconut. Saute for a few seconds and remove the pan from heat. Transfer the contents to a mixie jar. Instead of fresh coconut, desiccated coconut also works well in this recipe.
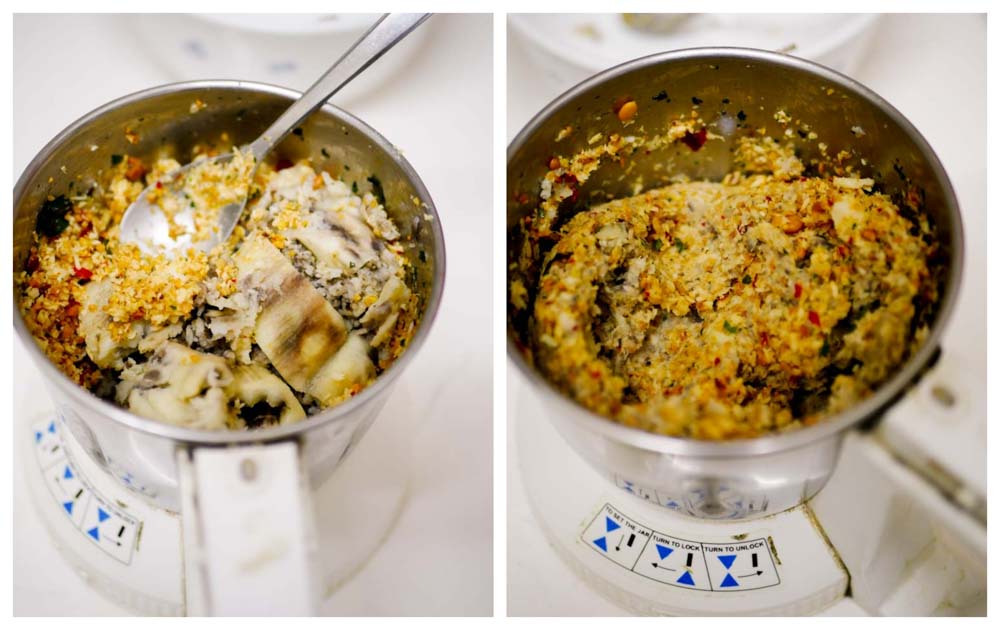
Grind the mixture in a small mixie jar to a coarse powder. Do not add any water while grinding. Pulse several times stopping in-between to mix the masala in the mixie jar so it gets powdered evenly. Finally add in the charred and peeled raw banana and pulse it for a few seconds. Set aside.
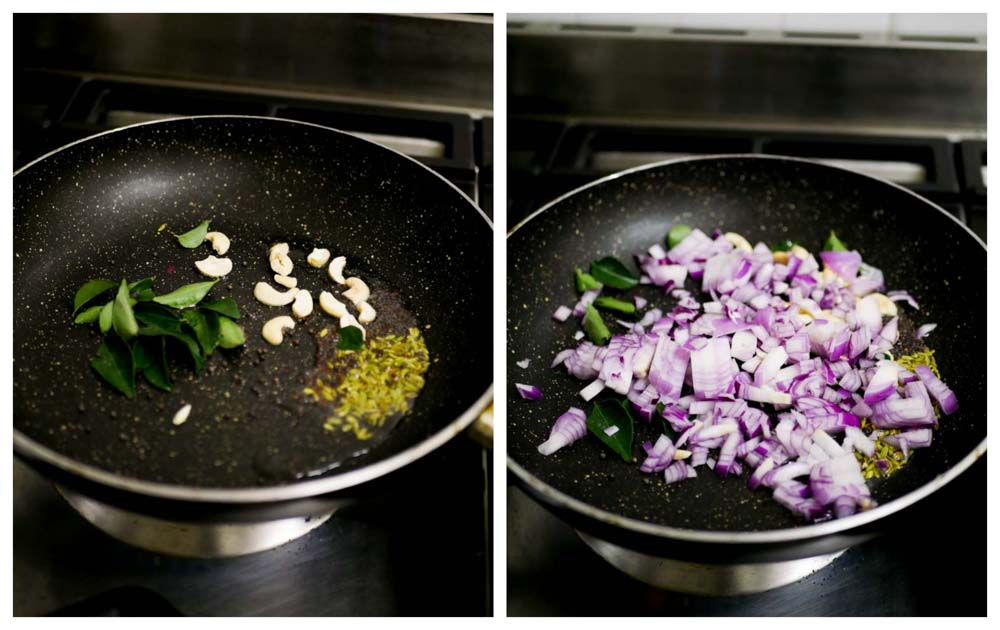
Tempering the Vazhakkai Podi Heat coconut oil in a pan (preferably non-stick) and add in the mustard seeds, curry leaves, fennel seeds (sombu) and broken cashew nuts. Let the mustard seeds crackle. Add in the finely chopped onion and the salt. Saute till the onions are nice and golden.
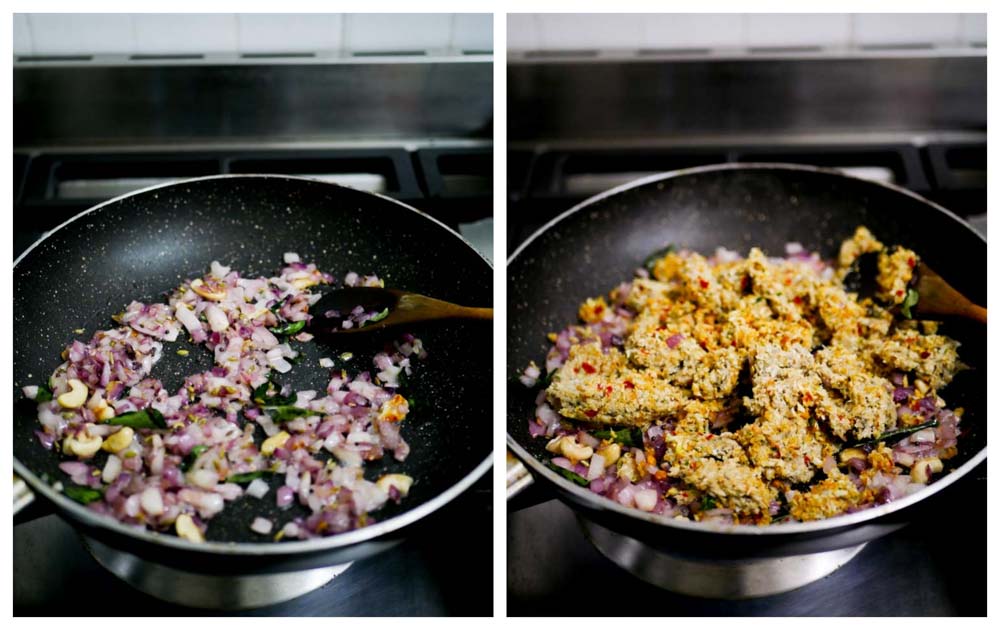
Once the onions are cooked, add in the ground mixture to the pan.
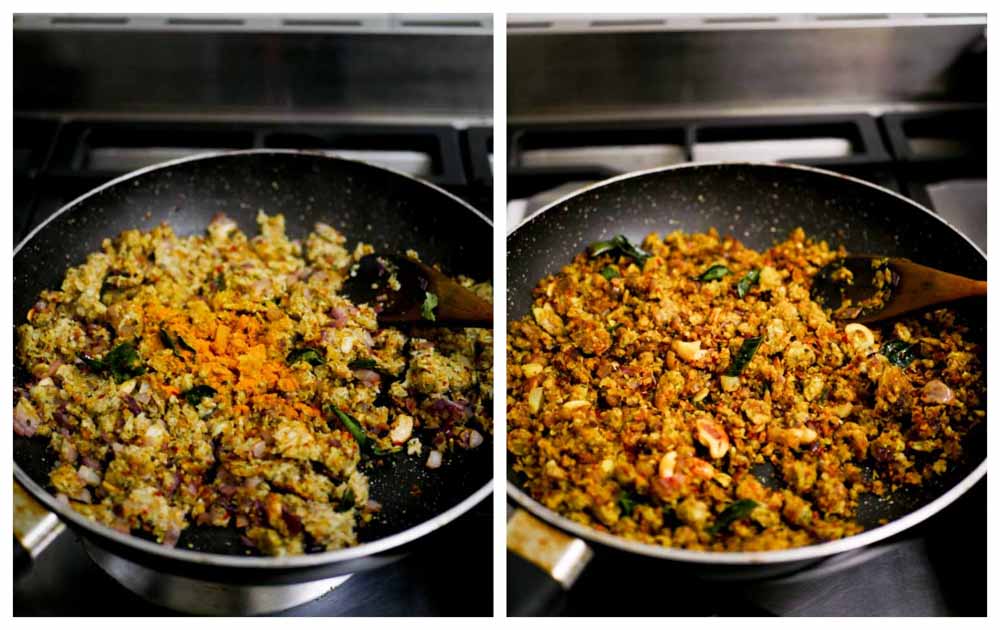
Add in the turmeric and the jaggery. Jaggery is optional but that little sweetness nicely balances the sourness from the tamarind and rounds out the flavour. Keep the flame on low and roast everything for a good 10-12 minutes. Keep breaking the lumps and roast till the mixture is dry.
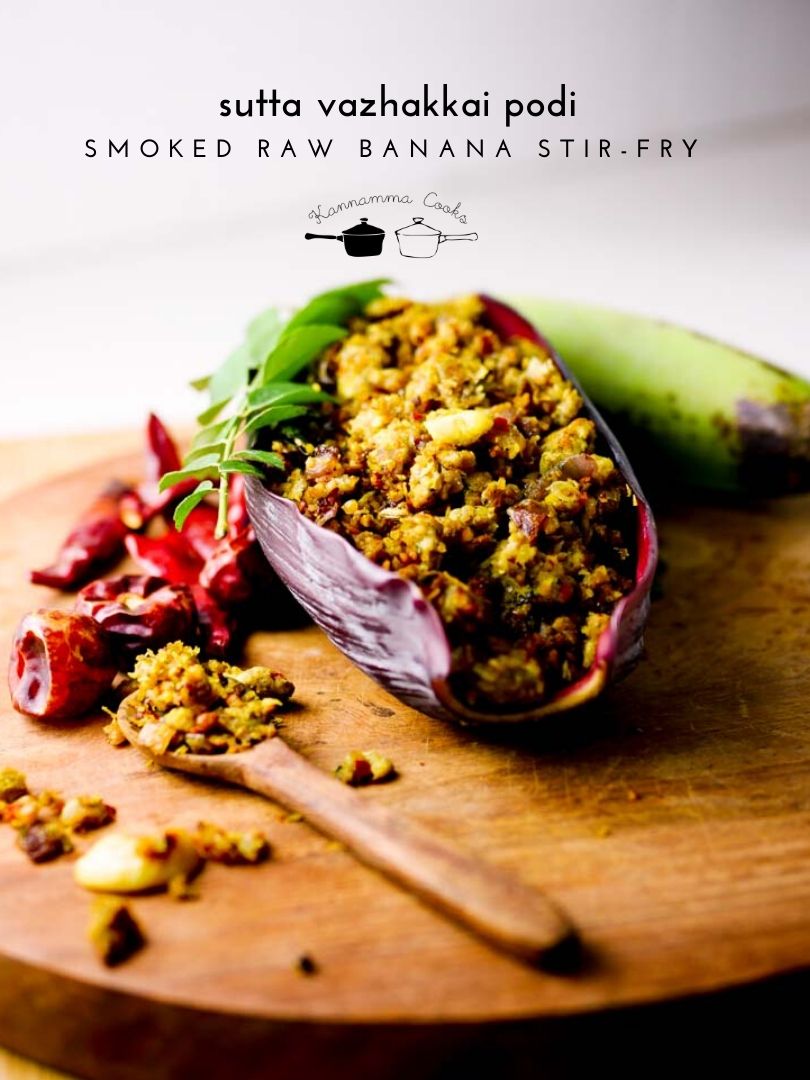
Raw banana stir-fry / sutta vazhakkai podi roast is ready. Serve hot with rice.
For charring the veggie for Sutta Vazhakkai Podi
- 2 raw bananas / vazhakkai (raw plantain variety)
For the Masala
- 1 teaspoon coconut oil
- 2 tablespoon chana dal
- 1 tablespoon urad dal
- 3 dried red chillies
- 2 sprigs curry leaves
- a small marble sized piece of tamarind
- 1/4 cup fresh shredded coconut
For the tempering Sutta Vazhakkai Podi
- 1 tablespoon coconut oil
- 1/4 teaspoon mustard seeds
- 1 sprig curry leaves
- 1 teaspoon fennel seeds
- 4 - 5 cashewnut
- 1/2 cup finely chopped onion
- 1 teaspoon salt
- 1/2 teaspoon turmeric
- 1/2 teaspoon jaggery
- Keep the oiled raw banana directly on a gas flame. Keep turning the raw banana every couple of minutes so it gets charred evenly. It will take about 5-6 minutes for the raw bananas to be completely charred.
- Once the raw bananas are charred, remove from flame and let it rest on a plate for a couple of minutes. Peel the skin with a knife. Wash the raw banana if the ash is sticking to the flesh. Set aside.
- Heat coconut oil in a pan and add in the chana dal and the urad dal. Roast on a low flame. Add in the dried red chillies, curry leaves and tamarind when the lentils are roasted half way.
- Once the lentils are nice and golden, add in the coconut. Saute for a few seconds and remove the pan from heat. Transfer the contents to a mixie jar.
- Grind the mixture in a small mixie jar to a coarse powder. Do not add any water while grinding. Pulse several times stopping in between to mix the masala in the mixie jar so it gets powdered evenly. Finally add in the charred and peeled raw banana and pulse it for a few seconds. Set aside.
- Heat coconut oil in a pan (preferably non-stick) and add in the mustard seeds, curry leaves, fennel seeds (sombu) and broken cashew nuts. Let the mustard seeds crackle. Add in the finely chopped onion and the salt. Saute till the onions are nice and golden.
- Once the onions are cooked, add in the ground mixture to the pan.
- Add in the turmeric and the jaggery. Jaggery is optional but that little sweetness nicely balances the sourness from the tamarind and balances out the flavour. Keep the flame on low and roast everything for a good 10-12 minutes. Keep breaking the lumps and roast till the mixture is dry.
- Raw banana stir-fry / sutta vazhakkai podi roast is ready. Serve hot with rice.
- Author: Kannamma - Suguna Vinodh
- Prep Time: 20 mins
- Cook Time: 20 mins
- Category: Side dish
- Cuisine: Tamilnadu
