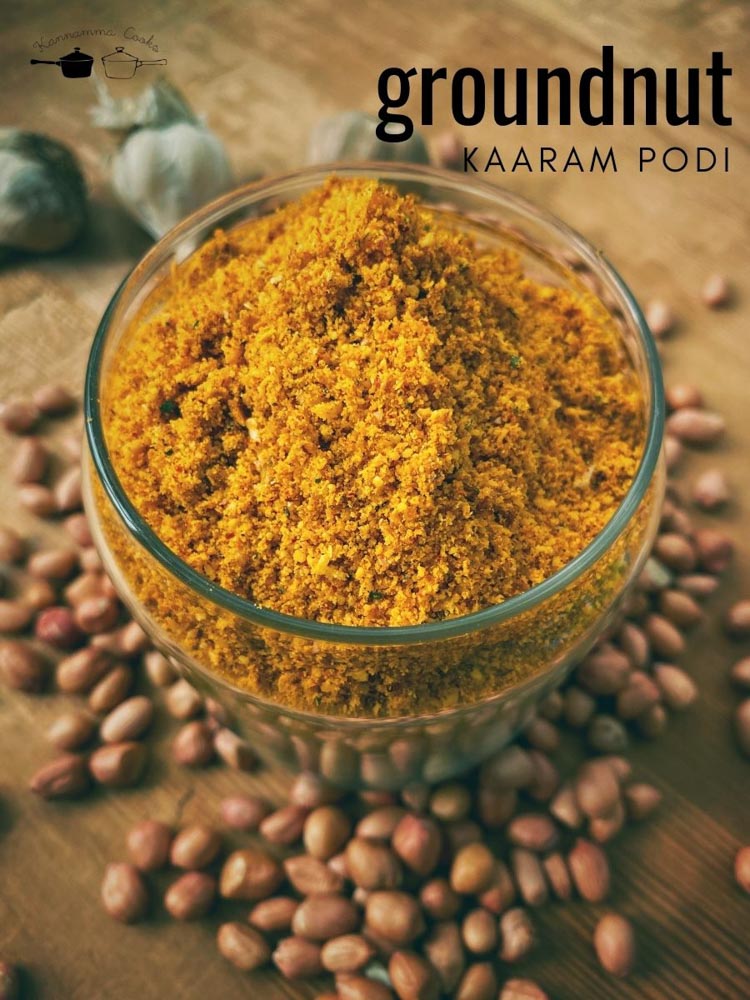
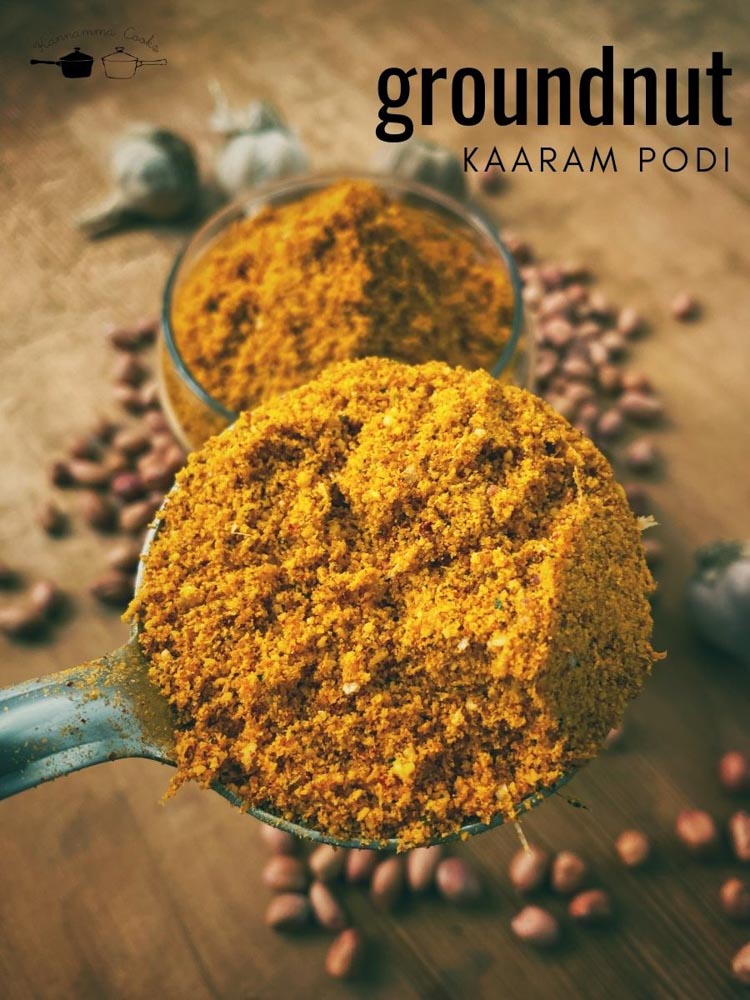
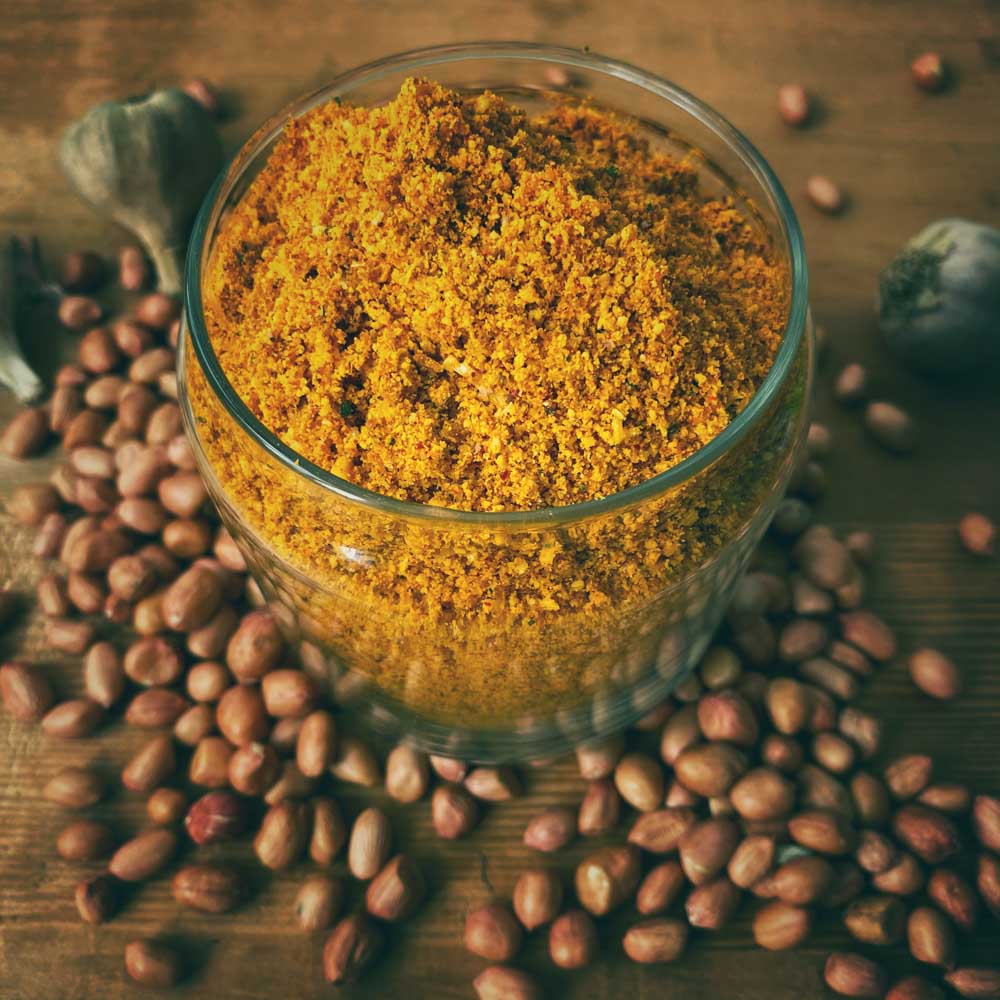
Recipe for Idli / Chutney podi made with groundnuts / peanuts and garlic. This spicy, tangy powder is so addictive and easy to make at home. Recipe with step by step pictures and video.
Idli podi is a staple everyday at our place. This is a slight variation from my garlic Idli podi made with the addition of groundnuts. I have kept the garlic whole and with the skin too. The garlic skin gives it a fantastic aroma and texture. This is the hot favorite of my son and mom now and they cannot have enough of it. The tricky thing with the podi is in the grinding of the groundnuts. The lentil mixture is ground first. Then, the peanuts and garlic are mixed with the lentil powder and ground again. The lentil powder helps the groundnuts from becoming oily when ground. Grind the mixture in batches and always use the pulse mode and do not overload the mixie. If the mixie heats up, the oils from the groundnut will try to ooze. I have used a cup of groundnuts in this recipe. I ground the podi in four batches using a heavy duty Indian mixie. The trick is to grind in small batches. Hope you try this recipe and like it too!
Here is the video of how to make Groundnut Kaaram Podi – Kadalai Poondu Podi Recipe
Here is how to make Groundnut Kaaram Podi – Kadalai Poondu Podi Recipe Here are some pointers while making the podi. 1. Always roast the ingredients on a low flame and do not let the ingredients burn. 2. Grind the lentils ( chana dal, urad dal ), dry red chillies and spices first. Then mix in the roasted groundnuts and garlic and grind again. If everything is ground together, the seeds tend to leave out oil and the mixture does not grind well. 3. Since the garlic is ground at last along with the seeds and the lentil powder, there will be no moisture left. The lentil powder absorbs the excess moisture and the garlic gets ground fine. Use garlic along with the skin. No need to peel the skin. The skin adds a fantastic aroma and flavour to the podi. If you do not like the flavour of garlic, you can omit it. 4. Do not overload the mixie while grinding. Always grind in batches and an Indian heavy duty mixie is preferred for making this recipe.
You will need a heavy duty mixie for making this Groundnut Kaaram Podi – Kadalai Poondu Podi. Here are the mixie brands I recommend Bosch Mixie Panasonic Mixie
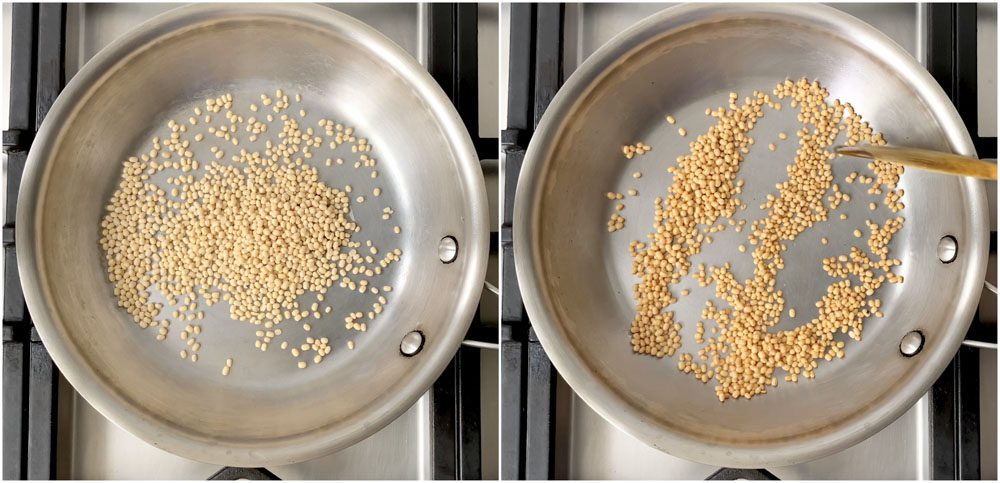
We will be dry roasting all the lentils separately so the lentils get evenly roasted. Add in 1/4 teaspoon of coconut oil and whole unpolished white urad dal. Use unpolished urad dal for best results. I like this particular brand of urad dal . Sauté on a low flame till the urad dal is golden. Set aside on a plate to cool.
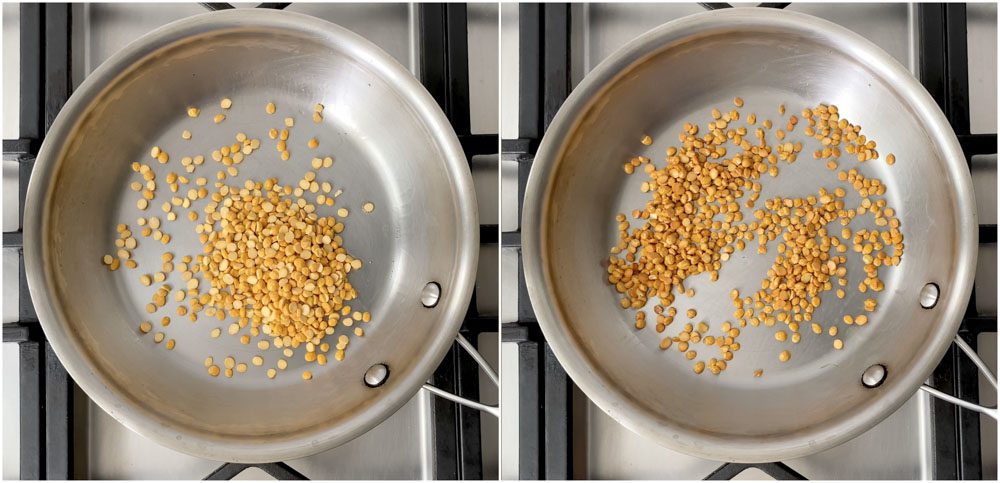
In the same pan, heat 1/4 teaspoon of coconut oil in a pan and add in the chana dal. Roast the chana dal on a low flame till the lentils are golden. Keep sautéing to avoid burning. Have patience and roast slow until the aroma comes and the dal turns color. Remove from the pan once the dal is golden. Set aside on a plate to cool.
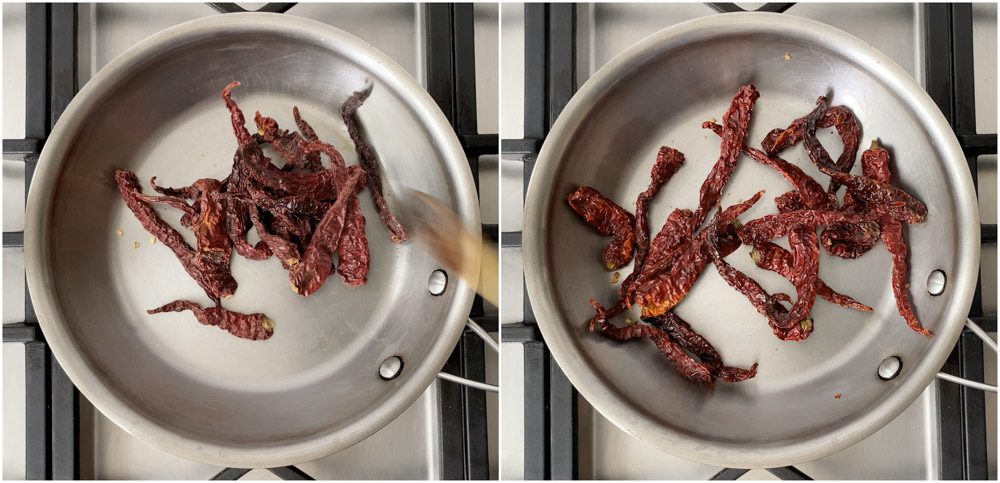
In the same pan, add in 1/4 teaspoon of coconut oil. Add in the Byadagi chillies / Kashmiri red chillies. I like to add the Byadagi chillies as it gives the idli podi a robust color and aroma. Sauté for a few seconds. The chillies will fluff up. Remove the chillies and set aside on a plate to cool. Do not fry the chillies for long.
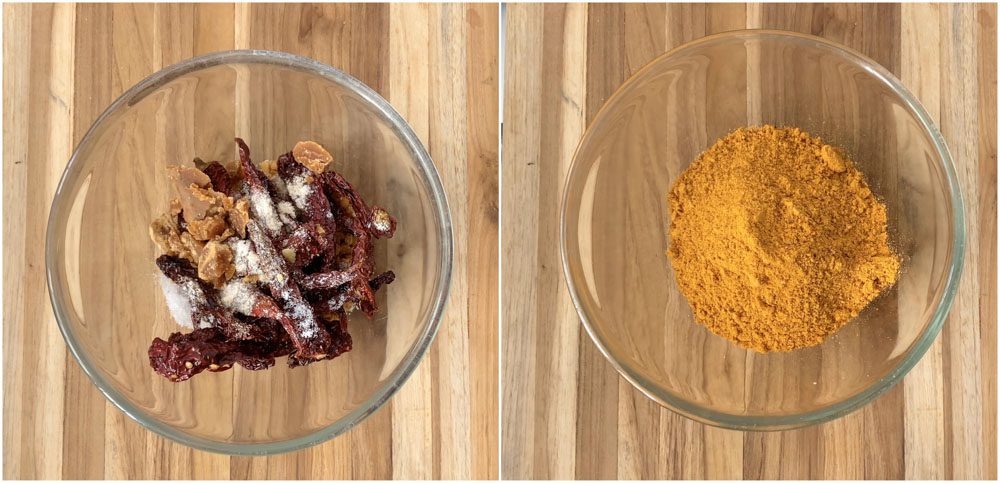
To this mixture, add in the salt, asafoetida and jaggery when the mixture is still hot. Let the mixture cool a bit. Grind this mixture in a mixie to a fine powder. Set aside.
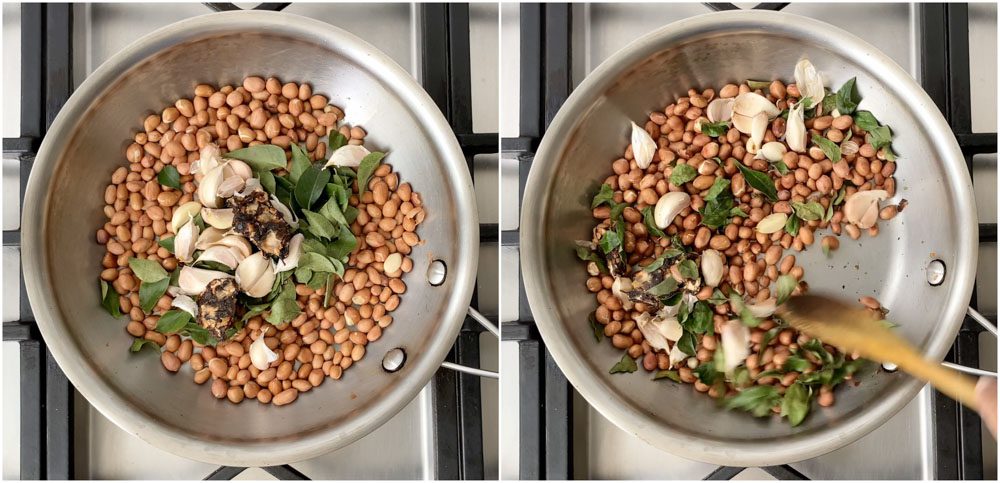
Take a pan and dry roast the groundnuts on a low flame. Dry roast for 2-3 minutes. To the pan, add in the garlic with the skin, curry leaves and tamarind. Roast for another couple of minutes. Roast until the groundnuts are golden and the garlic is charred here and there.
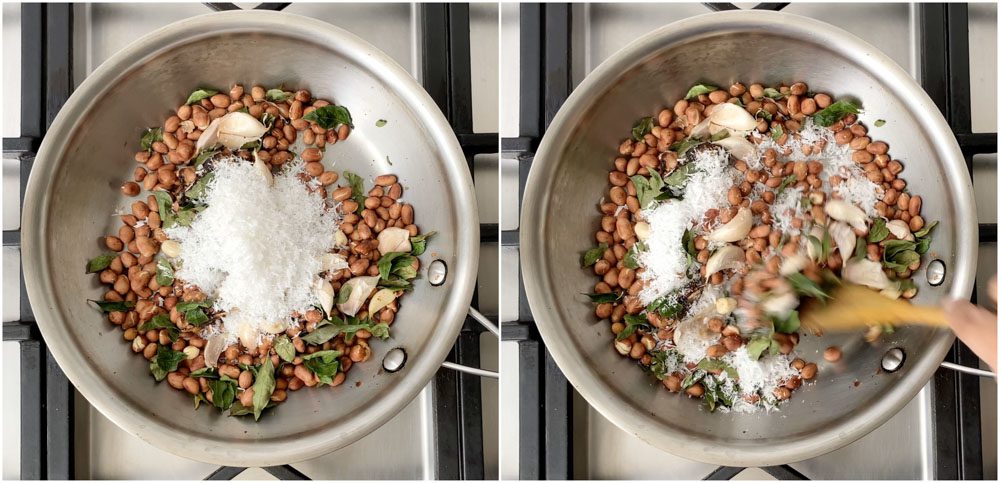
Add in the desiccated coconut and sauté for a few seconds.
Remove the mixture from heat and add it on top of the lentil mixture.
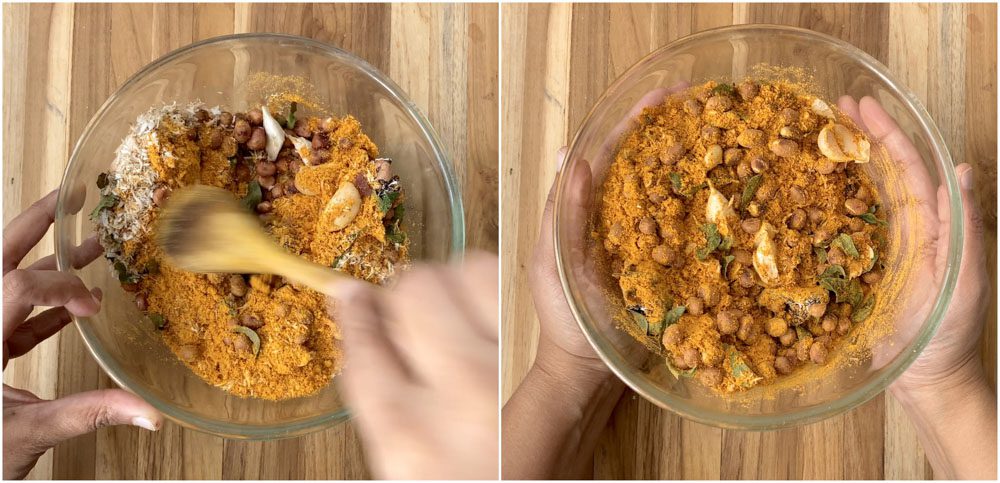
Mix well. Let the mixture cool.
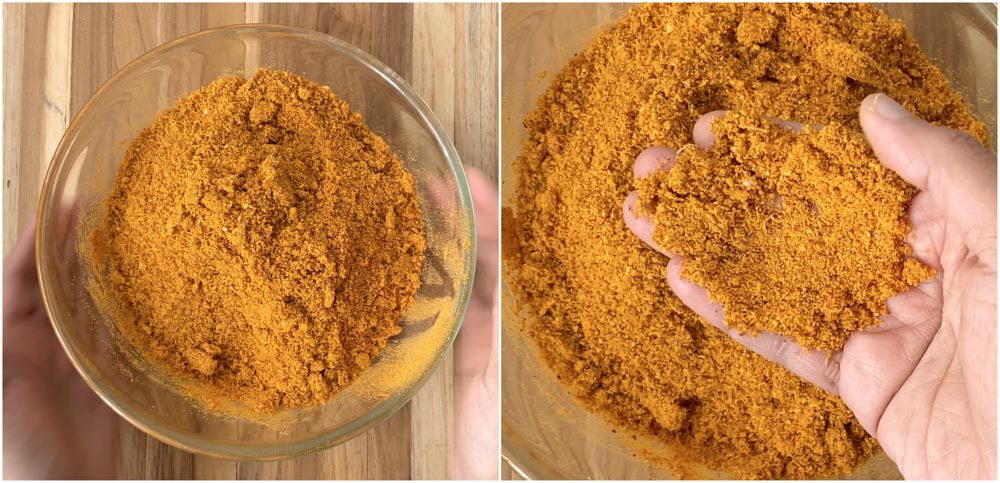
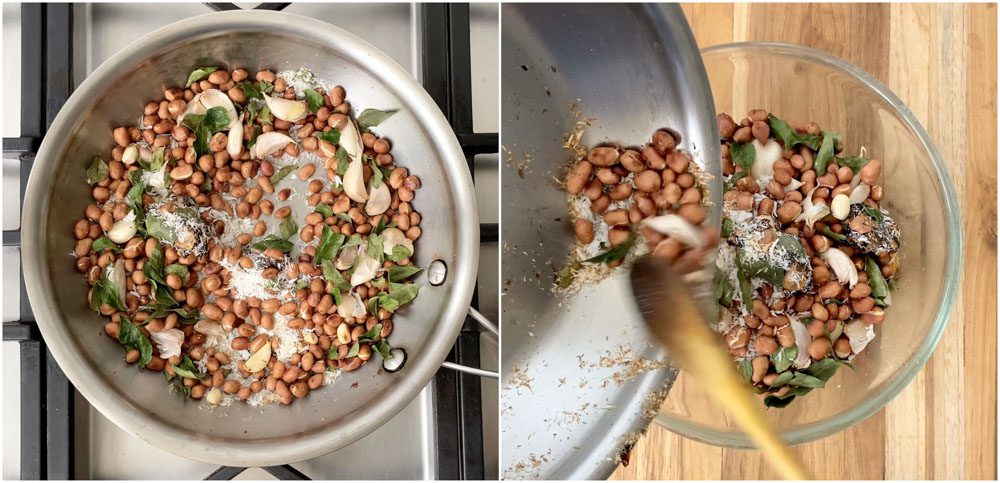
Now comes the important thing. Grinding the mixture. Grind the mixture in several batches. Grind in 3-4 batches and do not overload the mixie. Use the pulse mode several times till the mixture is ground to a slightly coarse powder.
Empty the contents of the mixie to a big bowl and let it completely cool. Store the idli podi in an air tight container and use within a month. For longer storage, store in the freezer. The podi stays fresh for months in the freezer.
This idli podi is super addictive and delicious. Definitely do try at home.
1 teaspoon coconut oil 1/4 cup whole white urad dal 1/4 cup chana dal 15 Byadagi / Kashmiri red chillies 20 grams jaggery 1/2 teaspoon salt 1/4 teaspoon asafoetida 1 cup groundnuts 1/4 cup curry leaves 1 small marble sized tamarind 2 pods garlic with skin 1/4 cup desiccated coconut
Add in 1/4 teaspoon of coconut oil and whole unpolished white urad dal to a pan. Sauté on a low flame till the urad dal is golden. Set aside on a plate to cool. In the same pan, heat 1/4 teaspoon of coconut oil in a pan and add in the chana dal. Roast the chana dal on a low flame till the lentils are golden. Keep sautéing to avoid burning. Set aside on a plate to cool. In the same pan, add in 1/4 teaspoon of coconut oil. Add in the Byadagi chillies / Kashmiri red chillies. Sauté for a few seconds. The chillies will fluff up. Remove the chillies and set aside on a plate to cool. Do not fry the chillies for long.
To this mixture, add in the salt, asafoetida and jaggery when the mixture is still hot. Let the mixture cool a bit. Grind this mixture in a mixie to a fine powder. Set aside.
Take a pan and dry roast the groundnuts on a low flame. Dry roast for 2-3 minutes. To the pan, add in the garlic with the skin, curry leaves and tamarind. Roast for another couple of minutes. Roast until the groundnuts are golden and the garlic is charred here and there. Add in the desiccated coconut and sauté for a few seconds. Remove the mixture from heat and add it on top of the lentil mixture. Mix well. Let the mixture cool.
Grind the mixture in several batches. Grind in 3-4 batches and do not overload the mixie. Use the pulse mode several times till the mixture is ground to a slightly coarse powder. Empty the contents of the mixie to a big bowl and let it completely cool. Store the idli podi in an air tight container and use within a month. For longer storage, store in the freezer. The podi stays fresh for months in the freezer.
This idli podi is super addictive and delicious. Definitely do try at home.
Notes
If you want a really spicy podi, add in some roasted guntur chillies along with the chillies mentioned above.
- Author: Suguna Vinodh
- Prep Time: 10m
- Cook Time: 20m
Find it online : https://www.kannammacooks.com/groundnut-kaaram/
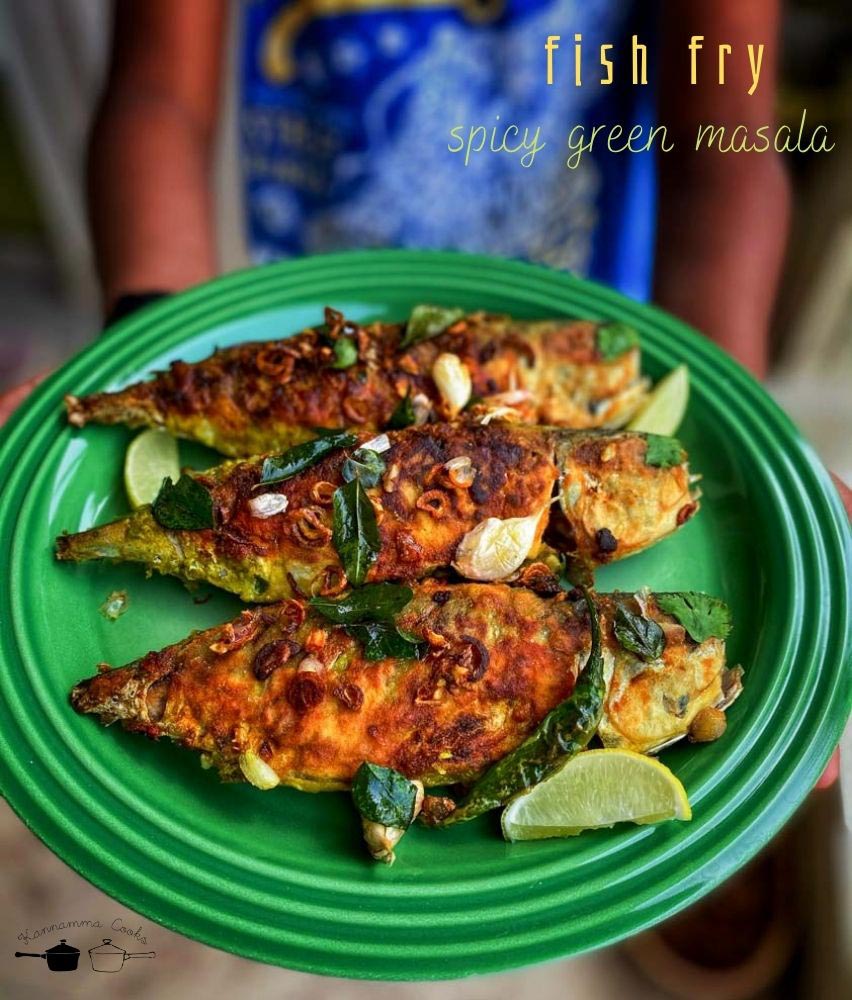
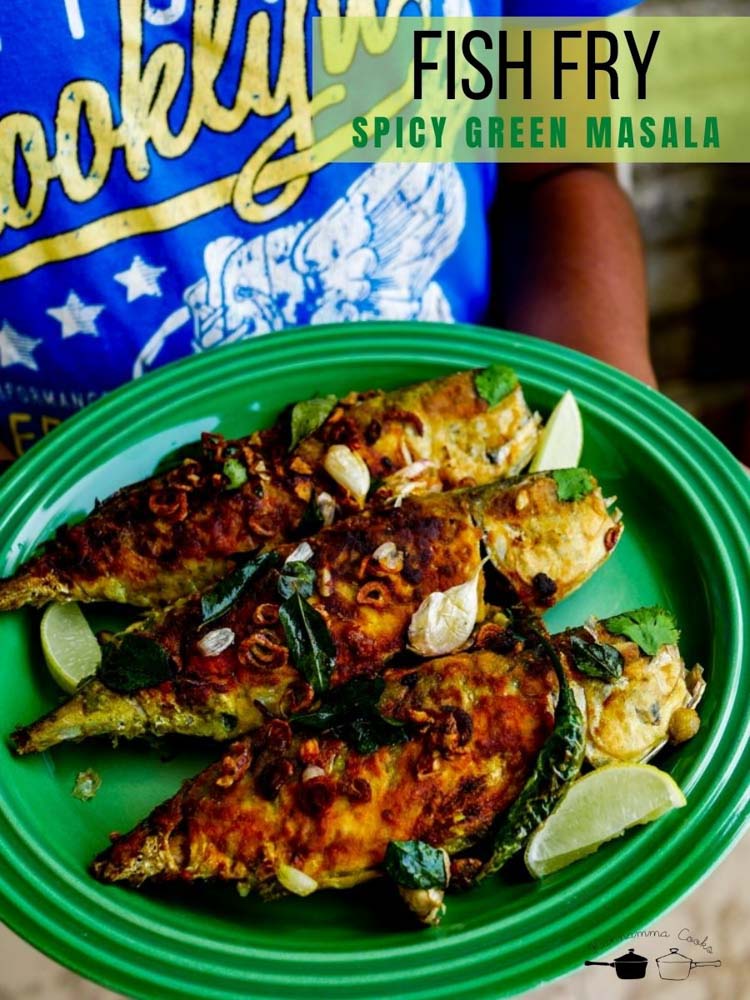
Spicy Green Masala Fish Fry Recipe made with mint, coriander, curry leaves and green chillies. Recipe with step by step pictures.
This fish fry uses green chillies for spice instead of the regular red chilli powder that is traditionally used in South Indian style fish fry. I marinated the fish in a masala made with coriander, mint, curry leaves, green chillies and other spices. The heat from green chillies when combined with the green herbs, is a total winner. Do try it at home.
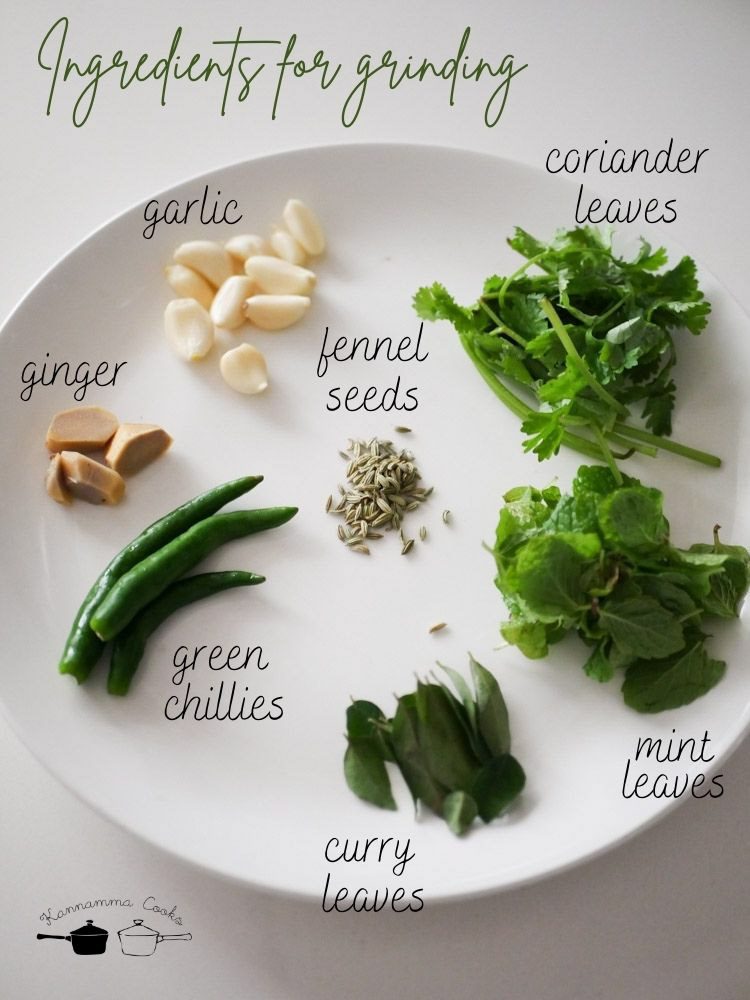
Here is how to do Spicy Green Masala Fish Fry First, we shall make a spice paste and here is what you will need.
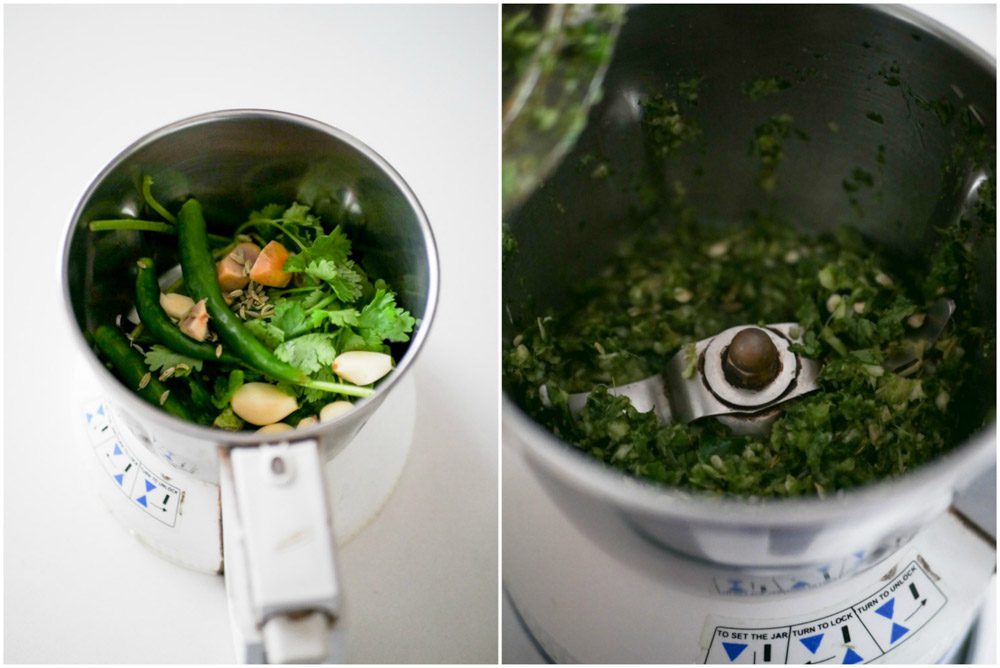
I have used about 500 grams of fish and about 4 chillies. But if you want a really spicy fish fry, use up to 6 chillies. Take all the ingredients in a mixie and grind it to a coarse paste. Use the pulse mode and frequently, open the mixie and clean the sides of the mixie so everything gets ground evenly. You can also grind in a mortar and pestle if you do not have a small mixie jar. The main trick is “ do not add water while grinding”.
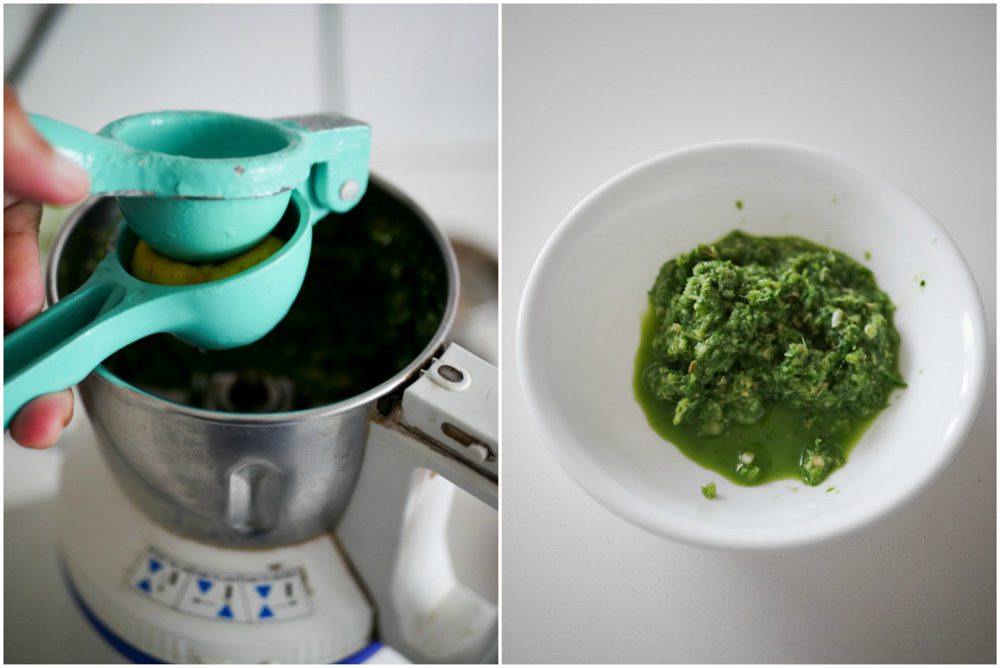
Once the mixture looks coarsely ground, add juice of half of a lemon to the mixie jar. Pulse again for a few seconds.

Empty the contents of the mixie to a bowl. Add in the turmeric and the salt. Mix well to combine.
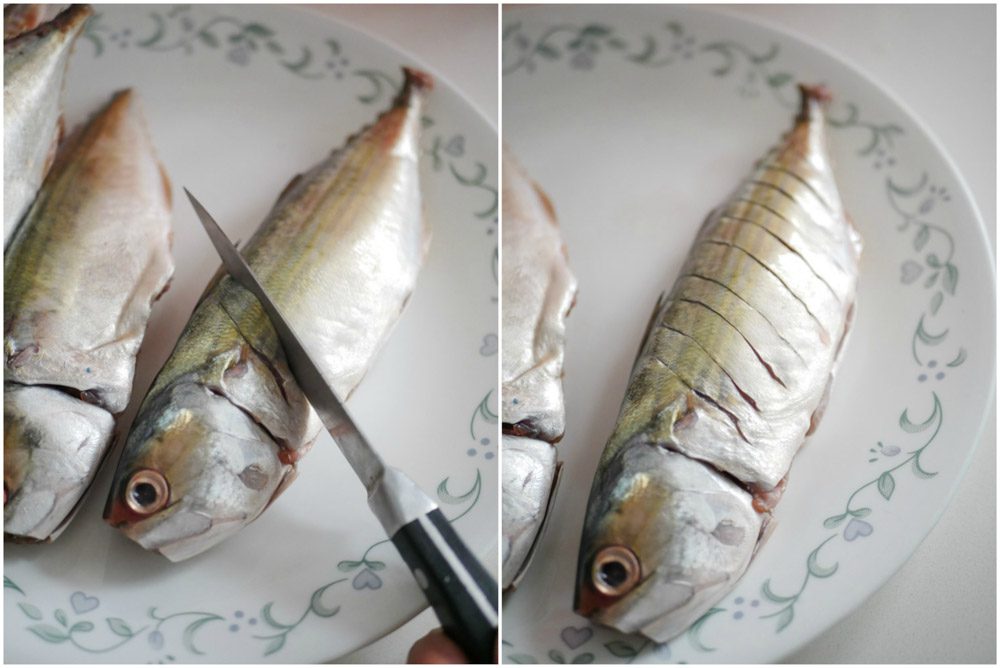
I have used mackerel fish for making the fish fry today. Pomfret also works well. Apply gashes on the fish so the masalas can penetrate well and the fish will also cook evenly.
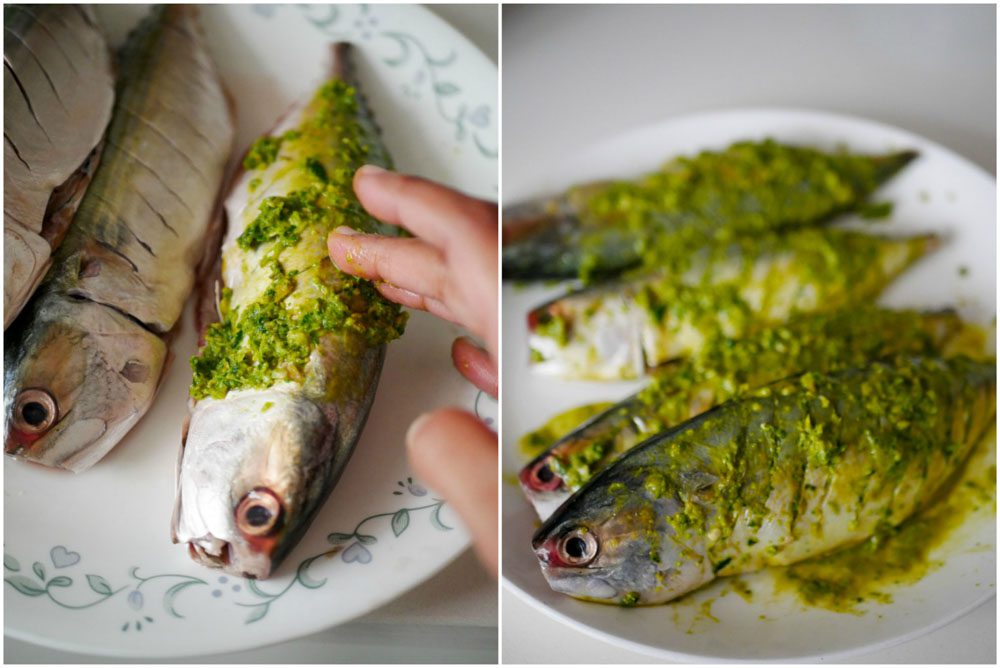
Apply the masala evenly on the fish and apply the masala inside the gashes. Apply evenly on both sides of the fish.
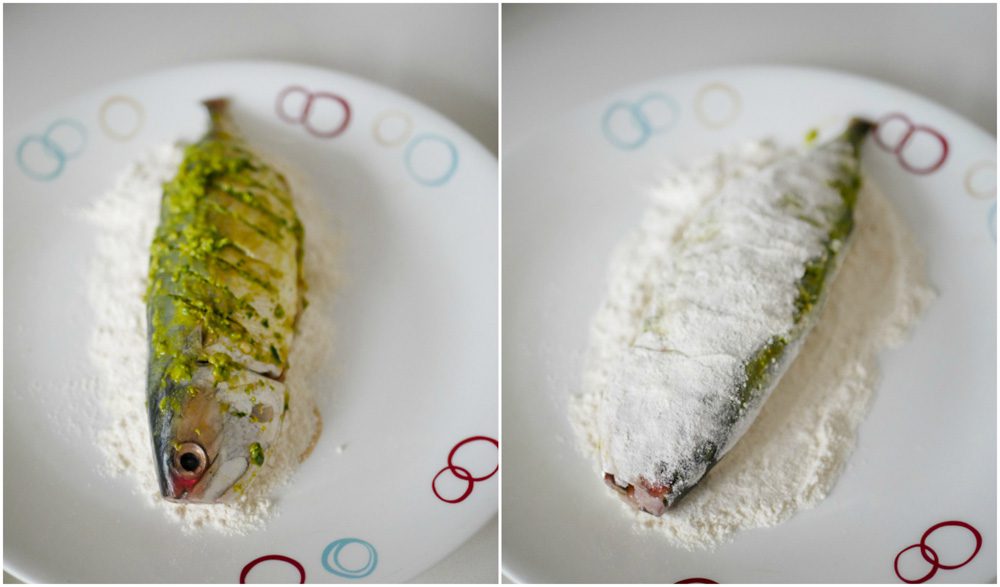
Take quarter cup of maida (all purpose flour) and place it on a wide plate. Coat the fish in maida (all purpose flour) on both the sides. A thin coating is enough. This step is essential so the masalas do not disintegrate in oil while fried.
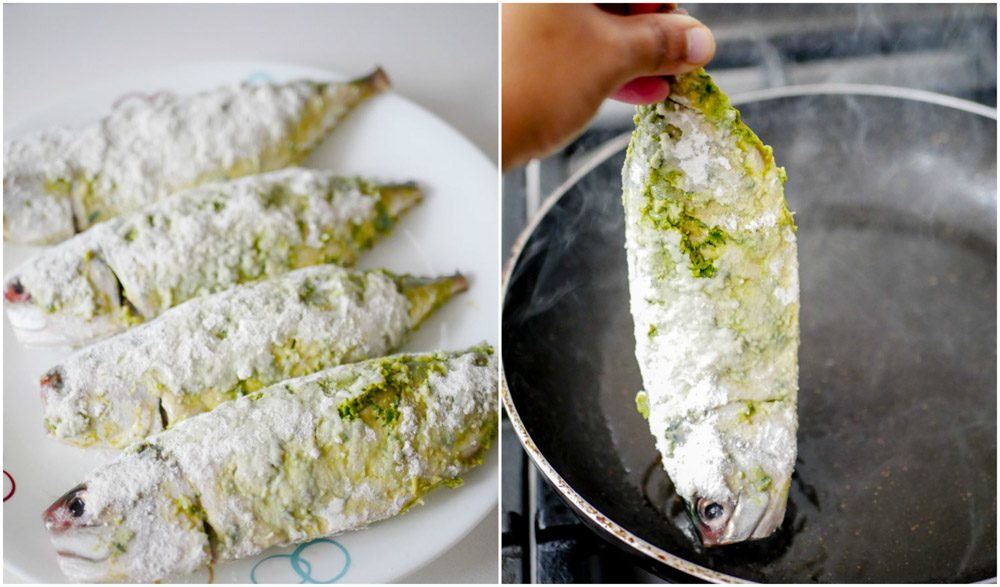
Let the fish marinate for 10-15 minutes. Heat coconut oil in a pan and when the oil is hot, gently place the fish in the hot oil. After placing the fish, reduce the flame to medium and let the fish cook for three minutes on one side. Note: Non stick pan or a cast iron pan works well for making the fish fry. I prefer a non stick pan as the masalas do not stick to the skillet and adheres to the fish nicely. Here is my choice of non-stick pan.
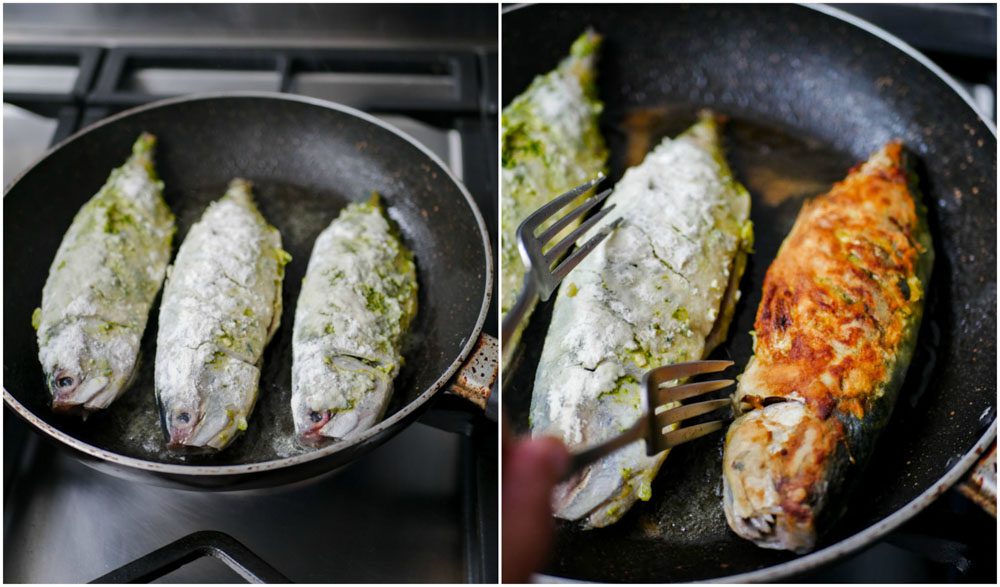
After 3 minutes, gently turn the fish. If the fish is small, two minutes will suffice. If the fish is big, it will take more time. Just slightly turn the fish and look for doneness and see if the fish is nice and brown. If its nice and brown, then turn the fish. I like to use a couple of forks to turn the fish.
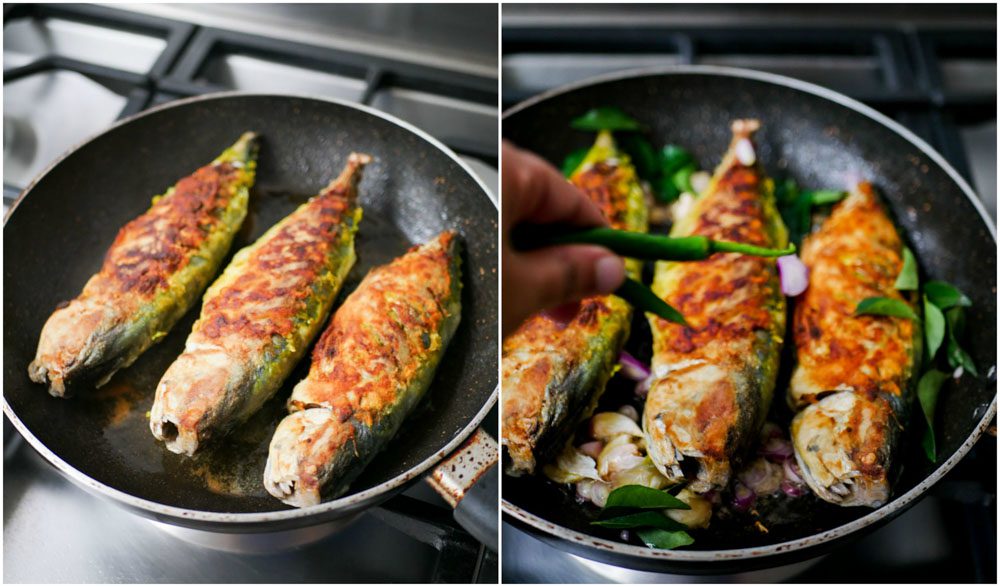
Let it cook for three more minutes. After two minutes, add in sliced shallots, crushed garlic, curry leaves and green chillies to the oil. Add it to the sides of the fish and not on top of the fish. Let these cook in the fish flavored oil and crisp up too. Add only at the end as it requires just a minute to crisp up. If you notice that the shallots are becoming very dark before the fish is getting done, remove and set aside on a plate.
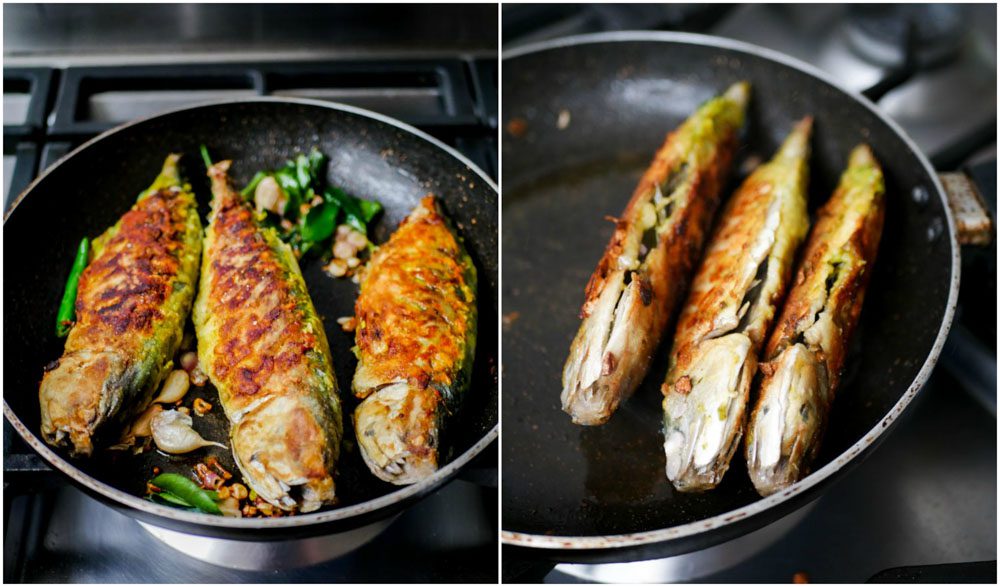
Gently turn the fish and cook the fish on all the sides and let it nicely crisp up evenly.
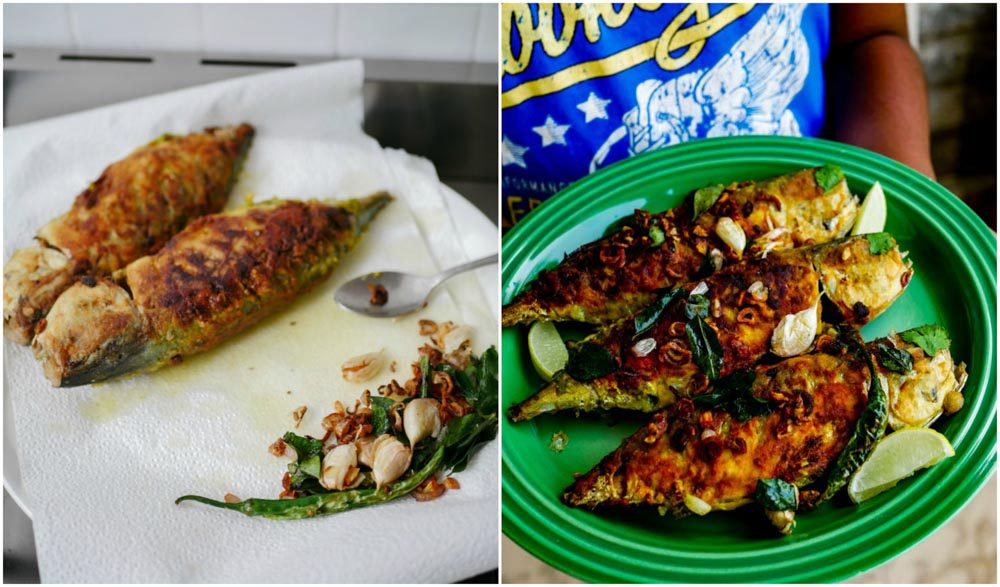
After the fish is done, remove and set aside on a plate lined with paper towels. The fish fry is ready.
For the marination of spicy green masala fish fry
10 cloves of garlic 1 inch piece ginger 4 - 6 green chillies 1/2 teaspoon fennel seeds 2 sprigs curry leaves 4 sprigs mint leaves 4 sprigs coriander leaves (with stem) Juice of 1/2 of a lemon 1/2 teaspoon turmeric powder 3/4 teaspoon salt 1/4 cup Maida (all purpose flour) to coat 500 grams fish (whole cleaned)
Other ingredients for the spicy green masala fish fry
4 tablespoon coconut oil 10 shallots, slices 5 cloves garlic, slightly crushed with skin 2 sprigs curry leaves 3 green chillies
To serve
Lemon Wedges
Take all the ingredients in a mixie and grind it to a coarse paste. Once the mixture looks coarsely ground, add juice of half of a lemon to the mixie jar. Pulse again for a few seconds. Empty the contents of the mixie to a bowl. Add in the turmeric and the salt. Mix well to combine.
I have used mackerel fish for making the fish fry today. Pomfret also works well. Apply gashes on the fish so the masalas can penetrate well and the fish will also cook evenly. Apply the masala evenly on the fish and apply the masala inside the gashes. Apply evenly on both sides of the fish.
Take quarter cup of maida (all purpose flour) and place it on a wide plate. Coat the fish in maida (all purpose flour) on both the sides. A thin coating is enough. This step is essential so the masalas do not disintegrate in oil while fried.
Let the fish marinate for 10-15 minutes. Heat oil in a pan and when the oil is hot, gently place the fish in the hot oil. After placing the fish, reduce the flame to medium and let the fish cook for three minutes on one side. After 3 minutes, gently turn the fish. If the fish is small, two minutes will suffice. If the fish is big, it will take more time.
Let it cook for three more minutes. After two minutes, add in sliced shallots, crushed garlic, curry leaves and green chillies to the oil. Add it to the sides of the fish and not on top of the fish. Let these cook in the fish flavored oil and crisp up too. Add only at the end as it requires just a minute to crisp up. If you notice that the shallots are becoming very dark before the fish is getting done, remove and set aside on a plate. Gently turn the fish and cook the fish on all the sides and let it nicely crisp up evenly.
After the fish is done, remove and set aside on a plate lined with paper towels. The fish fry is ready. Serve the fish fry with the fried shallots and curry leaves mixture and also add a lemon wedge.
- Author: Suguna Vinodh
- Prep Time: 10m
- Cook Time: 10m
