
Easy to do Coconut Burfi recipe. Thengai burfi as its called in Tamilnadu, this is a delicious never fail dessert sweet. Burfi made with milk. With step by step pictures.
Beginners Recipe! Easy to do 4 ingredient Coconut Burfi recipe. Coconut Barfi made with milk. Indian desserts can be daunting and difficult. But this one is such a winner. I had this Coconut Burfi back home at Vinodh’s place this time when we had gone for his sisters wedding. His elder sister Padma akka had brought these wonderful burfi’s. It was the soft and fudgy oooey gooey kind. She always brings some little nibbles for the family all the time. She is a great cook. I had these and I loved it so much. First, I had one, then another and then some. It was irresistible. It was so good that the big box of burfi which was supposed to have been our big family’s dessert was over even before we started lunch. Her recipes are a huge hit among us. She loves to entertain and I have seen her cooking for 20-30 people with such ease, it feels that she is cooking only for four. A very high energy person who is always on the move doing something. She describes this burfi as one pot burfi. Its really hard to mess up as this recipe is very forgiving. Here is an awesome Coconut Burfi recipe.

Here is the video of how to make Malai Coconut Burfi
Here are the things you can buy for making this recipe. Sathagam (coconut tool) https://amzn.to/3eMmyof Granite Pan https://amzn.to/3MJRthx
Things to keep in mind while making this Burfi If the mixture is furiously bubbling up while cooking, reduce the flame to low and cook on low flame. The timing may not be exact as each and every stove is different. Its only an approximate gauge. Look for the texture as mentioned in the picture at each stage. Be Patient! Remember, Indian Sweets are a labor of love.
Note on Fresh Shredded Coconut: Please shred only the white part of the coconut meat being careful not to scrape out the brown outer skin. The brown part is hard and does not give a smooth mouth feel for the burfi. So spend time to get rid of the brown skin. Shred the coconut and set aside. We will need 3 cups. I used about 1.5 big coconut for this recipe.
The Recipe Take a wide pan and add in the milk, sugar and fresh shredded coconut. Keep the pan on stove and start stirring on medium flame. If the milk boils over, try to reduce the flame to low for a couple of minutes and increase the flame again. Keep stirring.

It will start to bubble up after 15 minutes. The mixture will be watery at this moment. If at any point of time, the milk boils over, try to reduce the flame to low for a couple of minutes and increase the flame again.

After 30 minutes, add in the ghee and continue to stir. The mixture will slowly start to thicken up. Lot of patience. Lot of patience. Remember, good things take time.

After 45 minutes, the mixture would start drying up. It will be gooey at this stage.

After one hour, the mixture would have dried considerably and there would not be any liquid left. It will be like the consistency of wet sand. Switch off the flame.

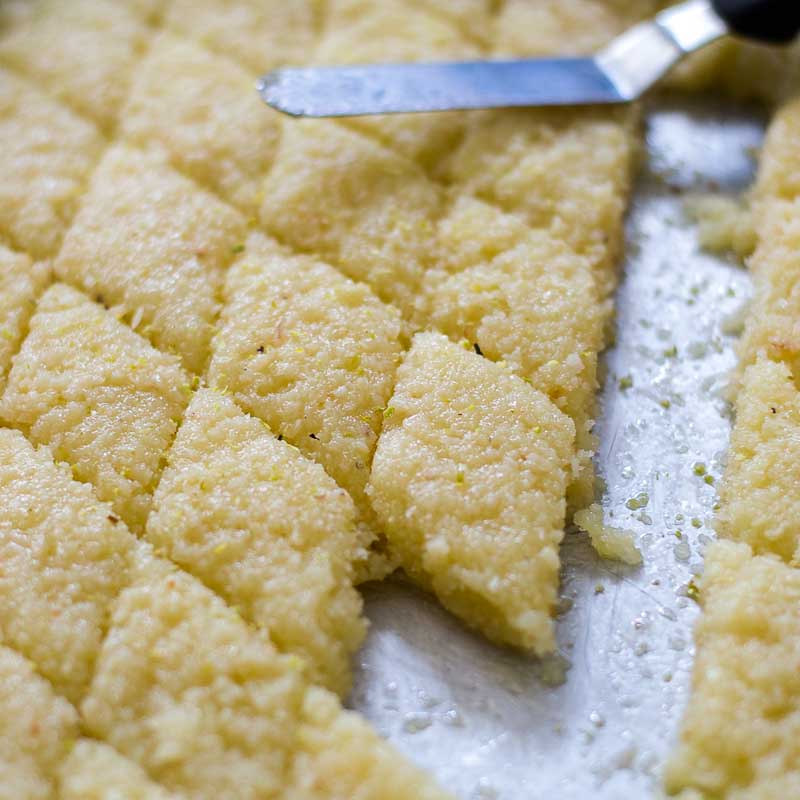
Apply ghee to a quarter sheet pan and dump the hot coconut burfi mixture on the sheet pan and spread it evenly with a spatula. Allow it to cool for one hour.

Mark with a knife and gently remove each piece to a serving plate or a storage container.

The burfi will keep in the refrigerator for up-to a week. Serve cold or at room temperature. You can sprinkle finely shredded pistachios as a garnish. Happy Cooking!

- Measurements Used – 1 Cup = 250ml
- 4 cups ( 1 liter) Milk
- 3 Cups Fresh shredded Coconut (white part only)
- 2 1/2 cups granulated sugar
- 4 tablespoons ghee
- 1 tablespoon ghee for sheet pan
- Shredded Pistachio for garnish
- Take a wide pan and add in the milk, sugar and fresh shredded coconut. Keep the pan on stove and start stirring on medium flame. If the milk boils over, try to reduce the flame to low for a couple of minutes and increase the flame again. Keep stirring.
- It will start to bubble up after 15 minutes. The mixture will be watery at this moment. If at any point of time, the milk boils over, try to reduce the flame to low for a couple of minutes and increase the flame again.
- After 30 minutes, add in the ghee and continue to stir. The mixture will slowly start to thicken up. Lot of patience. Lot of patience. Remember, good things take time.
- After 45 minutes, the mixture would start drying up. It will be gooey at this stage.
- After one hour, the mixture would have dried considerably and there would not be any liquid left. It will be like the consistency of wet sand. Switch off the flame.
- Apply ghee to a quarter sheet pan and dump the hot coconut burfi mixture on the sheet pan and spread it evenly with a spatula. Allow it to cool for one hour.
- Mark with a knife and gently remove each piece to a serving plate or a storage container.
- The burfi will keep in the refrigerator for up-to a week. Serve cold or at room temperature. You can sprinkle finely shredded pistachios as a garnish.
Notes
Note on Fresh Shredded Coconut: Please shred only the white part of the coconut meat being careful not to scrape out the brown outer skin. The brown part is hard and does not give a smooth mouth feel for the burfi. So spend time to get rid of the brown skin.
- Author: Kannamma - Suguna Vinodh
- Prep Time: 15 mins
- Cook Time: 1 hour
- Category: Sweets, Desserts
- Cuisine: South Indian
Find it online : https://www.kannammacooks.com/coconut-burfi-thenga-burfi-tamil-recipe/

I have already posted an easy Deepavali murukku recipe here . I have adapted the recipe to be made in an air fryer. With a little adjustment, the murukkus turn out crispy and crunchy. Its healthy too as they are fried in an air fryer and not deep fried. Apart from the 4 tablespoon of oil that we use in the dough, there is absolutely no other oil or fat used in the recipe. There are many best digital air fryer available in market which you can use for your healthy recipes.
Here is how to do it: Wash and soak half cup of urad dal in 1.5 cups of water for 20 minutes. Then pressure cook the dal with the water for 6 whistles. Switch off the flame and let the pressure in the cooker release naturally. Open the cooker and mash the dal with the back of the spoon. It should mash easily. If the dal is not fully cooked, add 1/4 cup more water and cook for 2 more whistles again. The dal should be fully cooked to a fine paste. Mash the dal with a back of a spoon. Set aside.

For every 1 portion of dal used, we will use 5 portion of rice flour. We have used half a cup of urad dal. So measure 2.5 cups of rice flour and place it in a bowl. Add salt, Ajwain seeds (Omam seeds), Sesame seeds (ellu) and 4 tablespoon of vegetable oil. Add in the cooked urad dal. Mix everything well and add water little by little to form a smooth ball. The dough should be smooth and there should not be any cracks in the dough. Add little water at a time. I added one cup of water. But each and every time, the water quantity might change depending upon the age of the rice flour. So the 1 cup water is only an approximate amount. You need to be your own judge. We are aiming for a smooth pliable dough without any cracks. Once the dough has reached that level, knead briefly for 30 seconds. Set aside. Note we did not add any kaaram (spice or chilli) to this recipe. This recipe has no kaaram.

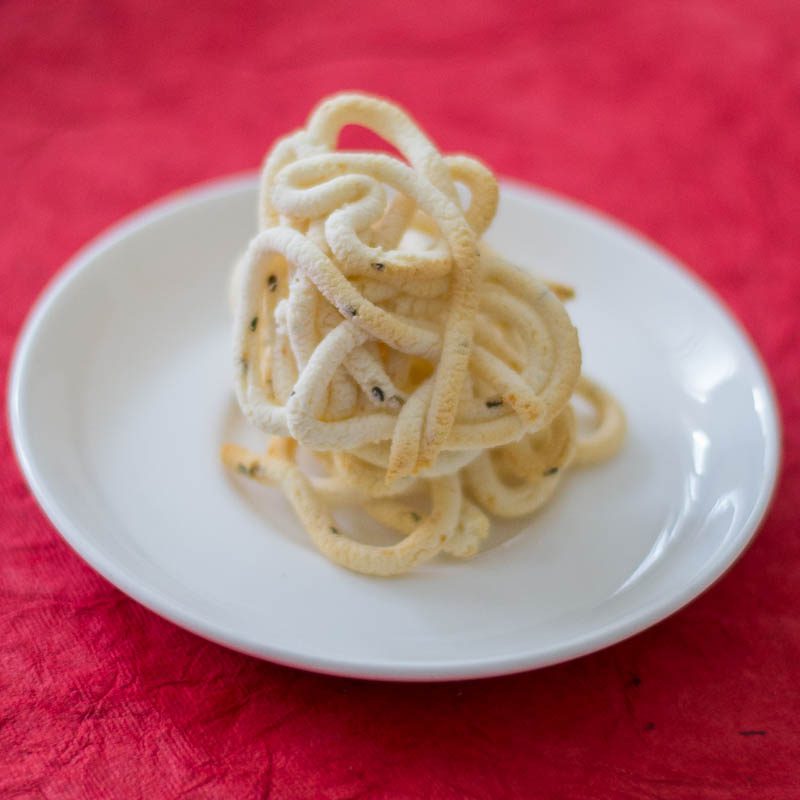
Form small logs and fill in the murukku press. I used the three hole mould for this murukku.

Press the murukku dough from murukku press onto the bowl of the air fryer. Fry in 350 degrees for 12 minutes.

Consume the murukkus within 2 days.
Havells Prolife 1230-Watt Air Fryer (Black)
- Measurements Used – 1 Cup = 250 ml
- ½ cup Urad dal
- 2.5 cups rice flour (store bought)
- ¼ teaspoon Ajwain seeds (Omam Seeds)
- ½ teaspoon Black Sesame Seeds ( Ellu )
- 1 teaspoon salt
- 4 Tablespoon Vegetable Oil
- 2 to 3 cups of water
- Wash and soak half cup of urad dal in 1.5 cups of water for 20 minutes. Then pressure cook the dal with the water for 6 whistles. Switch off the flame and let the pressure in the cooker release naturally. Open the cooker and mash the dal with the back of the spoon. Set aside.
- Add rice flour, salt, Ajwain seeds (Omam seeds), Sesame seeds (ellu) and vegetable oil.
- Mix everything well and add water little by little to form a smooth ball. The dough should be smooth and there should not be any cracks in the dough.
- Form small logs and fill in the murukku press.
- Press the murukku dough from murukku press onto the bowl of the air fryer. Fry in 350 degrees for 12 minutes.
- Consume the murukkus within 2 days.
- Author: Kannamma - Suguna Vinodh
- Prep Time: 20 mins
- Cook Time: 2 hours
- Category: Snacks
- Cuisine: South Indian

