Perfect Cocktails to Enjoy During Online Casino Nights at Home

There’s something undeniably glamorous about a casino night. The soft rustle of cards, the spin of the roulette wheel, the thrill of anticipation. Nowadays, you can enjoy all the excitement without leaving your living room. To improve the experience, why not pair your online casino night with a perfectly crafted cocktail?
Elevate the Experience
Nothing elevates an at-home casino night quite like a perfectly made cocktail. Be it spinning the roulette wheel on your laptop, bluffing in a virtual poker game, or simply soaking in the digital neon glow, a carefully chosen drink is crucial. It can set the mood, sharpen your senses, and add an extra wave of exhilaration.
Whether you’re spinning some popular slot or hitting on a blackjack table at some of the best casinos in Malaysia , the proper cocktail drink will make your game much more enjoyable. Here, you’ll find a curated list of the best cocktails, paired suggestions, and practical tips to elevate your next at-home casino session.
Cocktails and Online Gambling
The connection between cocktails and online gambling lies in their shared appeal to indulgence, amusement, and social thrill. Both offer a sensory experience that blends risk and reward – cocktails through bold flavors and crafted presentation, and online gambling through the suspense of chance and potential winnings.
In digital casino environments, the atmosphere often impersonates that of high-end lounges, where sipping a signature drink heightens the feeling of luxury and excitement. As virtual gaming platforms become more immersive, themed cocktails and interactive events are being integrated to create a more holistic, lifestyle-oriented event.
Shake, Stir, and Sip
Having an online casino night isn’t just about the games – it’s about recreating the full experience, which includes making the perfect cocktails. Mixing drinks at home adds a personal, interactive touch that sets the tone for a spectacular evening. Here are the top five cocktails to shake, stir, and sip during your online casino session:
- Classic Martini: For the High-Roller Vibes – Nothing says “casino elegance” quite like a classic martini. It’s Bond-approved, timeless, and just the right mix of smooth and strong. Ingredients: 2.5 oz gin or vodka 0.5 oz dry vermouth Lemon twist or olive for garnish Instructions – Stir (or shake, if you’re channeling your 007 ) the gin and vermouth with ice. Strain into a chilled martini glass. Garnish, raise your glass, and place your bets.
- Old Fashioned: For the Poker-Faced Strategist – If you love the slow burn of a good poker game, an Old Fashioned is your drink. It’s all about patience and boldness, just like your game strategy. Ingredients: 2 oz bourbon or rye whiskey 1 sugar cube A few dashes of Angostura bitters Orange twist Instructions – Muddle the sugar and bitters in a glass. Add whiskey and a large ice cube. Stir until chilled, then garnish with an orange twist.
- Negroni: For the Roulette Enthusiast – Equal parts bitter and sweet, the Negroni is a sophisticated sip that pairs beautifully with the unpredictable nature of roulette. Ingredients: 1 oz gin 1 oz Campari 1 oz sweet vermouth Instructions – Stir all ingredients with ice and strain into a glass over fresh ice. Garnish with an orange slice.
- French 75: For the Big Win Celebration – When you hit a lucky streak, toast your winnings with something sparkling and celebratory. The French 75 is light, bubbly, and slightly dangerous – just like a night at the tables. Ingredients: 1 oz gin 0.5 oz lemon juice 0.5 oz simple syrup Champagne or sparkling wine Instructions – Shake gin, lemon juice, and syrup with ice. Strain into a flute and top with bubbly. Cheers to your jackpot!
- Espresso Martini: For the Late-Night Gambler – For those who like to keep the action going into the early hours, the Espresso Martini provides the perfect pick-me-up. Ingredients: 1.5 oz vodka 1 oz coffee liqueur (like Kahlúa) 1 oz fresh espresso Coffee beans for garnish Instructions – Shake all ingredients with ice and strain into a chilled martini glass. Garnish with coffee beans and get ready to double down.
Pairing & Practical Tips
Making the perfect cocktails for an online casino night goes beyond just balancing flavor, theme, and presentation. It also involves selecting the right glassware, staying hydrated, and drinking responsibly. Here are some practical tips to follow:
- Glassware Matters – Use the proper glass for each cocktail to maintain temperature and presentation.
- Pre-Batch When Possible – For group sessions, pre-mix batches of Punch or Spritz and refrigerate. Add effervescence just before serving.
- Garnish as a Ritual – Twisting a lemon peel or dropping in a cherry can become part of your gaming ritual, sharpening focus.
- Stay Hydrated – Alternate each cocktail with a glass of water to avoid fatigue and keep your judgment sharp.
Setting the Scene
Creating the right atmosphere at home can elevate the gameplay and make it more authentic. These small touches can transform your space into a virtual Vegas or Monte Carlo, making your casino night feel immersive, stylish, and unforgettable:
- Dress the part by thinking of cocktail attire or themed costumes.
- Dim the lights and add some smooth jazz or lounge music.
- Use proper glassware to boost the experience.
- Create a virtual “table” with friends via video call for poker or blackjack tournaments.
Sip, Play, Repeat
With the right cocktail in hand, your online casino night can feel just as indulgent and thrilling as a night at a high-end casino lounge. Whether you’re bluffing with bourbon, spinning with sparkling wine, or sipping a classic martini between hands, the right drink adds a touch of elegance and excitement to the game.
So, next time you’re planning an online casino night at home, set up a mini-bar with your favorite spirits and pair your cocktail with themed snacks to heighten the atmosphere.

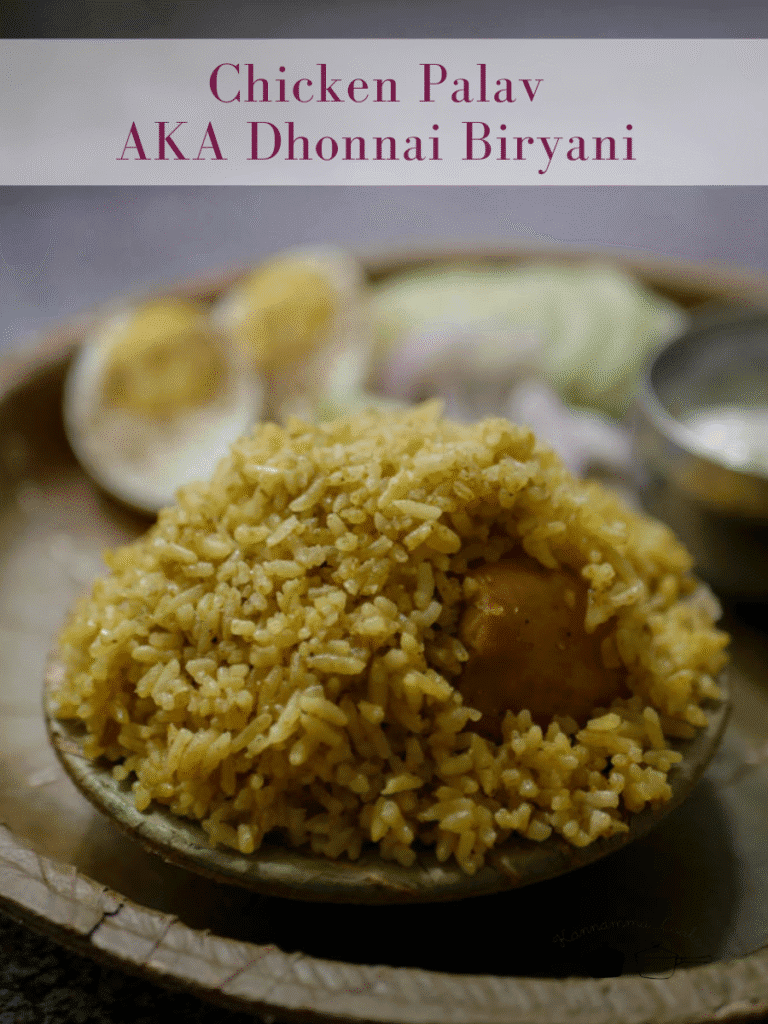
Chicken Dhonnai Biryani is a beloved Karnataka specialty, made famous by the iconic military hotels of Bengaluru. Unlike the traditional layered biryanis, this version is more of a spicy, one-pot dish where marinated chicken is cooked with seeraga samba rice (jeera rice) and a vibrant green masala made from coriander, mint, green chilies, and whole spices. What truly sets it apart is the way it’s served—in donne , or dried areca palm leaf bowls, which add a distinct earthy aroma. Military hotels have been serving this comforting, no-frills biryani for decades, and it continues to be a staple for anyone seeking an authentic taste of Karnataka’s culinary heritage. This is my version.
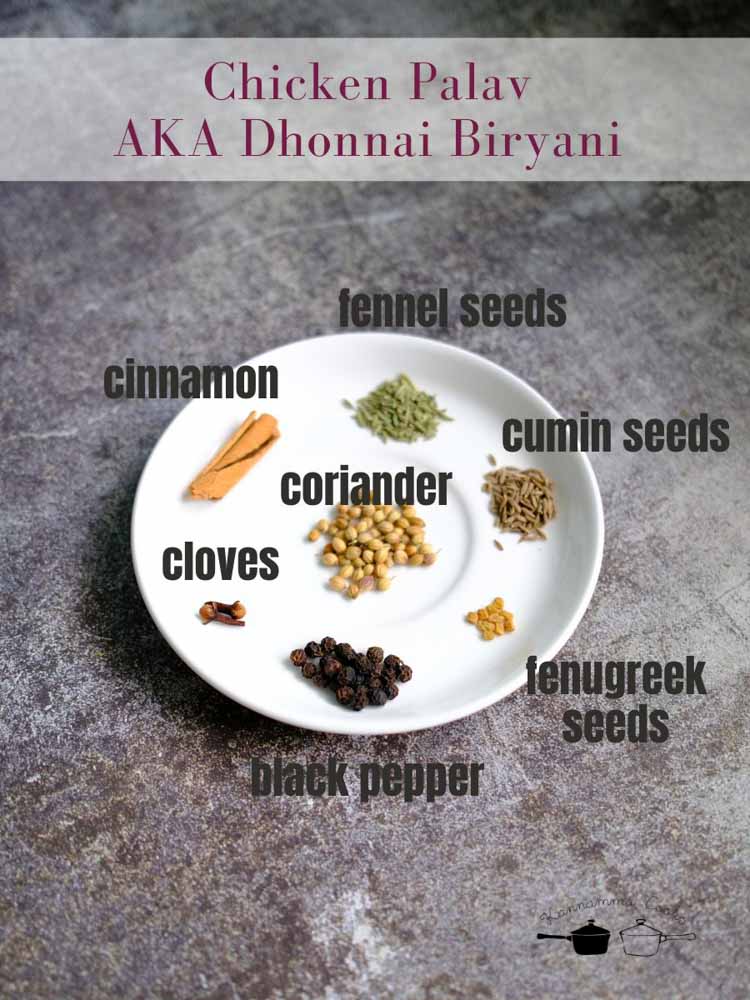
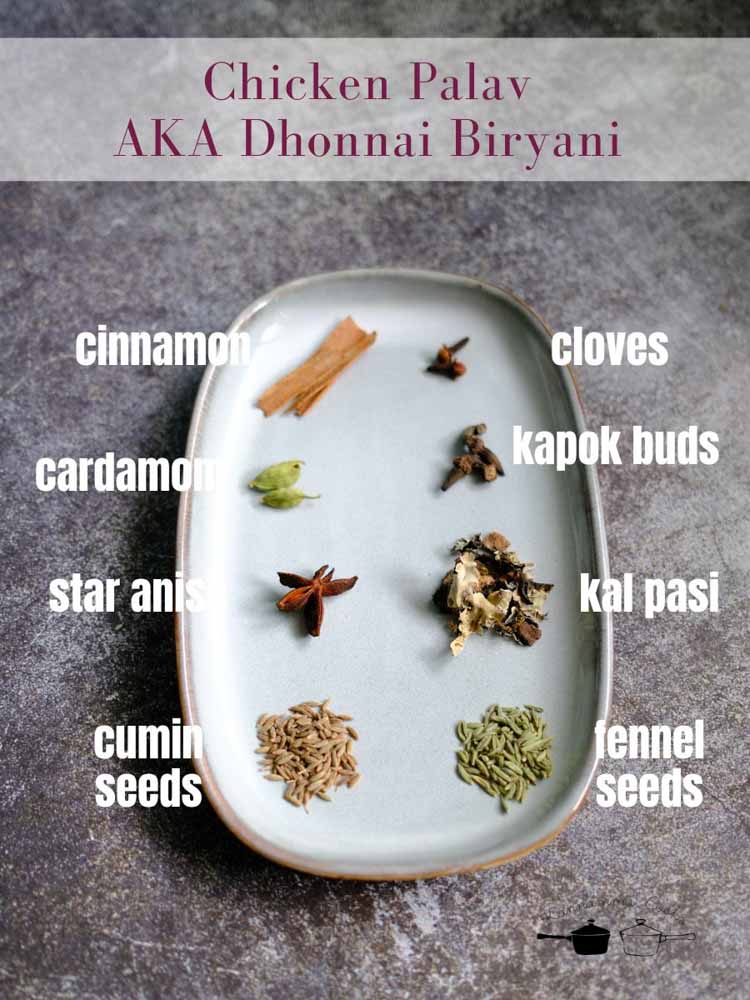
Prep One – First, we will make a biryani masala powder and here is what you will need.
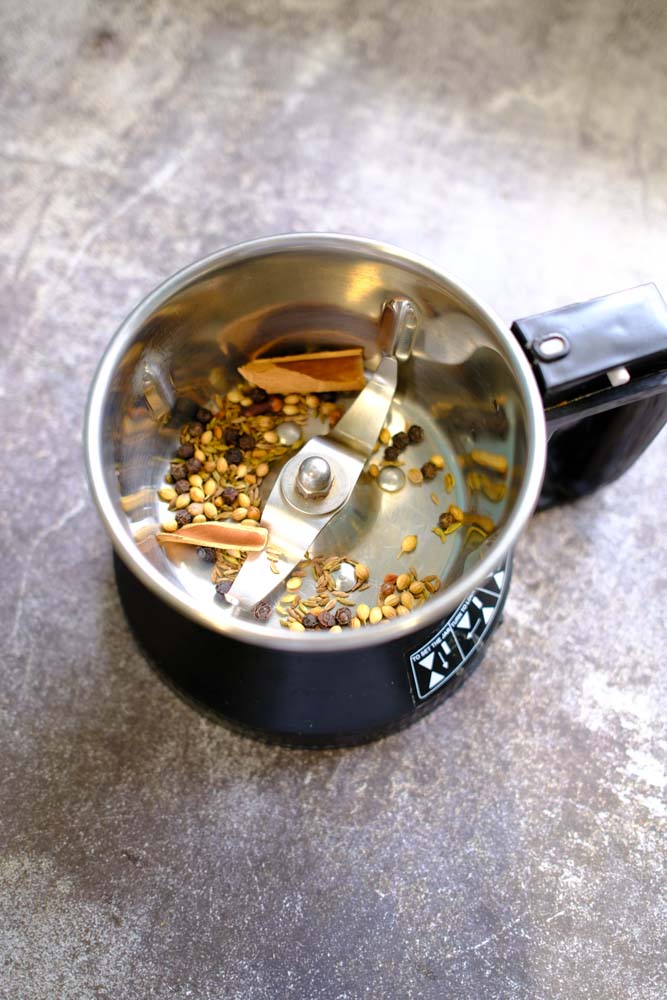
Take a heavy bottomed pan and add in all the spices. Dry roast on a low flame till the spices are slightly aromatic. Remove from the pan and set aside to cool.

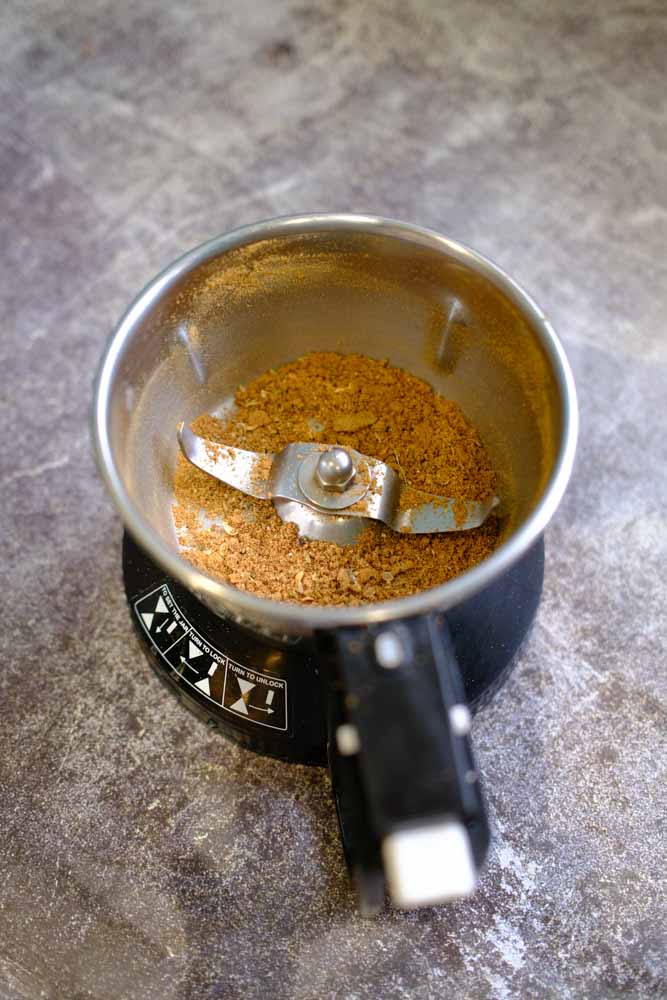
Once cool, Transfer the contents to a small mixie jar. Grind to a powder. I super love my Panasonic mixie that does a fantastic job. Here is the link to buy if you are looking for a good Indian style mixie – https://amzn.to/3HU7m6U
Prep 2 – We will make a masala paste that gives the biryani its signature yellowish green colour. Here is what you will need.

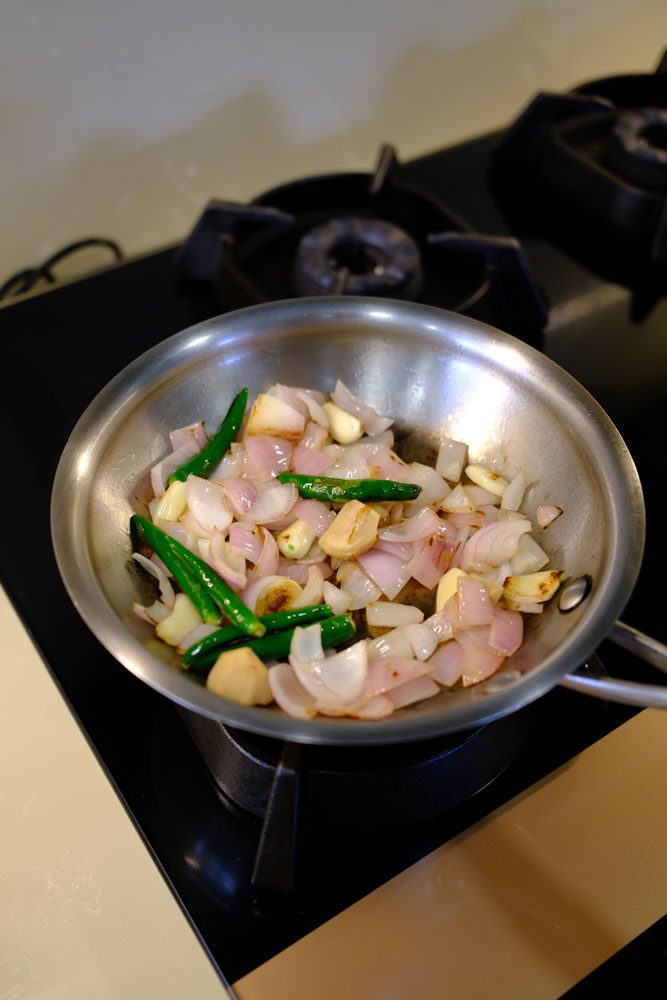
Heat oil in a pan and add in the ginger, garlic, green chillies and onions. Saute for a few minutes.

Let the veggies slightly char here and there.
Add all the greens and cook for a couple of minutes. Palak in a biryani may be a first for a lot of people but trust me, it works 🙂
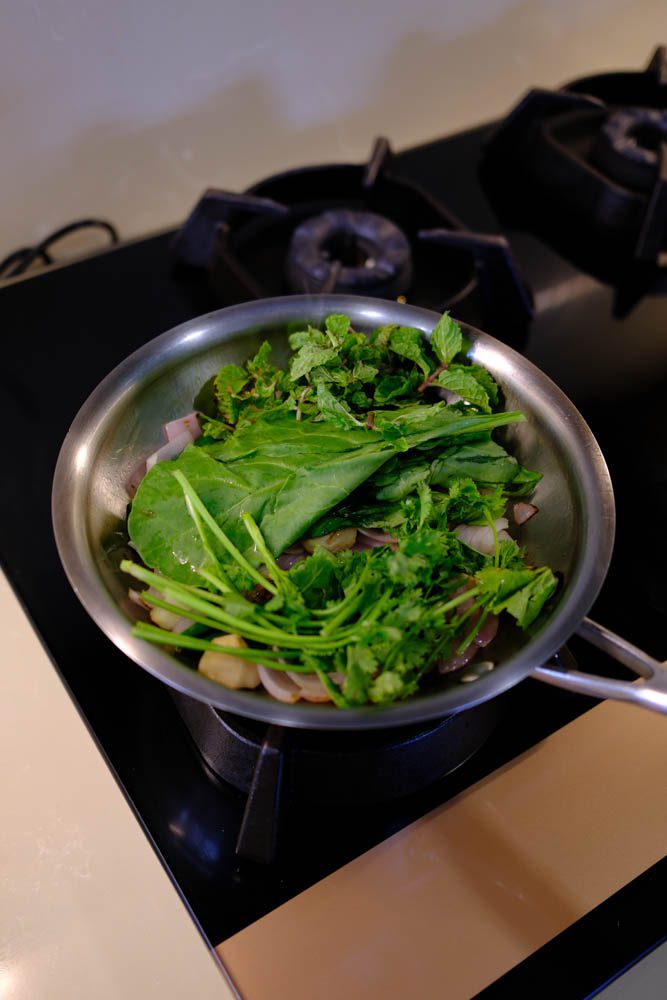
Remove the mixture from heat once the greens are wilted. Set aside to cool.
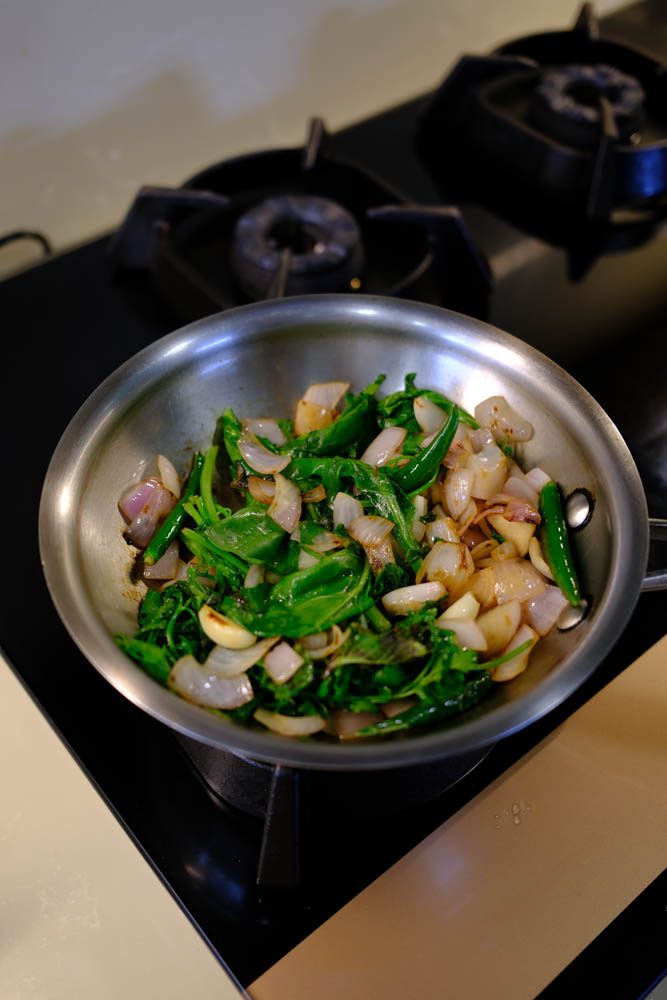
Grind the sauteed veggies to a fine paste. Set aside.

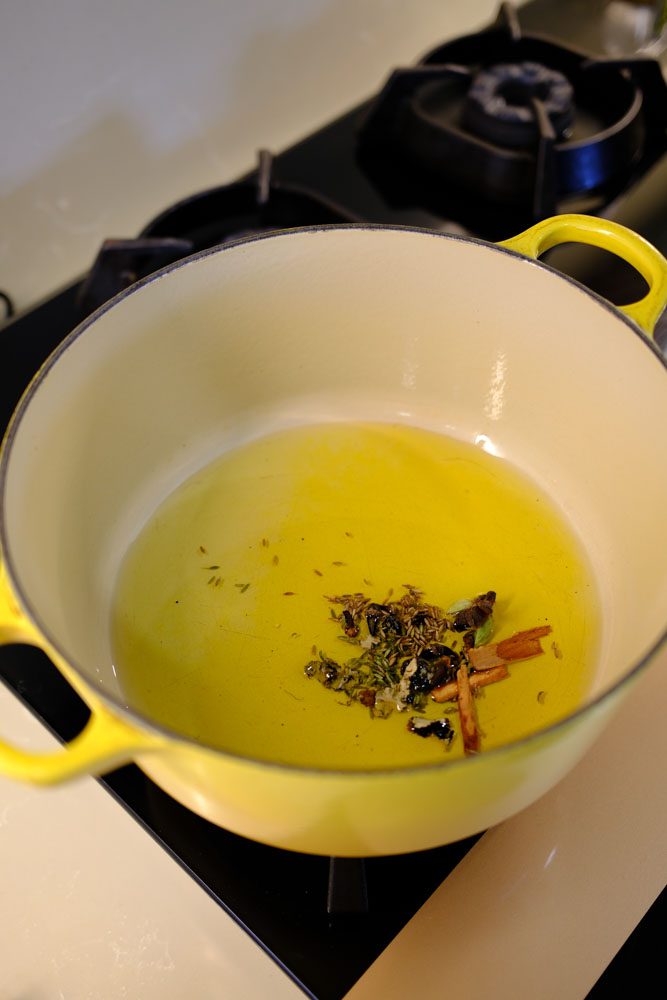
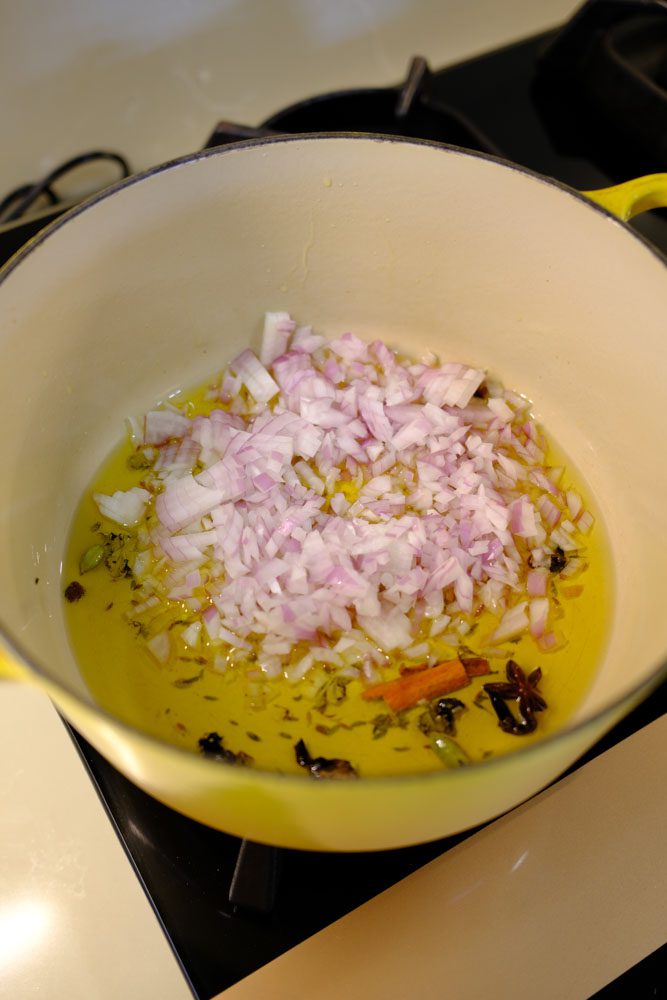
Now lets make the biryani. Here is all the whole spices we will need for the recipe.
Heat ghee and oil in a pan and add in all the whole spices. Saute for a few seconds.
Add the finely chopped onions to the pan.
Saute the onions for a couple of minutes.
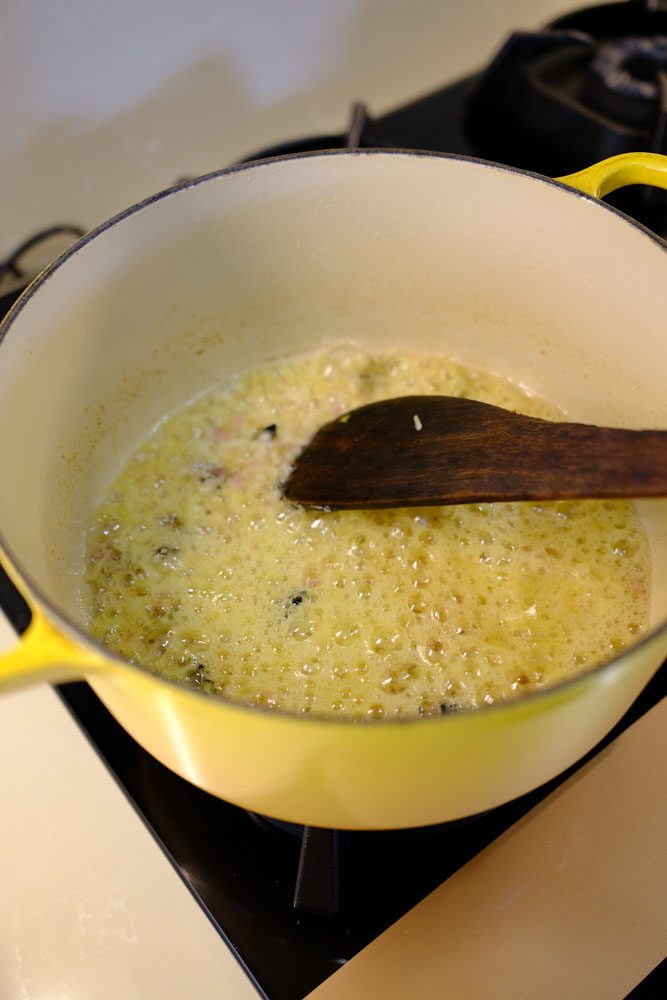
Add the turmeric powder and kasuri methi.

Saute for a few seconds.

Add the green masala paste that we prepared earlier.

Wash the mixie with about a quarter cup of water and add back to the pan. We do not want to waste the green gold masala that we made from scratch.

Add the chicken and the salt. Bone in chicken is always preferred as the bone imparts a lot of flavour to the biryani and keeps the meat juicy and soft.
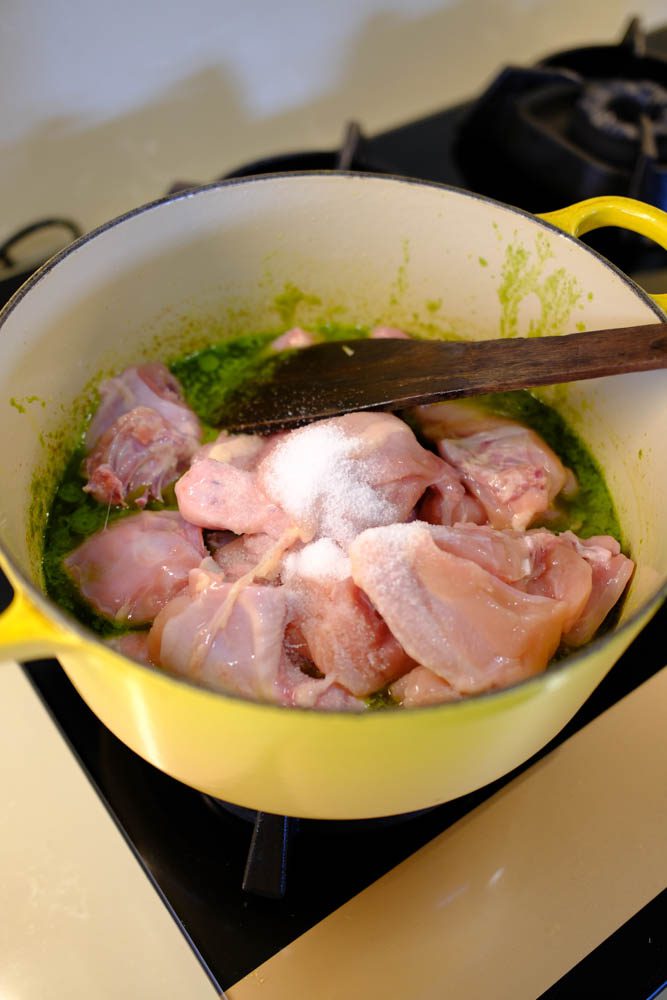
Mix well so all the chicken pieces are well coated in the masala.
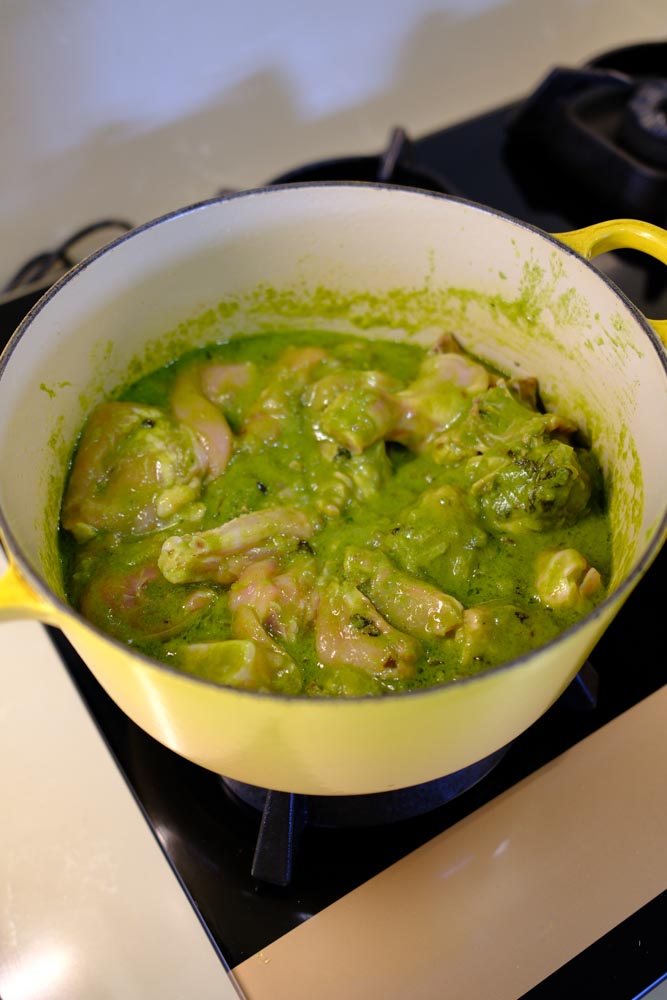
Whisk the curd in a bowl. Always whisk the curd before adding so it does not clump up in bits.
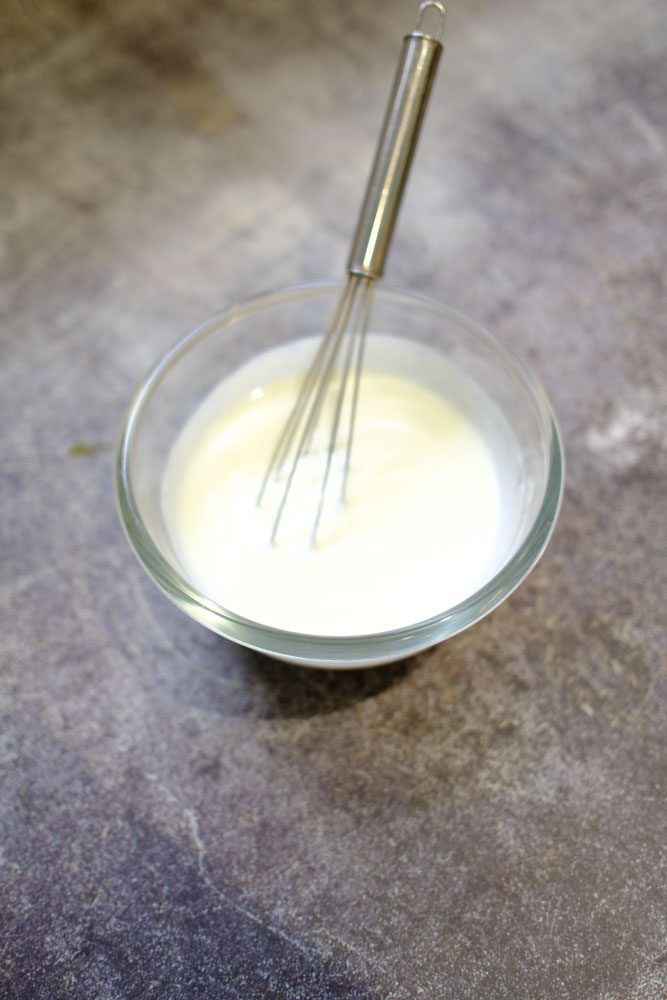
Add the whisked curd to the pan.

Mix well to combine.
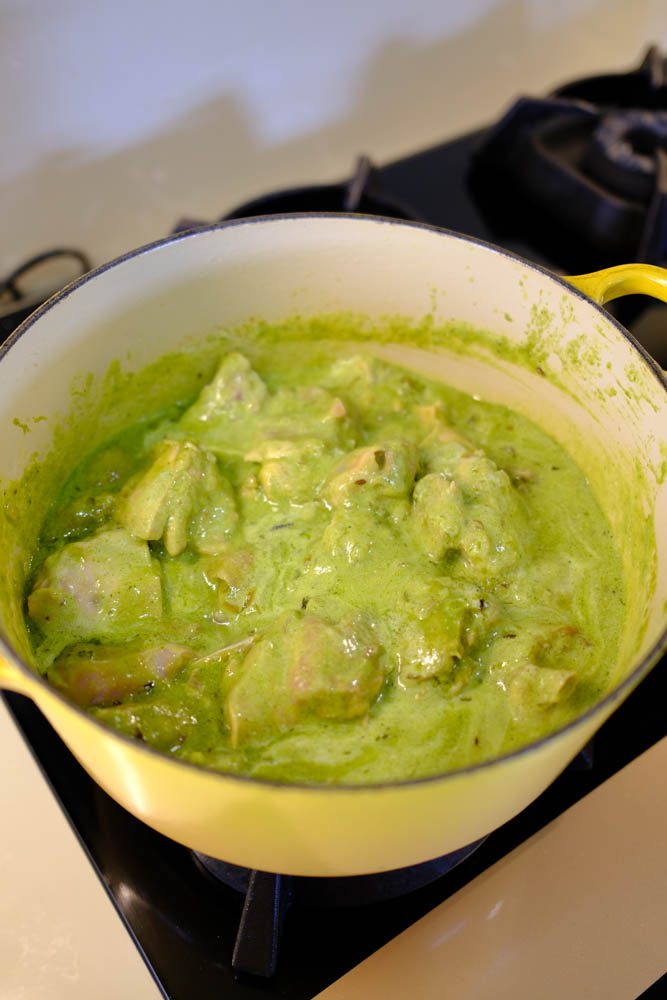
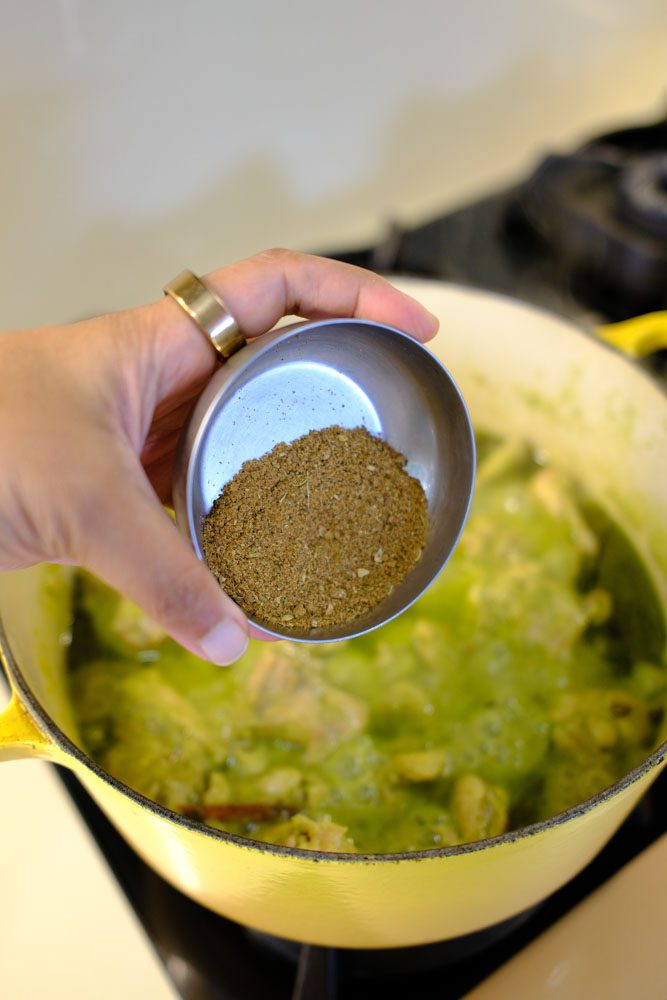
Cover the pan with a lid and cook on a low flame for about 10 minutes. Mix well in-between once or twice so the masalas do not scorch at the bottom.
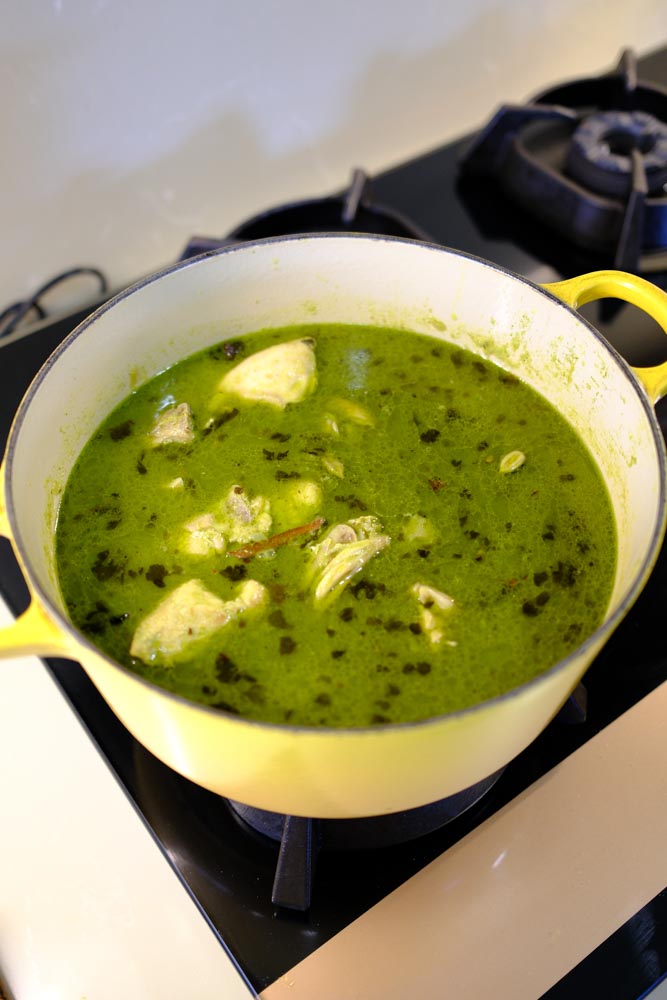
when the chicken cooks, it will leave out water as you can see below.
At this stage, add the prepared masala powder.
Add the lime juice.
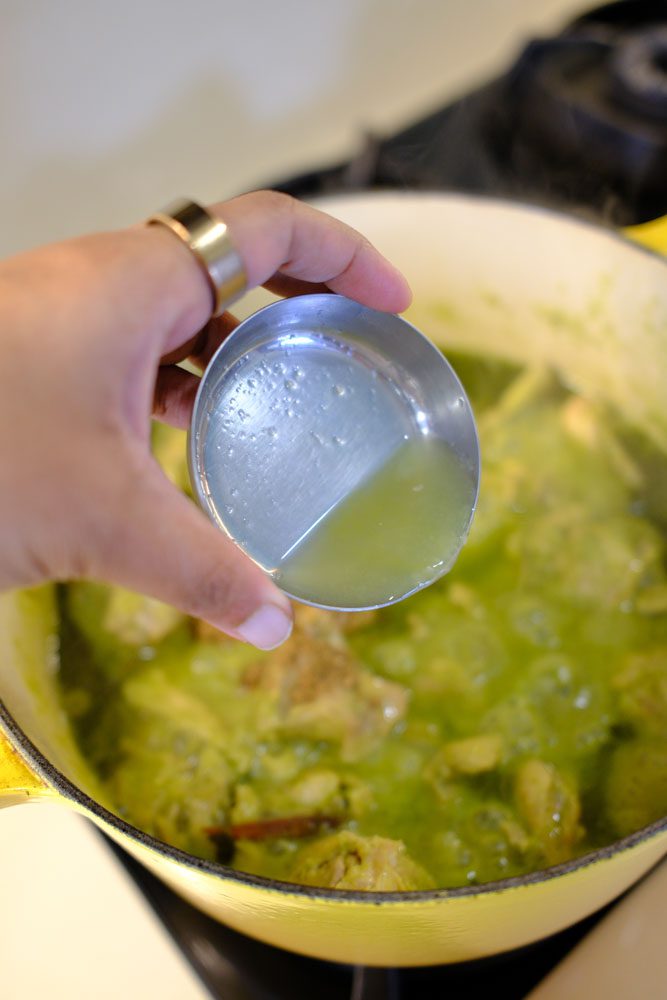
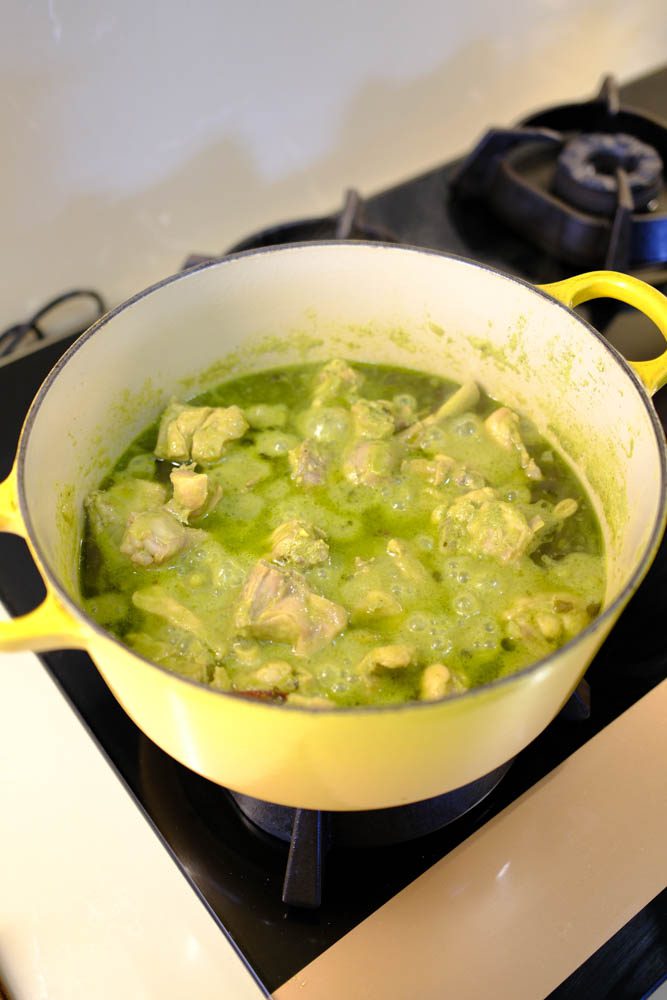
Take the chicken pieces out to a plate and measure the liquid left in the pan. Add the chicken pieces back. Add the water as required. For every cup of rice we add, we will need two cups of liquid (water + chicken cooked water in pan).

Let it all come to a boil.
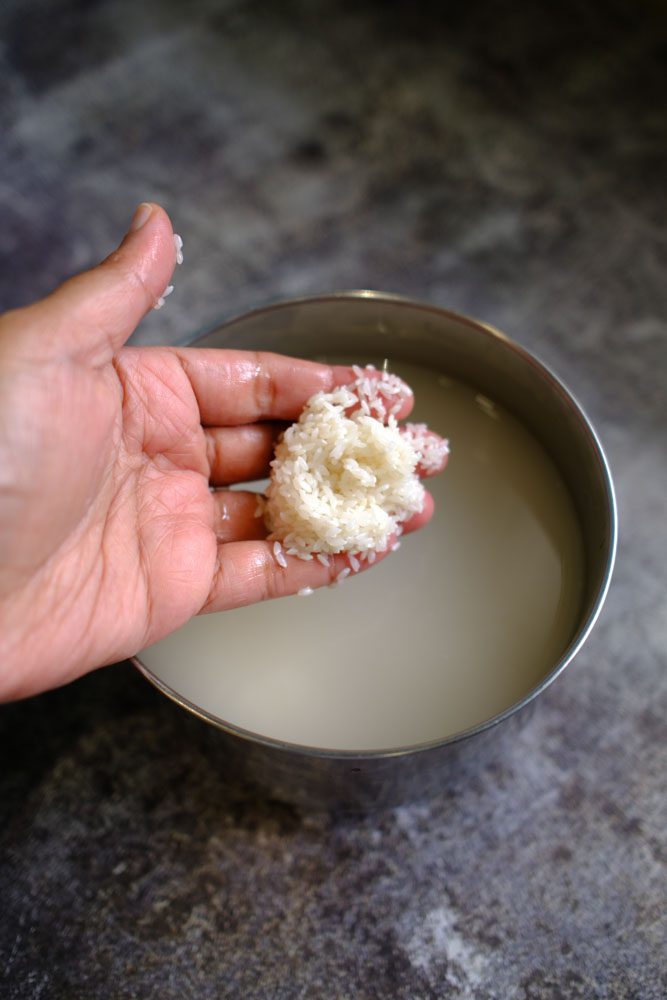
We will be using seeraga samba rice for this recipe. Soak the rice for around 30 minutes. After soaking, completely drain the rice.
Add the rice once the pot is boiling.
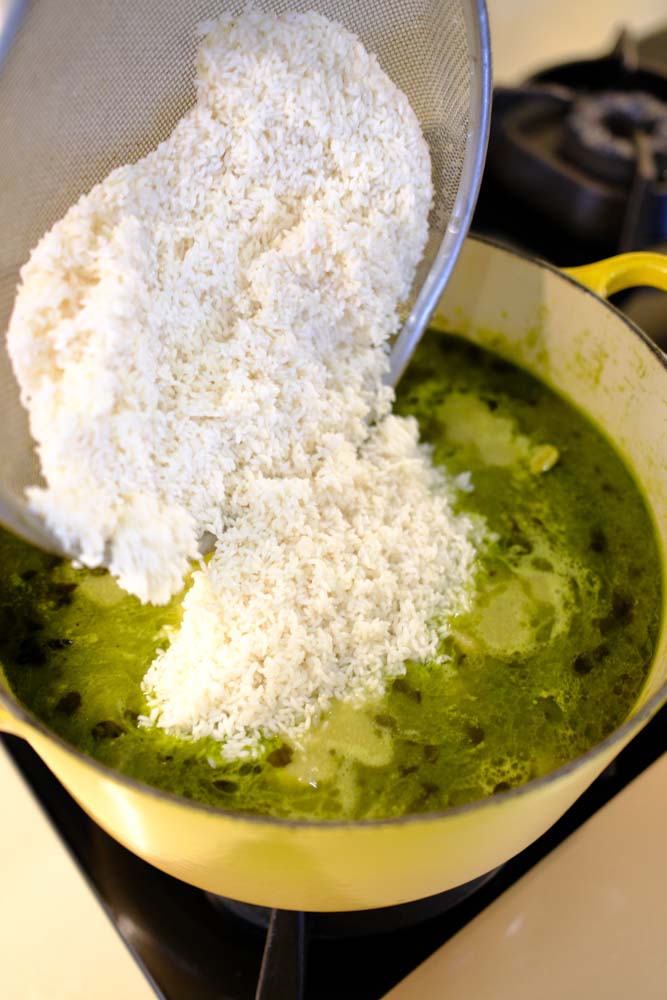
Mix well. Let it all come to a boil again.

The cooking of the biryani and “dum” can be done in two ways. I like the OTG method as its fool proof and comes perfect every single time without the rice scorching at the bottom or the rice going mushy. I love the consistency and texture of the cooked rice made using the OTG method.
Stovetop Method: Once it begins to boil, cover with a lid and cook on medium heat for 3–4 minutes. Open the lid, gently stir from the bottom, cover again, and reduce the heat to low. Simmer for 10 minutes. Open the lid, stir gently—the rice will be about three-fourths cooked. Simmer for 2 more minutes, then turn off the heat. Cover and let it rest undisturbed for 20 minutes to allow the rice to absorb the remaining moisture and fully cook.
Oven Method (OTG): Preheat the oven to 200°C for 10 minutes. Once the biryani pot comes to a boil, cover the pot tightly with a lid and transfer to the oven. Bake for 20 minutes. Remove from the oven and let it rest, covered, for another 20 minutes before serving. This method ensures perfectly cooked rice without the risk of burning at the bottom.

After taking the pot out of the oven, do not disturb or open the pot for 20 minutes. Let it rest.

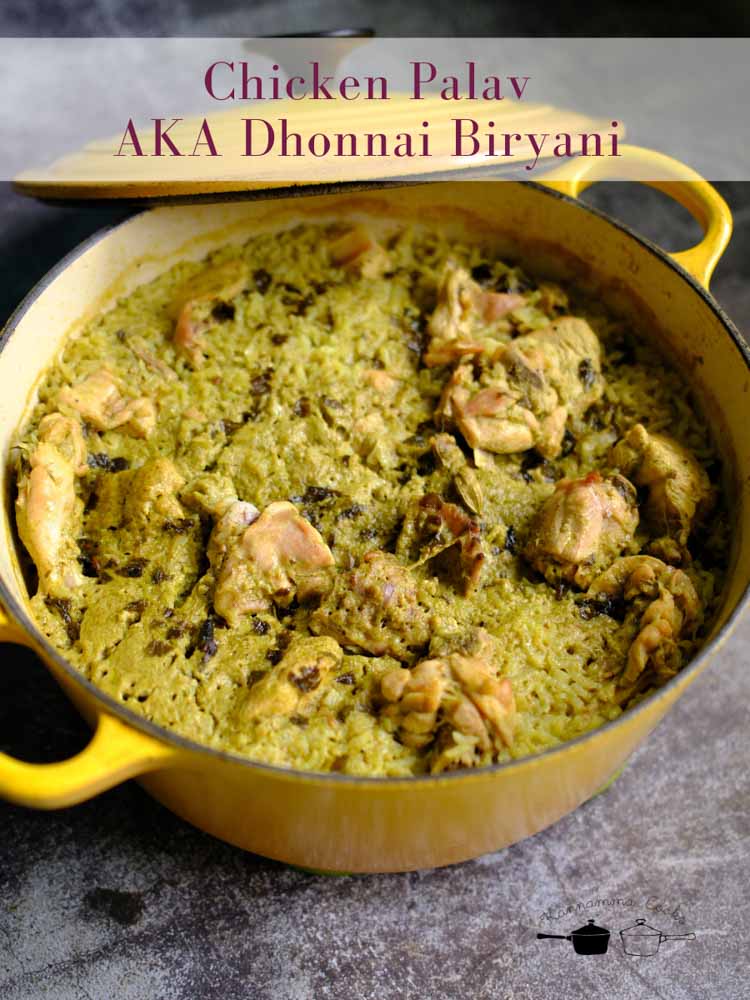
Our Chicken dhonnai biryani is ready.
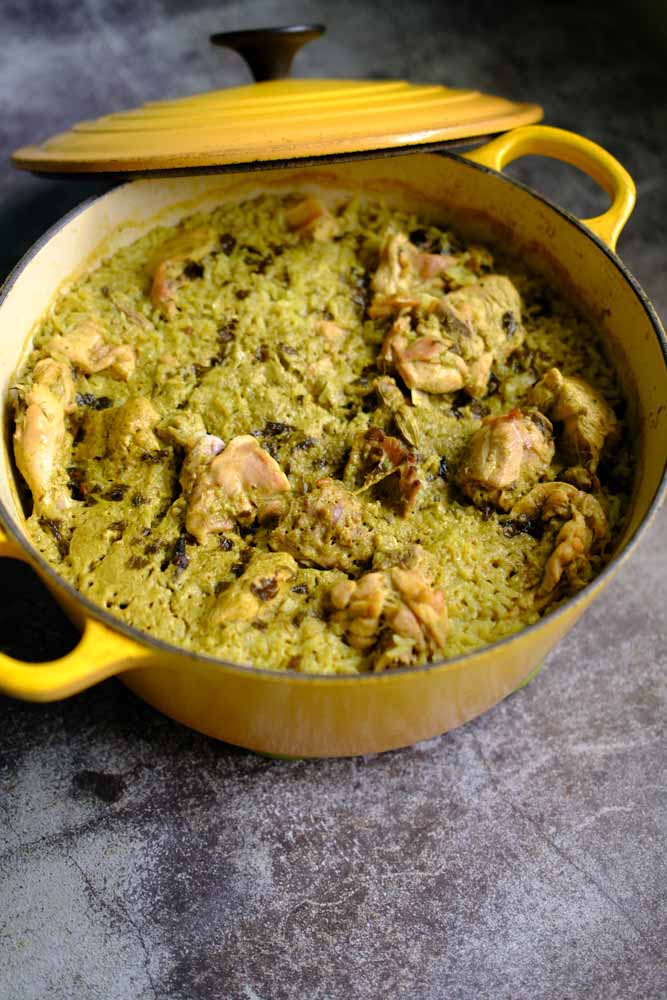
Fluff up the biryani, serve hot and enjoy.
1/2 teaspoon fennel seeds 1/2 teaspoon cumin seeds 1/4 teaspoon fenugreek seeds 1 teaspoon black peppercorn 2 cloves 1/2 inch piece cassia cinnamon 2 teaspoon coriander seeds
Prep Two – Biryani Masala Paste 1 teaspoon vegetable oil 5 sprigs mint leaves 5 sprigs coriander leaves 10 small palak leaves 1/2 cup onions, chopped 6 green chillies 1 pod garlic 3/4 inch piece ginger, chopped
Other Ingredients 3 tablespoon ghee 3 tablespoon vegetable oil 1/2 inch piece cassia cinnamon 2 cardamom 1 star anise 1/2 teaspoon cumin seeds 1/2 teaspoon fennel seeds 2 cloves 2 kapok buds 1 big pinch of kalpasi 1/2 cup onions, finely chopped 1/2 teaspoon turmeric powder 1 big pinch of kasuri methi 1/2 cup plain curd / yogurt 1 lime, juiced 1.5 teaspoon salt 3/4 kg bone-in chicken 2 cups seeraga samba rice Water as required (explained below)
Prep One Take a heavy bottomed pan and add in all the spices. Dry roast on a low flame till the spices are slightly aromatic. Remove from the pan and set aside to cool. Once cool, Transfer the contents to a small mixie jar. Grind to a powder.
Prep Two Heat oil in a pan and add in the ginger, garlic, green chillies and onions. Saute for a few minutes. Let the veggies slightly char here and there. Add all the greens and cook for a couple of minutes. Palak in a biryani may be a first for a lot of people but trust me, it works 🙂 Remove the mixture from heat once the greens are wilted. Set aside to cool. Grind the sauteed veggies to a fine paste. Set aside.
Now lets make the biryani.
Heat ghee and oil in a pan and add in all the whole spices. Saute for a few seconds. Add the finely chopped onions to the pan. Saute the onions for a couple of minutes. Add the turmeric powder and kasuri methi. Saute for a few seconds. Add the green masala paste that we prepared earlier. Wash the mixie with about a quarter cup of water and add back to the pan. We do not want to waste the green gold masala that we made from scratch. Add the chicken and the salt. Bone in chicken is always preferred as the bone imparts a lot of flavour to the biryani and keeps the meat juicy and soft. Mix well so all the chicken pieces are well coated in the masala. Whisk the curd in a bowl. Always whisk the curd before adding so it does not clump up in bits. Add the whisked curd to the pan. Mix well to combine. Cover the pan with a lid and cook on a low flame for about 10 minutes. Mix well in-between once or twice so the masalas do not scorch at the bottom. At this stage, add the prepared masala powder. Add the lime juice. Take the chicken pieces out to a plate and measure the liquid left in the pan. Add the chicken pieces back. Add the water as required. For every cup of rice we add, we will need two cups of liquid (water + chicken cooked water in pan). Let it all come to a boil. Soak the rice for around 30 minutes. After soaking, completely drain the rice. Add the rice once the pot is boiling. Mix well. Let it all come to a boil again. The cooking of the biryani and “dum” can be done in two ways. I like the OTG method as its fool proof and comes perfect every single time without the rice scorching at the bottom or the rice going mushy. Stovetop Method: Once it begins to boil, cover with a lid and cook on medium heat for 3–4 minutes. Open the lid, gently stir from the bottom, cover again, and reduce the heat to low. Simmer for 10 minutes. Open the lid, stir gently—the rice will be about three-fourths cooked. Simmer for 2 more minutes, then turn off the heat. Cover and let it rest undisturbed for 20 minutes to allow the rice to absorb the remaining moisture and fully cook. Oven Method (OTG): Preheat the oven to 200°C for 10 minutes. Once the biryani pot comes to a boil, cover the pot tightly with a lid and transfer to the oven. Bake for 20 minutes. Remove from the oven and let it rest, covered, for another 20 minutes before serving. This method ensures perfectly cooked rice without the risk of burning at the bottom. After taking the pot out of the oven, do not disturb or open the pot for 20 minutes. Let it rest. Our Chicken dhonnai biryani is ready. Fluff up the biryani, serve hot and enjoy.
- Author: Suguna Vinodh
- Prep Time: 20 minutes
- Cook Time: 60 minutes
